ML2023Spring - HW01 相关信息:
课程主页
课程视频
Kaggle link
Sample code
HW01 视频 可以在做作业之前看一部分,我摸索完才发现视频有讲 Data Feature :(
HW01 PDF
个人完整代码分享: GitHub

P.S. 即便 kaggle 上的时间已经截止,你仍然可以在上面提交和查看分数。但需要注意的是:在 kaggle 截止日期前你应该选择两个结果进行最后的Private评分。
每年的数据集size和feature并不完全相同,但基本一致,过去的代码仍可用于新一年的 Homework

[toc]

任务目标(回归)

  • COVID-19 daily cases prediction: COVID-19 每天的病例预测
  • 训练/测试数据大小:3009/997(每一年的homework 可能不同)

性能指标(Metric)

  • 均方误差 Mean Squared Error (MSE)

数据解析

  • covid_train.txt: 训练数据
  • covid_test.txt: 测试数据

数据大体分为三个部分:id, states: 病例对应的地区, 以及其他数据

  • id: sample 对应的序号。

  • states: 对 sample 来说该项为 one-hot vector。从整个数据集上来看,每个地区的 sample 数量是均匀的,可以使用pd.read_csv('./covid_train.csv').iloc[:,1:34].sum()来查看,地区 sample 数量为 88/89。

  • 其他数据: 这一部分最终应用在助教所给的 sample code 中的 select_feat。

    • Covid-like illness (5) 新冠症状

      • cli, ili …
    • Behavier indicators (5) 行为表现

      • wearing_mask、travel_outside_state … 是否戴口罩,出去旅游 …
    • Belief indicators (2) 是否相信某种行为对防疫有效

      • belief_mask_effective, belief_distancing_effective. 相信戴口罩有效,相信保持距离有效。
    • Mental indicator (2) 心理表现

      • worried_catch_covid, worried_finance. 担心得到covid,担心经济状况
    • Environmental indicators (3) 环境表现

      • other_masked_public, other_distanced_public … 周围的人是否大部分戴口罩,周围的人是否大部分保持距离 …
    • Tested Positive Cases (1) 检测阳性病例,该项为模型的预测目标

      • tested_positive (this is what we want to predict) 单位为百分比,指有多少比例的人

数据下载

To use the Kaggle API, sign up for a Kaggle account at https://www.kaggle.com. Then go to the ‘Account’ tab of your user profile (https://www.kaggle.com/<username>/account) and select ‘Create API Token’. This will trigger the download of kaggle.json, a file containing your API credentials. Place this file in the location ~/.kaggle/kaggle.json (on Windows in the location C:\Users\<Windows-username>\.kaggle\kaggle.json - you can check the exact location, sans drive, with echo %HOMEPATH%). You can define a shell environment variable KAGGLE_CONFIG_DIR to change this location to $KAGGLE_CONFIG_DIR/kaggle.json (on Windows it will be %KAGGLE_CONFIG_DIR%\kaggle.json).

https://github.com/Kaggle/kaggle-api

gdown 的链接总是挂,可以考虑使用 kaggle 的 api,流程非常简单,替换为你自己的用户名,https://www.kaggle.com/<username>/account,然后点击 Create New API Token,将下载下来的文件放去应该放的位置:

  • Mac 和 Linux 放在 ~/.kaggle/kaggle.json
  • Windows 放在 C:\Users\<Windows-username>\.kaggle\kaggle.json
pip install kaggle
# 你需要先在 Kaggle -> Account -> Create New API Token 中下载 kaggle.json
# mv kaggle.json ~/.kaggle/kaggle.json
kaggle competitions download -c ml2023spring-hw1

Sample code 主体部分解析

Some Utility Functions

def same_seed(seed): 
'''Fixes random number generator seeds for reproducibility.'''
# 使用确定的卷积算法 (A bool that, if True, causes cuDNN to only use deterministic convolution algorithms.)
torch.backends.cudnn.deterministic = True

# 不对多个卷积算法进行基准测试和选择最优 (A bool that, if True, causes cuDNN to benchmark multiple convolution algorithms and select the fastest.)
torch.backends.cudnn.benchmark = False

# 设置随机数种子
np.random.seed(seed)
torch.manual_seed(seed)
if torch.cuda.is_available():
torch.cuda.manual_seed_all(seed)

def train_valid_split(data_set, valid_ratio, seed):
'''Split provided training data into training set and validation set'''
valid_set_size = int(valid_ratio * len(data_set))
train_set_size = len(data_set) - valid_set_size
train_set, valid_set = random_split(data_set, [train_set_size, valid_set_size], generator=torch.Generator().manual_seed(seed))
return np.array(train_set), np.array(valid_set)

def predict(test_loader, model, device):
# 用于评估模型(验证/测试)
model.eval() # Set your model to evaluation mode.
preds = []
for x in tqdm(test_loader):
# device (int, optional): if specified, all parameters will be copied to that device)
x = x.to(device) # 将数据 copy 到 device
with torch.no_grad(): # 禁用梯度计算,以减少消耗
pred = model(x)
preds.append(pred.detach().cpu()) # detach() 创建一个不在计算图中的新张量,值相同
preds = torch.cat(preds, dim=0).numpy() # 连接 preds
return preds

Dataset

class COVID19Dataset(Dataset):
'''
x: Features.
y: Targets, if none, do prediction.
'''
def __init__(self, x, y=None):
if y is None:
self.y = y
else:
self.y = torch.FloatTensor(y)
self.x = torch.FloatTensor(x)

'''meth:`__getitem__`, supporting fetching a data sample for a given key.'''
def __getitem__(self, idx): # 自定义 dataset 的 idx 对应的 sample
if self.y is None:
return self.x[idx]
else:
return self.x[idx], self.y[idx]

def __len__(self):
return len(self.x)

__getitem__()实际应用于 dataloader 中,详细可见下图(图源自 PyTorch Tutorial PDF

源自 Pytorch PDF

Neural Network Model

这部分我做了简单的修改,以便于后续调参

class My_Model(nn.Module):
def __init__(self, input_dim):
super(My_Model, self).__init__()
# TODO: modify model's structure in hyper-parameter: 'config', be aware of dimensions.
self.layers = nn.Sequential(
nn.Linear(input_dim, config['layer'][0]),
nn.ReLU(),
nn.Linear(config['layer'][0], config['layer'][1]),
nn.ReLU(),
nn.Linear(config['layer'][1], 1)
)

def forward(self, x):
x = self.layers(x)
x = x.squeeze(1) # (B, 1) -> (B)
return x

Feature Selection

这部分可以使用 sklearn.feature_selection.SelectKBest 来进行特征选择。
具体代码如下(你可能需要传入 config):

from sklearn.feature_selection import SelectKBest, f_regression

k = config['k'] # 所要选择的特征数量
selector = SelectKBest(score_func=f_regression, k=k)
result = selector.fit(train_data[:, :-1], train_data[:,-1])
idx = np.argsort(result.scores_)[::-1]
feat_idx = list(np.sort(idx[:k]))

Training Loop

def trainer(train_loader, valid_loader, model, config, device):

criterion = nn.MSELoss(reduction='mean') # Define your loss function, do not modify this.

# Define your optimization algorithm.
# TODO: Please check https://pytorch.org/docs/stable/optim.html to get more available algorithms.
# TODO: L2 regularization (optimizer(weight decay...) or implement by your self).
optimizer = torch.optim.SGD(model.parameters(), lr=config['learning_rate'], momentum=config['momentum']) # 设置 optimizer 为SGD
writer = SummaryWriter() # Writer of tensoboard.

if not os.path.isdir('./models'):
os.mkdir('./models') # Create directory of saving models.

n_epochs, best_loss, step, early_stop_count = config['n_epochs'], math.inf, 0, 0

for epoch in range(n_epochs):
model.train() # Set your model to train mode.
loss_record = [] # 初始化空列表,用于记录训练误差

# tqdm is a package to visualize your training progress.
train_pbar = tqdm(train_loader, position=0, leave=True) # 让训练进度显示出来,可以去除这一行,然后将下面的 train_pbar 改成 train_loader(目的是尽量减少 jupyter notebook 的打印,因为如果这段代码在 kaggle 执行,在一定的输出后会报错: IOPub message rate exceeded...)

for x, y in train_pbar:
optimizer.zero_grad() # Set gradient to zero.
x, y = x.to(device), y.to(device) # Move your data to device.
pred = model(x) # 等价于 model.forward(x)
loss = criterion(pred, y) # 计算 pred 和 y 的均方误差
loss.backward() # Compute gradient(backpropagation).
optimizer.step() # Update parameters.
step += 1
loss_record.append(loss.detach().item())

# Display current epoch number and loss on tqdm progress bar.
train_pbar.set_description(f'Epoch [{epoch+1}/{n_epochs}]')
train_pbar.set_postfix({'loss': loss.detach().item()})

mean_train_loss = sum(loss_record)/len(loss_record)
writer.add_scalar('Loss/train', mean_train_loss, step)

model.eval() # Set your model to evaluation mode.
loss_record = [] # 初始化空列表,用于记录验证误差
for x, y in valid_loader:
x, y = x.to(device), y.to(device)
with torch.no_grad():
pred = model(x)
loss = criterion(pred, y)

loss_record.append(loss.item())

mean_valid_loss = sum(loss_record)/len(loss_record)
print(f'Epoch [{epoch+1}/{n_epochs}]: Train loss: {mean_train_loss:.4f}, Valid loss: {mean_valid_loss:.4f}')
# writer.add_scalar('Loss/valid', mean_valid_loss, step)

if mean_valid_loss < best_loss:
best_loss = mean_valid_loss
torch.save(model.state_dict(), config['save_path']) # Save your best model
print('Saving model with loss {:.3f}...'.format(best_loss))
early_stop_count = 0
else:
early_stop_count += 1

if early_stop_count >= config['early_stop']:
print('\nModel is not improving, so we halt the training session.')
return

Baselines

根据作业 PDF 中的提示:

  • Simple Baseline (1.96993)
    • 运行所给的 sample code。
  • Medium Baseline (1.15678)
    • 特征选择,简单手动的选择你认为关联性较大的特征。
  • Strong Baseline (0.92619)
    • 尝试不同的优化器(如:Adam)。
    • 应用 L2 正则化(SGD/Adam … 优化器参数中的 weight_decay)
  • Boss Baseline (0.81456)
    • 尝试更好的特征选择,可以使用 sklearn.feature_selection.SelectKBest。
    • 尝试不同的模型架构(调整 my_module.layers)
    • 调整其他超参数

个人完整代码分享: GitHub | Gitee | GitCode
参考链接

  1. PyTorch: What is the difference between tensor.cuda() and tensor.to(torch.device(“cuda:0”))?
  2. PyTorch Tutorial PDF

专栏用于写各个数据结构的基本算法和复杂算法思路(个人理解),便于理清思路

文章中算法题源主要来自于《数据结构与算法分析–C语言描述》和 天勤(考研机构) 的《2021 数据结构高分笔记》,分类按顺序排列,因其大部分在 LeetCode 中有对应,故附上题号以便参考
加了序号的注释是为了方便不同方法类似思路的引用

[TOC]

数组(顺序表)

基本操作

/* 初始化数组为 0 */
void initZero(int *nums, int numsSize){
int i = 0;
while(i < numsSize)
nums[i++] = 0;
}

/* 交换数组下标 i,j 对应的值 */
void swap(int *nums, int i, int j){
int t = nums[i];
nums[i] = nums[j];
nums[j] = t;
}

/* 另一个等价的方法,不过调用时格式为 swap(&nums[i], &nums[j]) */
void swap(int *ni, int *nj){
int t = *ni;
*ni = *nj;
*nj = t;
}


/* 返回关键字首次出现的位置,未找到返回 -1 */
int find(int *nums, int val){
int i, length;
length = sizeof(nums) / sizeof(int);

for (i = 0; i < length && nums[i] != val; i++)
;
if (i == length)
return -1;
else
return i;
}

/* 倒转数组 */
void reverse(int *nums, int begin, int end){
int i = begin;

while(i < end){
swap(&nums[i++], &nums[end--]);
}
}

/* 返回数组中的最大值 */
int maxNumber(int *nums, int numsSize){
int i, max;
for (i = 0, max = INT_MIN; i < numsSize; i++){
if (max < nums[i])
max = nums[i];
}
return max;
}

/* 返回数组中最大值的下标 */
int maxIndex(int *nums, int numsSize){
int i, max, maxi;
for (i = 0, max = INT_MIN; i < numsSize; i++){
if (max < nums[i]){
max = nums[i];
maxi = i;
}
}
return maxi;
}

/* 对数组中所有数加 val */
void addVal(int *nums, int numsSize, int val){
int i = 0;
while(i < numsSize)
nums[i++] += val;
}

从位置 i 插入一个数(假设数组长度足够)

void insert(int *nums, int i, int numsSize, int data){
/* 下标从后到i,各向右移动一位,若从i开始向右移动,则需要保存下一个数的值,否则会因覆盖丢失 */
int cur = numsSize; /* numsSize为当前存储的数据长度 */
while(cur-- > i)
nums[cur + 1] = nums[cur];
nums[cur + 1] = data; /* 此时cur = i-1,故需要+1在位置 i 处插入数据(当然,直接 nums[i] 也可) */
}

循环右移 k 位

解法1: 通过三次反转达到移动的效果

对应于 LeetCode 189题
算法思路:有两个思路原理一致的方式

(方式一)先旋转前numsSize-k%numsSize,再旋转后k%numsSize个,最后整体旋转,可以达到循环右移k位的效果,即循环左移numsSize-k位

(方式二)先整体旋转,再旋转前k%numsSize位和后numsSize-k%numsSize位,可循环左移k位

注:取余可以跳过多余的移动

/* 方式一 */
void rotate(int* nums, int numsSize, int k){
int r = k % numsSize;

reverse(nums, 0, numsSize-r-1); /* reverse() 见基础操作 */
reverse(nums, numsSize-r, numsSize-1);
reverse(nums, 0, numsSize-1);

}

/* 方式二 */
void rotate(int* nums, int numsSize, int k){
int r = k % numsSize;

reverse(nums, 0, numsSize-1); /* reverse() 见基础操作 */
reverse(nums, 0, r-1);
reverse(nums, r, numsSize-1);
}

删除有序表中的重复元素

算法思路:若数组内元素小于 2,直接返回 numsSize,不需对 nums 进行修改。

因为有序,直接用 tmp 记录上个重复的数,初始化 tmp 为数组中的第一个元素。

从第二个元素开始对比,用 n 记录重复次数,重复时 +1,不重复时将数组内元素向前移动 n 位。

/* 删除有序数组内的重复元素,并返回数组剩余的元素个数 */
int removeDuplicates(int* nums, int numsSize){
int i, tmp, n; /* tmp 记录上个重复元素,n 记录重复次数 */

if(numsSize < 2){
return numsSize;
}
tmp = nums[0];
for (i = 1, n = 0; i < numsSize; i++){
if (tmp == nums[i])
n++;
else{
tmp = nums[i];
nums[i - n] = nums[i];
}
}
return numsSize - n;
}

返回数组中前 k 个高频

解法1: 暴力解法

对应于 LeetCode 347题
算法思路:创建两个数组:数组 numsTimes 记录对应 nums 的频数,数组 frequent 记录前 k 个高频对应的值。(虽然代码不复杂,但其实算是暴力解法)

(最初想法:建立一个数组记录频数,一个链表记录出现过的数,最后根据链表查找,后来发现创建多个链表结构会报错,可能是平台原因,故改成下方代码 )

int maxNumber(int *nums, int numsSize); /* 返回数组中的最大值 */
int maxIndex(int *nums, int numsSize); /* 返回数组中最大值的下标 */
void initZero(int *nums, int numsSize);

/* 仅能处理数组元素全大于 0 的情况 */
int* topKFrequent_pos(int* nums, int numsSize, int k){
int i, cur, maxi;

int max = maxNumber(nums, numsSize);
int numsTimes[max+1];
initZero(numsTimes, max+1);

for (i = 0; i < numsSize; i++){
cur = nums[i];
++numsTimes[cur]; /* 记录频数 */
}

int *frequent = (int *)malloc(sizeof(int) * k); /* 因为需返回数组,故需要malloc分配空间 */
i = 0;
while(i < k){
maxi = maxIndex(numsTimes, max+1);
frequent[i++] = maxi;
numsTimes[maxi] = 0; /* 将当前最高频数置为0 */
}

return frequent;
}

/* 对于所有情况 */
void addVal(int *nums, int numsSize, int val);
int* topKFrequent(int* nums, int numsSize, int k){
/* 思路同上,只是先对数组做个预处理,让其中的值必然大于0 */
int i, cur, maxi;

int max = abs(maxNumber(nums, numsSize)); /* 取其绝对值是为了处理存在负数的情况 */
addVal(nums, numsSize, max);

int numsTimes[2 * max + 1]; /* 2*max+1 是因为此时 nums 数组中最大的是 max+|max|,+1 是为了直接以其值作为索引,省去后续为了不越界的 -1 操作 */
initZero(numsTimes, 2 * max + 1);

for (i = 0; i < numsSize; i++){
cur = nums[i];
++numsTimes[cur];
}

int *frequent = (int *)malloc(sizeof(int) * k);
i = 0;
while(i < k){
maxi = maxIndex(numsTimes, 2*max+1);
frequent[i++] = maxi - max; /* 需 -max, 对应于原 nums 中的值 */
numsTimes[maxi] = 0;
}

return frequent;
}

一个更简洁的表达方式(但会多 o(k) 的时间)

int maxNumber(int *nums, int numsSize);
int maxIndex(int *nums, int numsSize);
void initZero(int *nums, int numsSize);
int* topKFrequent_pos(int* nums, int numsSize, int k);

/* 是上面方法的汇总 */
int* topKFrequent(int* nums, int numsSize, int k){
int max = abs(maxNumber(nums, numsSize));
addVal(nums, numsSize, max);
int *frequent = topKFrequent_pos(nums, numsSize, k);
addVal(frequent, k, -max); /* 该语句为多余时间来源 */
return frequent;
}

链表

节点定义

/* 链表节点结构体定义 */
struct Listnode{
int val;
struct Listnode *next;
};

基本操作·

/* 判空 */
int isempty(struct Listnode *node){
return node == NULL;
}

/* 判断是否为尾指针,对于空指针返回 0 */
int islast(struct Listnode *node){
if (!node && node->next == NULL)
return 1;
else
return 0;
}

/* 返回关键字首次出现的节点指针,若未找到返回 NULL */
struct Listnode *find(struct Listnode *head, int val){
struct Listnode *ret = head;

while (ret != NULL){
if (ret->val == val)
return ret;
ret = ret->next;
}
return ret;
}

/* 插入节点(头插法),可实现链表逆置 */
void insert(struct Listnode *head, struct Listnode *node){
node->next = head->next;
head->next = node;
}

/* 删除下一节点 */
void deleteNext(struct Listnode *node){
struct Listnode *t = node->next;
node->next = t->next;
free(t);
}

/* 删除当前节点(无法处理最后一个节点),删除成功返回1,否则(为最后一个节点)返回0 */
int deleteCur(struct Listnode *cur){
/* 思路为用下一个节点覆盖当前节点,然后删除下一节点,达到删除当前节点的效果 */
struct Listnode *next = cur->next;
if (!isempty(next)){
cur->val = next->val;
cur->next = next->next;
free(next);
return 1;
}
return 0;
}

反转链表(无额外头结点,即判空的语句为 head == NULL)

解法1: 前后双指针

对应于 LeetCode 206 题

算法思路:利用前后双指针p,q实现节点之间的反转,p 初始为 head ,q 始终为 p->next,即指向需翻转的下一个节点,故还需要一个节点 t 保存 q->next,在通过 q->next = p 翻转链表后,令 q = t,p = q 以移动指针处理下一节点,当 q 为尾指针即 t 为 NULL 时代表完成反转(以 q == NULL 为结束条件更好,否则 t 需要提前初始化,而且因为 q 在反转后指向 t 所指,故依然正确)。

首个节点需要对 *head 单独处理,否则会导致局部循环,处理也很简单,在初始化用 q 保存了 head-next 后,令head->next = NULL。

在初始化前需要判断链表是否为空,若为空直接返回 head。

struct ListNode *reverseList(struct ListNode* head){
struct ListNode *p, *q, *t;

if(head != NULL){
p = head;
q = p->next;
head->next = NULL;

while(q != NULL){
t = q->next;
q->next = p; /* 1.这一步为反转步骤,其余均是为了两个指针能够向后移动 */
p = q;
q = t;
}
head = p; /* 2.仅为了只写一个 return,也可以在这里直接 return p; */
}
return head;
}

解法2:递归

算法思路:假设链表有 n 个结点,链表可以分解为 1 个头结点和 n-1 个剩余结点两个部分,剩余结点组成的链表亦可继续分解,直到 1 个头结点和 0 个剩余结点,也即 head->next == NULL,这时便有了递归终止的条件,满足该条件时返回 head。

现在根据递归的特性,倒退回 1 个头结点和 1 个剩余结点的情况,反转只有两个节点的链表仅需要头结点的指针,此时令 head->next->next = head(该步和解法1的注释1所在行的目的一样), head->next = NULL 即可,这是基准情况。递归过程本身可以看成保存数据的栈,所以不需要像解法1那样额外记录下一个反转的结点,之后每次倒退其实都可以看成只有两个“结点”的链表,一个是头结点,一个是已经反转好的链表。

现在最后的需求是返回新的头结点,即原来链表的尾结点,有三种方式(其实想法一致):

  1. 定义一个全局变量 *rhead ,rhead 在触发递归终止条件时记录当前所处结点,随后一直返回 rhead(因为 head 会随递归出栈而变化,故记录)。
  2. 和 1 思路一样,不过是在函数内定义变量,然后将递归的步骤在一个小函数中重写,该函数接受的参数为(head, &rhead),这里 rhead 的声明和上面不同,是指向结点类型的指针的指针。
  3. 递归在终止时返回的就是反转后的 head,故只需要记录该指针并令其始终为返回值即可(当前递归程序并不需要额外的返回值来帮助反转链表)
/* 方式1 */
struct ListNode *rhead;

struct ListNode *reverseList(struct ListNode* head){
if(head == NULL || head->next == NULL){
rhead = head;
return rhead;
}

reverseList(head->next);
head->next->next = head;
head->next = NULL;
return rhead;
}

/* 方式3 */
struct ListNode *reverseList(struct ListNode* head){
if (head == NULL || head->next == NULL)
return head;

struct Listnode *rhead = reverseList(head->next);
head->next->next = head; /* 反转 */
head->next = NULL;
return rhead;
}

返回倒数第 k 个结点的值

解法1: 快慢指针

对应于 LeetCode 面试题 02.02.

算法思路:初始化两个指针 p 和 q,p 先逐个遍历结点,用 i 记录 p 遍历的结点个数,当 p 遍历了 k-1 个结点后,q 开始和 p 一起逐步遍历,当 q == NULL时, q 恰好指向链表的倒数第 k 个结点。

int kthToLast(struct ListNode *head, int k){
struct ListNode *p = head;
struct ListNode *q = head;
int i = 0;

while (p != NULL){
p = p->next;
if (i > k-1) /* k-1 是因为 k>=1,而当 k==1时,q与p指向同一个结点(可以初始化 i=1,if(i >k)) */
q = q->next;
else
++i; /* ++i 移到 if 语句前也可以,放在这里是因为当 i>k 后就没有必要再对 i 进行 +1 操作了 */
}
return q->val;
}

解法2: 递归

算法思路:初始化全局变量 i = 0,当递归至 NULL 时(若递归至尾结点,那么当 k == 1时还需额外判断,所以这里就改成 NULL),i++(或 i = 1),然后开始递归出栈,出栈时每次判断 i 是否等于 k,并令 i++,若等于,返回当前结点的值

int i = 0;

int kthToLast(struct ListNode *head, int k){
if (head == NULL){
i++; /* 在 LeetCode 中这里应改为i = 1(原因见 LeetCode 对全局变量的处理) */
return -1;
}

int ret = kthToLast(head->next, k);
if (i++ == k)
return head->val;
else
return ret;
}

刚好在读这本书,故将习题代码进行分享,经过测试均可以运行。

如果有所帮助,也希望收到你的正向反馈~

目录为题目的一个简要描述,方便回溯代码。

仓库地址:

[TOC]

第一章

1-8: 统计空白字符个数

// Count blank characters
#include <stdio.h>

int main(void) {
int c;
int space, tab, nl;

space = tab = nl = 0;
while ((c = getchar()) != EOF){
if (c == ' ')
++space;
if (c == '\t')
++tab;
if (c == '\n')
++nl;
}
// 注意,采用 '\' 可以实现句内换行,但其前面的空白会被打印至输出
printf("Space: %d\
Tab: %d\
Newline: %d\n", space, tab, nl);
}

1-9: 复制输入到输出,多个空格转一个

// Ignore extra space
#include <stdio.h>

int main(void) {
int c;

while ((c = getchar()) != EOF){
putchar(c);
if (c == ' ') // 打印第一个空格,其他的略去
while ((c = getchar()) == ' ')
;
}
}

1-10: 复制输入到输出,可视化制表符,回退符及反斜杠

// exercise 1-10
#include <stdio.h>
#include <stdlib.h>

int main(void) {

int c;

// 关闭输入缓存机制,让 getchar() 达到 getch() 的效果
// -icanon: Enable (disable) canonical input (ERASE and KILL processing). -- From manual of stty
// Ps: Mac 没有 conio.h 库
system("stty -icanon");

while ((c = getchar()) != EOF){
if (c == '\t')
printf("\\t");
else if (c == '\b')
printf("\\b");
else if (c == '\\')
printf("\\\\");
else
putchar(c);
}
system("stty -icanon"); // 重新打开缓存机制,不然会影响到其他 exercise 的运行
}


1-12: 以每行一个单词的形式输出

// exercise 1-12
#include <stdio.h>

#define IN 1 /* inside a word */
#define OUT 0 /* outside a word */

int main()
{
int c, state;

while ((c = getchar()) != EOF) {
putchar(c);
if (c == ' ' || c == '\n' || c == '\t')
putchar('\n');
}
}

1-13-a: 水平打印单词长度直方图

#include <stdio.h>
#define LENGTH 10
int main()
{
int c, i, j, lw;
int lws[LENGTH];

lw = 0;
for (i = 0; i < LENGTH; ++i)
lws[i] = 0;

while ((c = getchar()) != EOF) {
if (c == ' ' || c == '\n' || c == '\t'){
++lws[lw];
lw = 0;
}
else
++lw;
}

for (i = 0; i < LENGTH; ++i){
printf("%d |", i);
for (j = 0; j < lws[i]; ++j)
putchar('#');
putchar('\n');
}
}

1-13-b: 垂直打印单词长度直方图

#include <stdio.h>
#define LENGTH 10
#define HAVEUNPRINTED 1 // 还没打印完
#define EOP 0 // End of printing

int main()
{
int c, i, j, lw, state;
int lws[LENGTH];

lw = 0;
state = HAVEUNPRINTED;
for (i = 0; i < LENGTH; ++i)
lws[i] = 0;

while ((c = getchar()) != EOF) {
if (c == ' ' || c == '\n' || c == '\t'){
++lws[lw];
lw = 0;
}
else
++lw;
}

// 这里打印一下“坐标”,之所以和上面循环分开是因为这样可能更易读 :)
for (i = 0; i < LENGTH; ++i)
printf("%d\t", i);
putchar('\n');

for (i = 0; i < LENGTH; ++i)
printf("-\t");
putchar('\n');

while (state){
j = 0;
for (i = 0; i < LENGTH; ++i){
if (lws[i] > 0){
printf("#\t");
--lws[i]; // 打印完后频数-1
}
else{
putchar('\t');
j++;
}
}
putchar('\n');

if (j == LENGTH)
state = EOP; //当所有频数为 0 时,j == LENGTH
}
}

1-15: 重新编写温度转换程序

#include <stdio.h>
#define FAHR 0
#define UPPER 300
#define STEP 20
void temperature_convert(int fahr, int upper, int step);

int main(){
temperature_convert(FAHR, UPPER, STEP);
return 0;
}

void temperature_convert(int fahr, int upper, int step){
int celsius;
while (fahr <= upper) {
celsius = 5 * (fahr-32) / 9;
printf("%d\t%d\n", fahr, celsius);
fahr = fahr + step;
}
}

1-16: 打印任意长度输出行

#include <stdio.h>
#define MAXLINE 1000 /*maximum input line length*/

int get_line(char line[], int maxline);

/* print input line and length */
int main()
{
int len; /* current line length */
char line[MAXLINE]; /* current input line */

while ((len = get_line(line, MAXLINE)) > 0)
printf("Length: %d \nline: %s", len, line);
return 0;
}

/* getline: read a line into s, return length */
int get_line(char s[],int lim)
{
int c, i;
c = 0;

for (i=0; i < lim-1 && (c=getchar())!=EOF && c!='\n'; ++i)
s[i] = c;
if (c == '\n')
{
s[i] = c;
++i;
}
s[i] = '\0';
return i-1;
}

1-17: 打印大于长度80的行

#include <stdio.h>
#define MAXLINE 1000 /*maximum input line length*/

int get_line(char line[], int maxline);

/* print input line and length */
int main()
{
int len; /* current line length */
char line[MAXLINE]; /* current input line */

while ((len = get_line(line, MAXLINE)) > 0)
if(len > 80)
printf("%s", line);
return 0;
}

/* getline: read a line into s, return length */
int get_line(char s[],int lim)
{
int c, i;
c = 0;

for (i=0; i < lim-1 && (c=getchar())!=EOF && c!='\n'; ++i)
s[i] = c;
if (c == '\n')
{
s[i] = c;
++i;
}
s[i] = '\0';
return i-1;
}

/* copy: copy 'from' into 'to'; assume to is big enough */
void copy_then_print_length(char to[], char from[])
{
int i;
i = 0;
while ((to[i] = from[i]) != '\0')
++i;
printf("Length: %d", i);
}


1-18: 删除行末尾的空白和全为空白字符的行

#include <stdio.h>
#define MAXLINE 10000 /*maximum input text length*/

void get_text(char text[], int maxline);
void delete_space(char text[]);

/* 可以看到本段程序中有重复的代码和一些可以优化的地方 */
int main()
{
char text[MAXLINE]; /* current input text */

get_text(text, MAXLINE);

delete_space(text); /* 删除每一行末尾的空格*/
delete_space(text); /* 第二次删除原来有空格的行*/
printf("%s", text);
return 0;
}

/* getline: read text into s */
void get_text(char s[],int lim)
{
int c, i;
c = 0;

for (i=0; i < lim-1 && (c=getchar())!=EOF; ++i)
s[i] = c;
s[i] = '\0';

}

/* 删除每行后多余的空白字符(就地修改) */
void delete_space(char text[])
{
int i, j, space; /* i, j 双指针,space用于记录行尾空白字符(除换行符)的数量,以更新 j 的位置 */

/* 利用 j 对 text[] 进行就地修改 */
for (i = j = space = 0; text[i] != '\0'; ++i, ++j)
{
if (text[i] == '\n')
{
if (j == 0) /* 防止数组在下面的判断中越界 */
{
--j;
continue;
}
else if (text[i] == text[j-1]) /* 判断是否是连续的空行 */
--j;
else if (space != 0) /* 判断换行符前是否有空白,其实 space != 0 可以删去,加上便于理解 */
j -= space;
}

if (text[i] == ' ' || text[i] == '\t')
++space; /* 下一次循环起作用 */
else
space = 0;

text[j] = text[i];
}
text[j] = '\0';
}


1-19: 颠倒每行的字符

#include <stdio.h>
#define MAXLINE 10000 /*maximum input text length*/

void get_text(char text[], int maxline);
void reverse(char text[], int i, int j);

int main()
{
char text[MAXLINE]; /* current input text */

get_text(text, MAXLINE);

printf("%s", text);
return 0;
}

/* getline: read text into s */
void get_text(char s[],int lim)
{
int c, i, j; /* i, j 记录当前行首和行尾的位置 */
c = 0;

for (i=0, j=0; i < lim-1 && (c=getchar())!=EOF; ++i)
{
s[i] = c;
if (c == '\n')
{
reverse(s, i-1, j);
j = i + 1;
}
}
s[i] = '\0';

}

/* 颠倒顺序 */
void reverse(char text[], int i, int j)
{
int temp;
while (i > j)
{
temp = text[i];
text[i] = text[j];
text[j] = temp;
--i;
++j;
}
}


1-20: tab转space

#include <stdio.h>
#define MAXLINE 10000 /*maximum input text length*/
#define TSPACE 4 /* Tab = 4 space */

void get_text(char text[], int maxline);
int detab(char s[], int i);

int main()
{
char text[MAXLINE]; /* current input text */

get_text(text, MAXLINE);

printf("%s", text);
return 0;
}

/* get_text: read text into s */
void get_text(char s[],int lim)
{
int c, i;
c = 0;

for (i=0; i < lim-1 && (c=getchar())!=EOF; ++i)
{
s[i] = c;
if (c == '\t')
i = detab(s, i);
}
s[i] = '\0';

}

/* 替换制表符,返回索引 i */
int detab(char s[], int i)
{
int fill_space;

fill_space = TSPACE - i % TSPACE; /* 计算填充的空格数量,i 从 0 开始索引,故 TSPACE-,否则 (TSPACE+1)- */
while(fill_space--){
s[i] = ' ';
++i;
}
return i-1; /* 最后需要让i-1,因为循环会自动加1,若不进行抵消程序会出错,当然,应当可以优化代码 & 下次一定 */
}


1-21: space转tab

#include <stdio.h>
#define MAXLINE 10000 /*maximum input text length*/
#define TSPACE 4 /* Tab = 4 space */
#define KEEPSPACE 1 /* 1: 倾向于保留空格,0: 倾向于替换空格为制表符 */

void get_text_entab(char text[], int maxline);
int detab(char s[], int i);

int main()
{
char text[MAXLINE]; /* current input text */

get_text_entab(text, MAXLINE);

printf("%s", text);
return 0;
}

/* get_text: read text into s*/
/* entab: 替换空格为制表符,本质上来说,这题和18题很像,均是减少数组内字符的操作 */
void get_text_entab(char s[],int lim)
{
int c, i, redundant_space; /* redundant_space 记录多余的空格,或者说替换时 i 需要倒退的次数 */
c = 0;

for (i=0, redundant_space=-1; i < lim-1 && (c=getchar())!=EOF; ++i)
{
s[i] = c;
if (c == ' ')
{
++redundant_space;
if (i % TSPACE == (TSPACE-1))
{
/* 若KEEPSPACE==1,那么当一个空格后是制表符终止位时,不进行替换,此时goto到else后的语句重置 redundant_space(这么写是为了简洁,然后熟悉一下goto语句)*/
if (KEEPSPACE && redundant_space == 0)
goto keepspace;
i = i - redundant_space; /* 若记录的是(连续)空格的数量,此处需要 +1,否则会覆盖空格前面的字符 */
s[i] = '\t';
}
}
else
keepspace:
redundant_space = -1;
}
s[i] = '\0';
}


1-22: “折”行

#include <stdio.h>
#define MAXLINE 10000 /*maximum input text length*/
#define LENGTH 3 /* 每行的字符数 */

void get_text(char text[], int maxline);

/* 此程序未对tab进行空格的替换从而使得真正分行,结合1-20的detab程序可以实现,不过还需处理多余的空格 */
int main()
{
char text[MAXLINE]; /* current input text */
get_text(text, MAXLINE);

// forcing_newline(text, LENGTH);

printf("%s", text);
return 0;
}

/* getline: read text into s */
void get_text(char s[],int lim)
{
int c, i, j;
c = 0;

for (i=0, j=0; i < lim-1 && (c=getchar())!=EOF; ++i)
{


s[i] = c;

if (s[i] == '\n')
j = 0;
else
++j;

if (j == LENGTH){
s[++i] = '\n';
// s[++i] = c;
j = 0;
}

}
s[i] = '\0';

}

本文内容基于计网自顶向下第二章的套接字编程作业:

1.Web 服务器 2.UDP ping 程序 3.邮件客户端 4. 多线程 Web 代理服务器

以下基于Web官网所给作业框架完成,包含拓展部分

作业细节(官网)自取:https://pan.baidu.com/s/1BYlQNwsjc9QCpeOQQ_R0ZQ 密码: vgfl

下面的代码也同步放在了github上:https://github.com/Hoper-J/Socket-Programming

ps: 以下代码均可跑通,做了部分注解,后续有需要再补相关说明

如何在一台电脑上运行服务器和客户端

开两个终端(terminal)分别运行,或者Pycharm+终端,抑或其他的,能跑就行

实现简单Web服务器(TCP)

webserver.py

from socket import *
import sys # In order to terminate the program


SERVER = gethostbyname(gethostname())
PORT = 18888
ADDR = (SERVER, PORT)

BUFSIZE = 4096
FORMAT = 'UTF-8'

serverSocket = socket(AF_INET, SOCK_STREAM) #Prepare a sever socket
serverSocket.bind(ADDR)

while True:
print('Ready to serve...')
serverSocket.listen()
connectionSocket, addr = serverSocket.accept()
try:
message = connectionSocket.recv(BUFSIZE).decode(FORMAT)

filename = message.split()[1]

f = open(filename[1:])

outputdata = f.readlines()

# Send one HTTP header line into socket
connectionSocket.send('HTTP/1.1 200 OK\r\n\r\n'.encode(FORMAT))

# Send the content of the requested file to the client
for i in range(0, len(outputdata)):
connectionSocket.send(outputdata[i].encode())
connectionSocket.send("\r\n".encode())

connectionSocket.close()

except IOError:
# Send response message for file not found
connectionSocket.send('HTTP/1.1 404 Not found\r\n\r\n'.encode(FORMAT))
connectionSocket.send('文件不存在\r\n'.encode(FORMAT))
# Close client socket
connectionSocket.close()

serverSocket.close()
sys.exit() # Terminate the program after sending the corresponding data

多线程 webserver_thread.py

import sys  # In order to terminate the program
import threading

from socket import *

SERVER = gethostbyname(gethostname())
PORT = 18888
ADDR = (SERVER, PORT)

HEADER = 64
BUFSIZE = 4096
FORMAT = 'UTF-8'
CLOSE_CONNECTION = '!QUIT'

serverSocket = socket(AF_INET, SOCK_STREAM) #Prepare a sever socket
serverSocket.bind(ADDR)


def start():
print('Ready to serve...')
serverSocket.listen()
while True:
connectionSocket, addr = serverSocket.accept()
thread = threading.Thread(target=handle_client, args=(connectionSocket,))
thread.start()
print(f"[当前连接数量]: {threading.activeCount() - 1}") # 去除创立的线程

def handle_client(connectionSocket):
while True:
try:
message = connectionSocket.recv(BUFSIZE).decode(FORMAT)
if message == CLOSE_CONNECTION:
break

filename = message.split()[0]

f = open(filename[1:])

outputdata = f.readlines()

# Send one HTTP header line into socket
connectionSocket.send('HTTP/1.1 200 OK\r\n\r\n'.encode(FORMAT))

# Send the content of the requested file to the client
for i in range(0, len(outputdata)):
connectionSocket.send(outputdata[i].encode())
connectionSocket.send("\r\n".encode())

# connectionSocket.close()

except (OSError, IOError):
# Send response message for file not found

connectionSocket.send('HTTP/1.1 404 Not found\r\n\r\n'.encode(FORMAT))
# connectionSocket.send('文件不存在\r\n'.encode(FORMAT))

# Close client socket
connectionSocket.close()

start()
serverSocket.close()
sys.exit()

UDP ping 程序

客户端

下面的代码结合了作业的扩展练习 1:

  1. Currently, the program calculates the round-trip time for each packet and prints it out individually. Modify this to correspond to the way the standard ping program works. You will need to report the minimum, maximum, and average RTTs at the end of all pings from the client. In addition, calculate the packet loss rate (in percentage).

UDPPingerClient.py


import socket
import time

PORT = 12000
FORMAT = 'utf-8'
DISCONNECT_MESSAGE = '!DISCONNECT'
SERVER = '127.0.0.1'
ADDR = (SERVER, PORT)

client = socket.socket(socket.AF_INET, socket.SOCK_DGRAM)

time_queue = []
loss_number = 0


def send(msg):
try:
message = msg.encode(FORMAT)
b = time.time()
client.sendto(message, ADDR)
client.settimeout(0.1)
modified_msg = client.recv(2048).decode()
a = time.time()
time_queue.append(a-b)
print(f"RESPONSE: {modified_msg}")
print(f"RTT: {time_queue[-1]}s")
# print(client.recv(2048).decode())
except socket.timeout:
global loss_number
loss_number += 1
print("Request timed out!")


for i in range(1,11):
send(f"Ping {i} {time.asctime()}")
else:
client.close()
print(f"""---ping statics---
10 transmitted, {10 - loss_number} received, {loss_number/10:.2%} loss
min/max/avg: {min(time_queue):f}/{max(time_queue):f}/{sum(time_queue)/10:f} s
""")
# send(input())

UDPPingerServer.py

# We will need the following module to generate randomized lost packets
import random
from socket import *

# Create a UDP socket
# Notice the use of SOCK_DGRAM for UDP packets
serverSocket = socket(AF_INET, SOCK_DGRAM)

# Assign IP address and port number to socket
serverSocket.bind(('', 12000))


while True:
# Generate random number in the range of 0 to 10
rand = random.randint(0, 10)
# Receive the client packet along with the address it is coming from
message, address = serverSocket.recvfrom(1024)
# Capitalize the message from the client
message = message.upper()

# If rand is less is than 4, we consider the packet lost and do not respond
if rand < 4:
continue

# Otherwise, the server responds
serverSocket.sendto(message, address

心跳包(Heartbeat packets)

UDPHeartbeatClient.py

import socket
import threading
import time


PORT = 12000
FORMAT = 'utf-8'
DISCONNECT_MESSAGE = '!DISCONNECT'
SERVER = '127.0.0.1'
ADDR = (SERVER, PORT)

client = socket.socket(socket.AF_INET, socket.SOCK_DGRAM)

noTransferSequence = True
sequenceLength = 5 # 指定message的发送格式,以序列 12 为例:f" 12{TIME}"


def listen_recv():
while True:
print(client.recv(2048).decode())


def send_length():
global noTransferSequence
while noTransferSequence:
client.sendto(str(sequenceLength).encode(FORMAT), ADDR)
status = client.recv(2048).decode()
if status == 'Length OK':
noTransferSequence = False
# 创建线程监听收到的信息
threading.Thread(target=listen_recv).start()

print(status)


def send(msg):
send_length()
client.sendto(msg.encode(FORMAT), ADDR)
time.sleep(0.1)


i = 0
while True:
message = f"{i:{sequenceLength}}{time.time()}" # message[:sequenceLength]存放序列号
send(message)
i += 1

# send(input())

UDPHeartbeatServer.py

"""
time.time()在不同平台上可能会有不同表现,这里仅为了本地演示
ps: 对心跳包不太了解,按自己理解做了个简单的
"""

# We will need the following module to generate randomized lost packets
import random
import threading
import time
from socket import *

# Create a UDP socket
# Notice the use of SOCK_DGRAM for UDP packets
serverSocket = socket(AF_INET, SOCK_DGRAM)

# Assign IP address and port number to socket
serverSocket.bind(('', 12000))

TIMEOUT = 2 # 设定心跳包间隔不超过 2 秒
sendTimeSequence = [] # 心跳包时间序列

noSequenceLength = True # 标识是否收到序列长度
noThreadMonitoring = True # 标识是否有线程监控超时


def handle_heatbeat(sequence_length):
while sequence_length:
time.sleep(0.1)
now_time = time.time()
latest_send = sendTimeSequence[-1] # 获取最近一次客户端发送心跳包的时间
if now_time - latest_send > TIMEOUT:
serverSocket.close()
break


def start():
global noSequenceLength, noThreadMonitoring
print('Ready to serve')
latest_number = 0
sequence_length = 0
while True:
try:
# Generate random number in the range of 0 to 10
rand = random.randint(0, 10)
# Receive the client packet along with the address it is coming from
message, address = serverSocket.recvfrom(1024)
# If rand is less is than 1, we consider the packet lost and do not respond
if rand < 1:
if noSequenceLength:
serverSocket.sendto(b'Retransmission', address)
continue

# Otherwise, the server responds
msg = message.decode()
if noSequenceLength: # 此时已经收到序列长度,对第一次收到的序列长度进行处理
sequence_length = int(msg[:5])
noSequenceLength = False
serverSocket.sendto(b'Length OK', address)
continue

number = int(msg[:sequence_length])
sendTimeSequence.append(float(msg[sequence_length:]))
if noThreadMonitoring:
threading.Thread(target=handle_heatbeat,args=(sequence_length,)).start()
noThreadMonitoring = False

for i in range(latest_number + 1, number): # 若间隔为1,则代表未丢失,不需回复
serverSocket.sendto(f'{i} have lost'.encode(), address)
latest_number = number
except OSError:
print('CLOSE')
break


if __name__ == '__main__':
start()

邮件客户端

为选择的是网易的163邮箱作为实验对象,下文中发件邮箱以及收件邮箱都作了更改,可以根据自己的邮箱地址进行替换。

服务器地址默认端口号SSL协议端口号
pop3.163.com110995
smtp.163.com25465/994

MailClient.py

smtp.163.com 的默认端口号为 25,建议初学者使用 telnet smtp.163.com 25 (com 和 25 之间为空格而非:)在终端进行同步的实验,结果一致

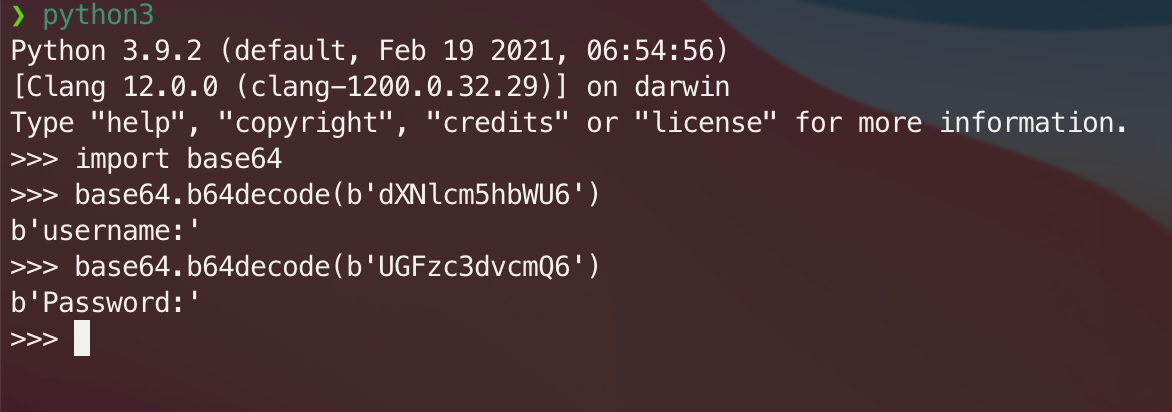
提前解释一下, AUTH LOGIN 命令返回的 334 dXNlcm5hbWU6,实际是经过base64加密的 username:,同样的UGFzc3dvcmQ6就是password:

image-20210415163722750

# 非 SSL 加密
import base64

from socket import *

msg = "\r\n I love computer networks!" # 信息前面需空行
endmsg = "\r\n.\r\n"
recv = []

# Choose a mail server (e.g. Google mail server) and call it mailserver
mailserver = "smtp.163.com"

# Create socket called sslClientSocket and establish a TCP connection with mailserver
clientSocket = socket(AF_INET, SOCK_STREAM)
clientSocket.connect((mailserver, 25))

recv.append(clientSocket.recv(1024).decode())

if recv[-1][:3] != '220':
print('220 reply not received from server.')
print(recv[-1])

# Send HELO command and print server response.
heloCommand = 'HELO Alice\r\n'
clientSocket.send(heloCommand.encode())
recv.append(clientSocket.recv(1024).decode())
print(recv[-1])

# Login
LoginCommand = 'AUTH LOGIN\r\n' # 要加\r\n,否则会报 504 错误
User = b'你的账户'
Psw = b'你的密码'

UserB64 = base64.b64encode(User) # 账号密码需要base64加密
PswB64 = base64.b64encode(Psw)

clientSocket.send(LoginCommand.encode())
recv.append(clientSocket.recv(1024).decode())
print(recv[-1])

clientSocket.send(UserB64 + b'\r\n')
recv.append(clientSocket.recv(1024).decode())
print(recv[-1])

clientSocket.send(PswB64 + b'\r\n')
recv.append(clientSocket.recv(1024).decode())
print(recv[-1])

# Send MAIL FROM command and print server response.

FromCommand = 'mail from: <your_email_address>\r\n'
clientSocket.send(FromCommand.encode())
recv.append(clientSocket.recv(1024).decode())
print(recv[-1])

# Send RCPT TO command and print server response.
ToCommand = 'rcpt to: <recipient_email_address>\r\n'
clientSocket.send(ToCommand.encode())
recv.append(clientSocket.recv(1024).decode())
print(recv[-1])

# Send DATA command and print server response.
DataCommand = 'data'
clientSocket.send(DataCommand.encode())

# Send message data.
header = f'''
from: <your_email_address>
to: <recipient_email_address>
subject: test
'''
clientSocket.send((header + msg).encode())

# Message ends with a single period.
clientSocket.send(endmsg.encode())
recv.append(clientSocket.recv(1024).decode())
print(recv[-1])

# Send QUIT command and get server response.
QuitCommand = 'QUIT\r\n'
clientSocket.send(QuitCommand.encode())
recv.append(clientSocket.recv(1024).decode())
print(recv[-1])
recv.append(clientSocket.recv(1024).decode())
print(recv[-1])

SecureMailClient.py

此部分为额外的练习,可于终端下使用 openssl s_client -connect smtp.163.com:465加深理解

原文:Mail servers like Google mail (address: smtp.gmail.com, port: 587) requires your client to add a Transport Layer Security (TLS) or Secure Sockets Layer (SSL) for authentication and security reasons, before you send MAIL FROM command. Add TLS/SSL commands to your existing ones and implement your client using Google mail server at above address and port.

因为换个端口号就能使用 SSL 协议,接下来继续用网易做示范。

smtp.163.com SSL协议的端口号为465/994,任选其一使用

# SSL 加密
import base64
import ssl

from socket import *

msg = "\r\n I love computer networks!"
endmsg = "\r\n.\r\n"
recv = []

# Choose a mail server (e.g. Google mail server) and call it mailserver
mailserver = "smtp.163.com"

# Create socket called sslClientSocket and establish a TCP connection with mailserver
clientSocket = socket(AF_INET, SOCK_STREAM)
clientSocket.connect((mailserver, 465))

# ssl
purpose = ssl.Purpose.SERVER_AUTH
context = ssl.create_default_context(purpose)

sslClientSocket = context.wrap_socket(clientSocket, server_hostname=mailserver)

recv.append(sslClientSocket.recv(1024).decode())

if recv[-1][:3] != '220':
print('220 reply not received from server.')

print(recv[-1])
# Send HELO command and print server response.
heloCommand = 'HELO Alice\r\n'
sslClientSocket.send(heloCommand.encode())
recv.append(sslClientSocket.recv(1024).decode())
print(recv[-1])

# Login
LoginCommand = 'AUTH LOGIN\r\n' # 命令要加\r\n
User = b'你的账户'
Psw = b'你的密码'

UserB64 = base64.b64encode(User)
PswB64 = base64.b64encode(Psw)

sslClientSocket.send(LoginCommand.encode())
recv.append(sslClientSocket.recv(1024).decode())
print(recv[-1])
sslClientSocket.send(UserB64 + b'\r\n')
recv.append(sslClientSocket.recv(1024).decode())
print(recv[-1])
sslClientSocket.send(PswB64 + b'\r\n')
recv.append(sslClientSocket.recv(1024).decode())
print(recv[-1])

# Send MAIL FROM command and print server response.

FromCommand = 'mail from: <your_email_address>\r\n'
sslClientSocket.send(FromCommand.encode())
recv.append(sslClientSocket.recv(1024).decode())
print(recv[-1])

# Send RCPT TO command and print server response.
ToCommand = 'rcpt to: <recipient_email_address>\r\n'
sslClientSocket.send(ToCommand.encode())
recv.append(sslClientSocket.recv(1024).decode())
print(recv[-1])

# Send DATA command and print server response.
DataCommand = 'data'
sslClientSocket.send(DataCommand.encode())

# Send message data.
header = f'''
from: <your_email_address>
to: <recipient_email_address>
subject: test
'''
sslClientSocket.send((header + msg).encode())

# Message ends with a single period.
sslClientSocket.send(endmsg.encode())
recv.append(sslClientSocket.recv(1024).decode())
print(recv[-1])

# Send QUIT command and get server response.

QuitCommand = 'QUIT\r\n'
sslClientSocket.send(QuitCommand.encode())
recv.append(sslClientSocket.recv(1024).decode())
print(recv[-1])
recv.append(sslClientSocket.recv(1024).decode())
print(recv[-1])

ProxyServer.py

程序从自己手中跑起来的瞬间令人着迷

Mac改代理:在Safari中Command+, -> 高级 -> 更改设置… -> 代理 -> 网页代理 (HTTP) ,点击并且应用,测试完记得取消代理。

image-20210425172041771

# Test URL:http://gaia.cs.umass.edu/wireshark-labs/HTTP-wireshark-file1.html
import sys

from socket import *

if len(sys.argv) <= 1:
print('Usage : "python ProxyServer.py server_ip"\n'
'[server_ip : It is the IP Address Of Proxy Server\n'
'The default address is 0.0.0.0')
IP = ''
# sys.exit(2)
else:
IP = sys.argv[1]

PORT = 8086
FORMAT = 'utf-8'

# Create a server socket, bind it to a port and start listening
tcpSerSock = socket(AF_INET, SOCK_STREAM)
tcpSerSock.bind((IP, PORT))
tcpSerSock.listen()

while 1:
# Start receiving data from the client
print('Ready to serve...')
tcpCliSock, addr = tcpSerSock.accept()
print('Received a connection from:', addr)
message = tcpCliSock.recv(2048).decode(FORMAT)
print(message)
# Extract the filename from the given message print(message.split()[1])
print(message.split()[1])
filename = message.split()[1].partition("//")[2]
# filename = message.split()[1].split(':')[0]
print(filename)
fileExist = "false"
filetouse = filename.replace('/', '_')
print(filetouse)
try:
# Check wether the file exist in the cache
f = open(filetouse, "r")
outputdata = f.readlines()
fileExist = "true"
# ProxyServer finds a cache hit and generates a response message
tcpCliSock.send("HTTP/1.0 200 OK\r\n".encode(FORMAT))
tcpCliSock.send("Content-Type:text/html\r\n".encode(FORMAT))

# Send the content of the requested file to the client
for data in outputdata:
tcpCliSock.send(data.encode(FORMAT))
tcpCliSock.send("\r\n".encode(FORMAT))

print('Read from cache')

# Error handling for file not found in cache
except IOError:
if fileExist == "false":
# Create a socket on the proxyserver
c = socket(AF_INET, SOCK_STREAM) # Fill in start. # Fill in end.
hostn = filename.replace("www.", "", 1).split('/')[0]
print(f'Host: {hostn}')
try:
# Connect to the socket to port 80
c.connect((hostn, 80))

# Create a temporary file on this socket and ask port 80 for the file requested by the client
fileobj = c.makefile('rwb', 0)
fileobj.write(message.encode(FORMAT))

# Read the response into b_buffer
b_buffer = fileobj.read() # 这里没有 decode()
print(b_buffer)
# Create a new file in the cache for the requested file.
# Also send the response in the b_buffer to client socket and the corresponding file in the cache
tcpCliSock.send(b_buffer)

tmpFile = open(filename.replace('/', '_'), "w+b") # 事实上这里的路径等于 filetouse

# https://stackoverflow.com/questions/48639285/a-bytes-like-object-is-required-not-int
tmpFile.write(b_buffer) # 不要对 bytes 使用 writelines
tmpFile.close()

fileobj.close()

except:
print('Illegal request')
else:
# HTTP response message for file not found
tcpCliSock.send('HTTP/1.1 404 Not Found\r\n'.encode(FORMAT))
tcpCliSock.send('Content-Type:text/html\r\n'.encode(FORMAT))
with open('404 Not Found.html', "r") as f:
notfound_data = f.readlines()
for data in notfound_data:
tcpCliSock.send(data.encode(FORMAT))
tcpCliSock.send("\r\n".encode(FORMAT))

# Close the client and the server sockets
tcpCliSock.close()
tcpSerSock.close()

分享一下自己在使用计网: 自顶向下这本书课后习题时的一些经验

以下命令会在 Mac (Linux适用) 和 Windows 下同时运行,或许能帮你解决一些疑惑

先做个简单的介绍吧,nslookup (全称 name server lookup) ,是一个在命令行界面下的网络工具,它有两种模式:交互 & 非交互,进入交互模式在命令行界面直接输入nslookup按回车,非交互模式则是后面跟上查询的域名或者IP地址按回车。一般来说,非交互模式适用于简单的单次查询,若需要多次查询,则交互模式更加适合,例如计网第七版第二章的课后习题p19 (单纯举例子,没有书不影响接下来的阅读),从根服务器进行迭代查询。

RR (Resource Records) – 来自WIKI百科以及计算机网络: 自顶向下(7th)

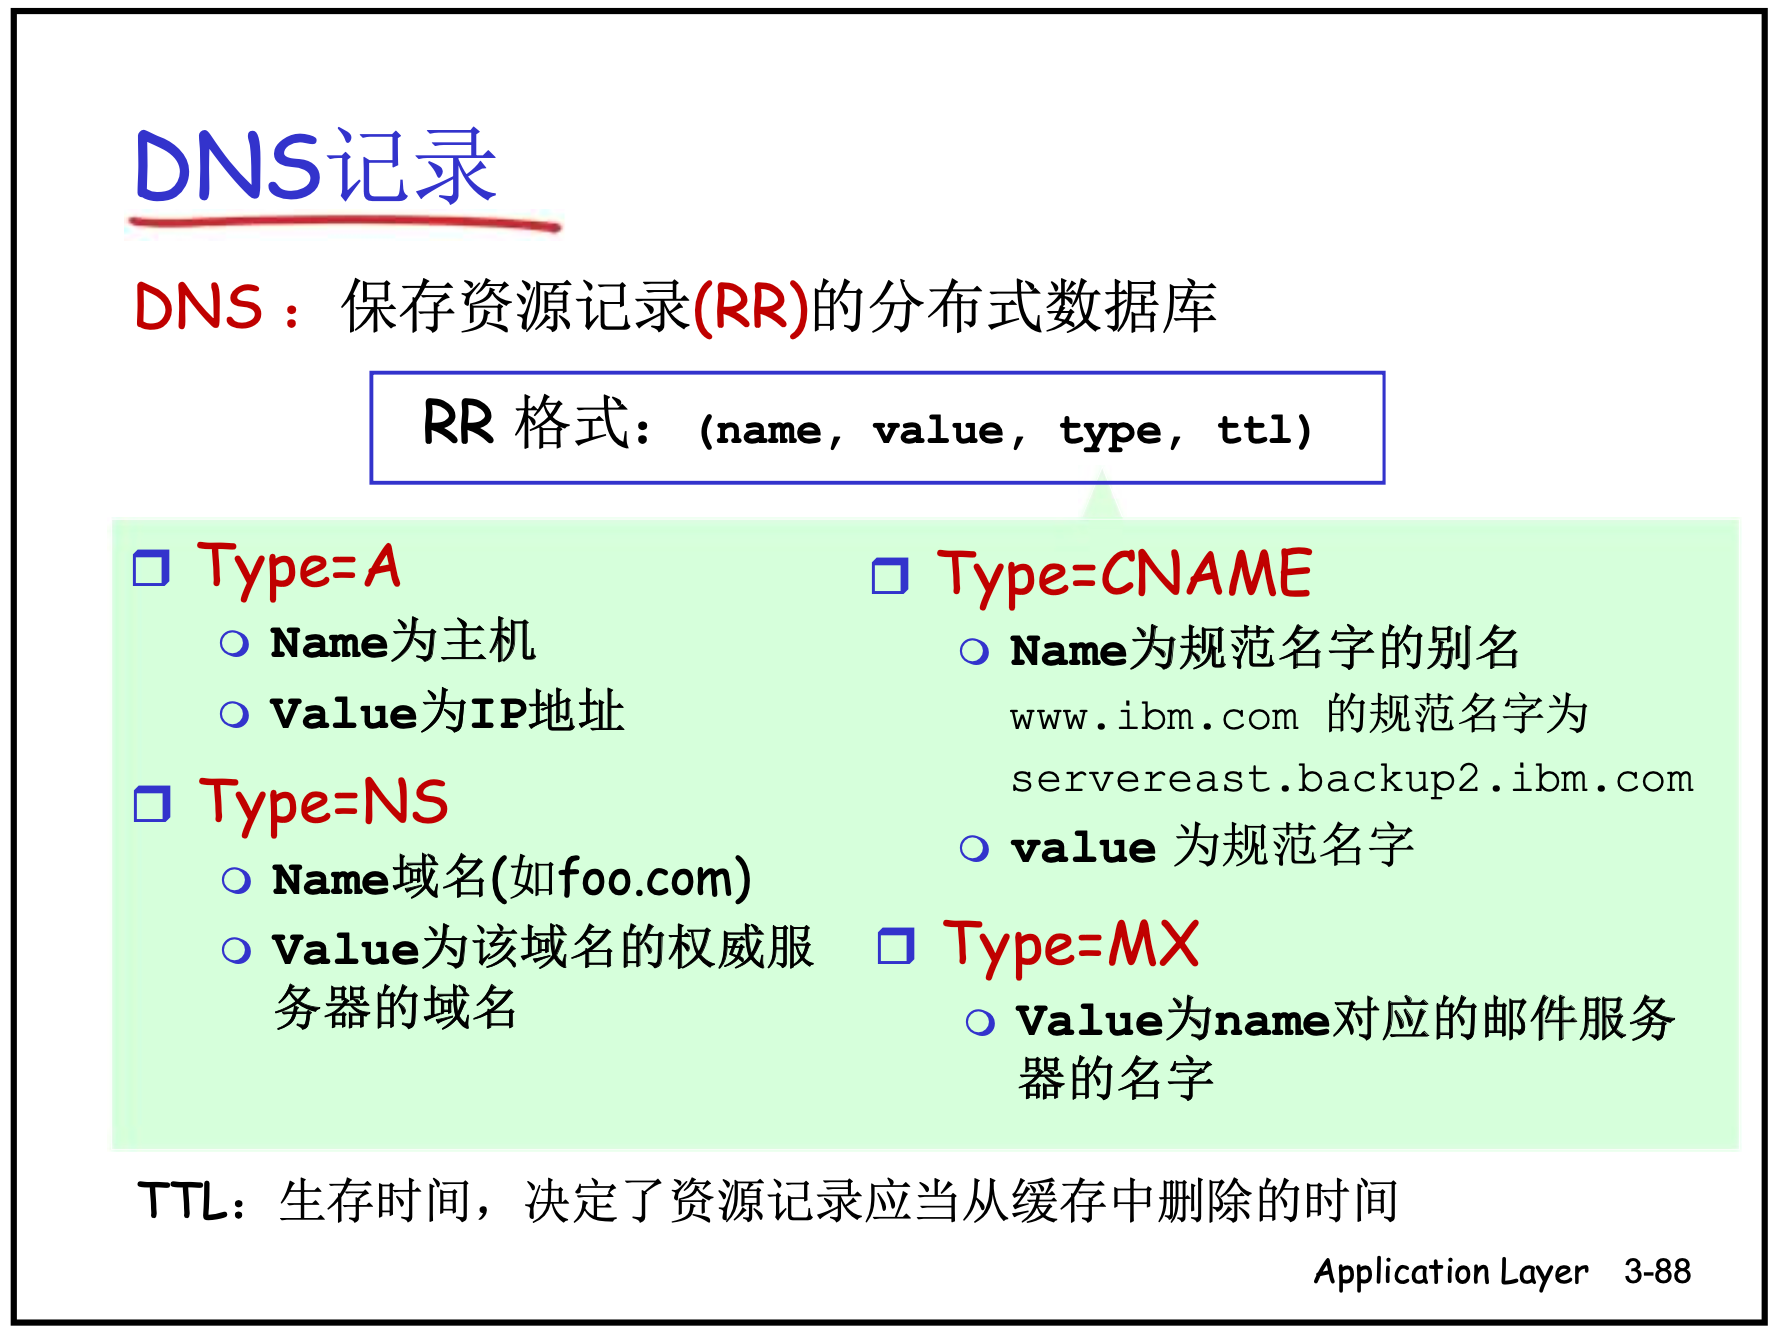
资源记录(RR)是包含了下列字段的4元组:

(Name, Value, Type, TTL)

  • 主机记录(A记录):RFC 1035 定义,A记录是用于名称解析的重要记录,提供标准的主机名到IP的地址映射。
  • 别名记录(CNAME记录): RFC 1035 定义,向查询的主机提供主机名对应的规范主机名。
  • 域名服务器记录(NS记录) :用来指定该域名由哪个DNS服务器来进行解析。 您注册域名时,总有默认的DNS服务器,每个注册的域名都是由一个DNS域名服务器来进行解析的,DNS服务器NS记录地址一般以以下的形式出现: ns1.domain.com、ns2.domain.com等。 简单的说,NS记录返回域中主机IP地址的权威DNS服务器的主机名。
  • 邮件交换记录(MX记录):返回别名为Name对应的邮件服务器的规范主机名。

上述表述总感觉略显抽象,引用中科大郑老师的PPT内容以做补充

PS: 老师在b站上有分享视频,讲的非常的棒

image-20210331205605245

这里仅介绍常见的一部分记录类型,如果在使用当中有其他的需求,可以到 DNS RecordsList of DNS record types–WIKI上查看,非常的全面。

nslookup

语法格式:

nslookup –option1 –option2 host-to-find dns-server

非交互模式

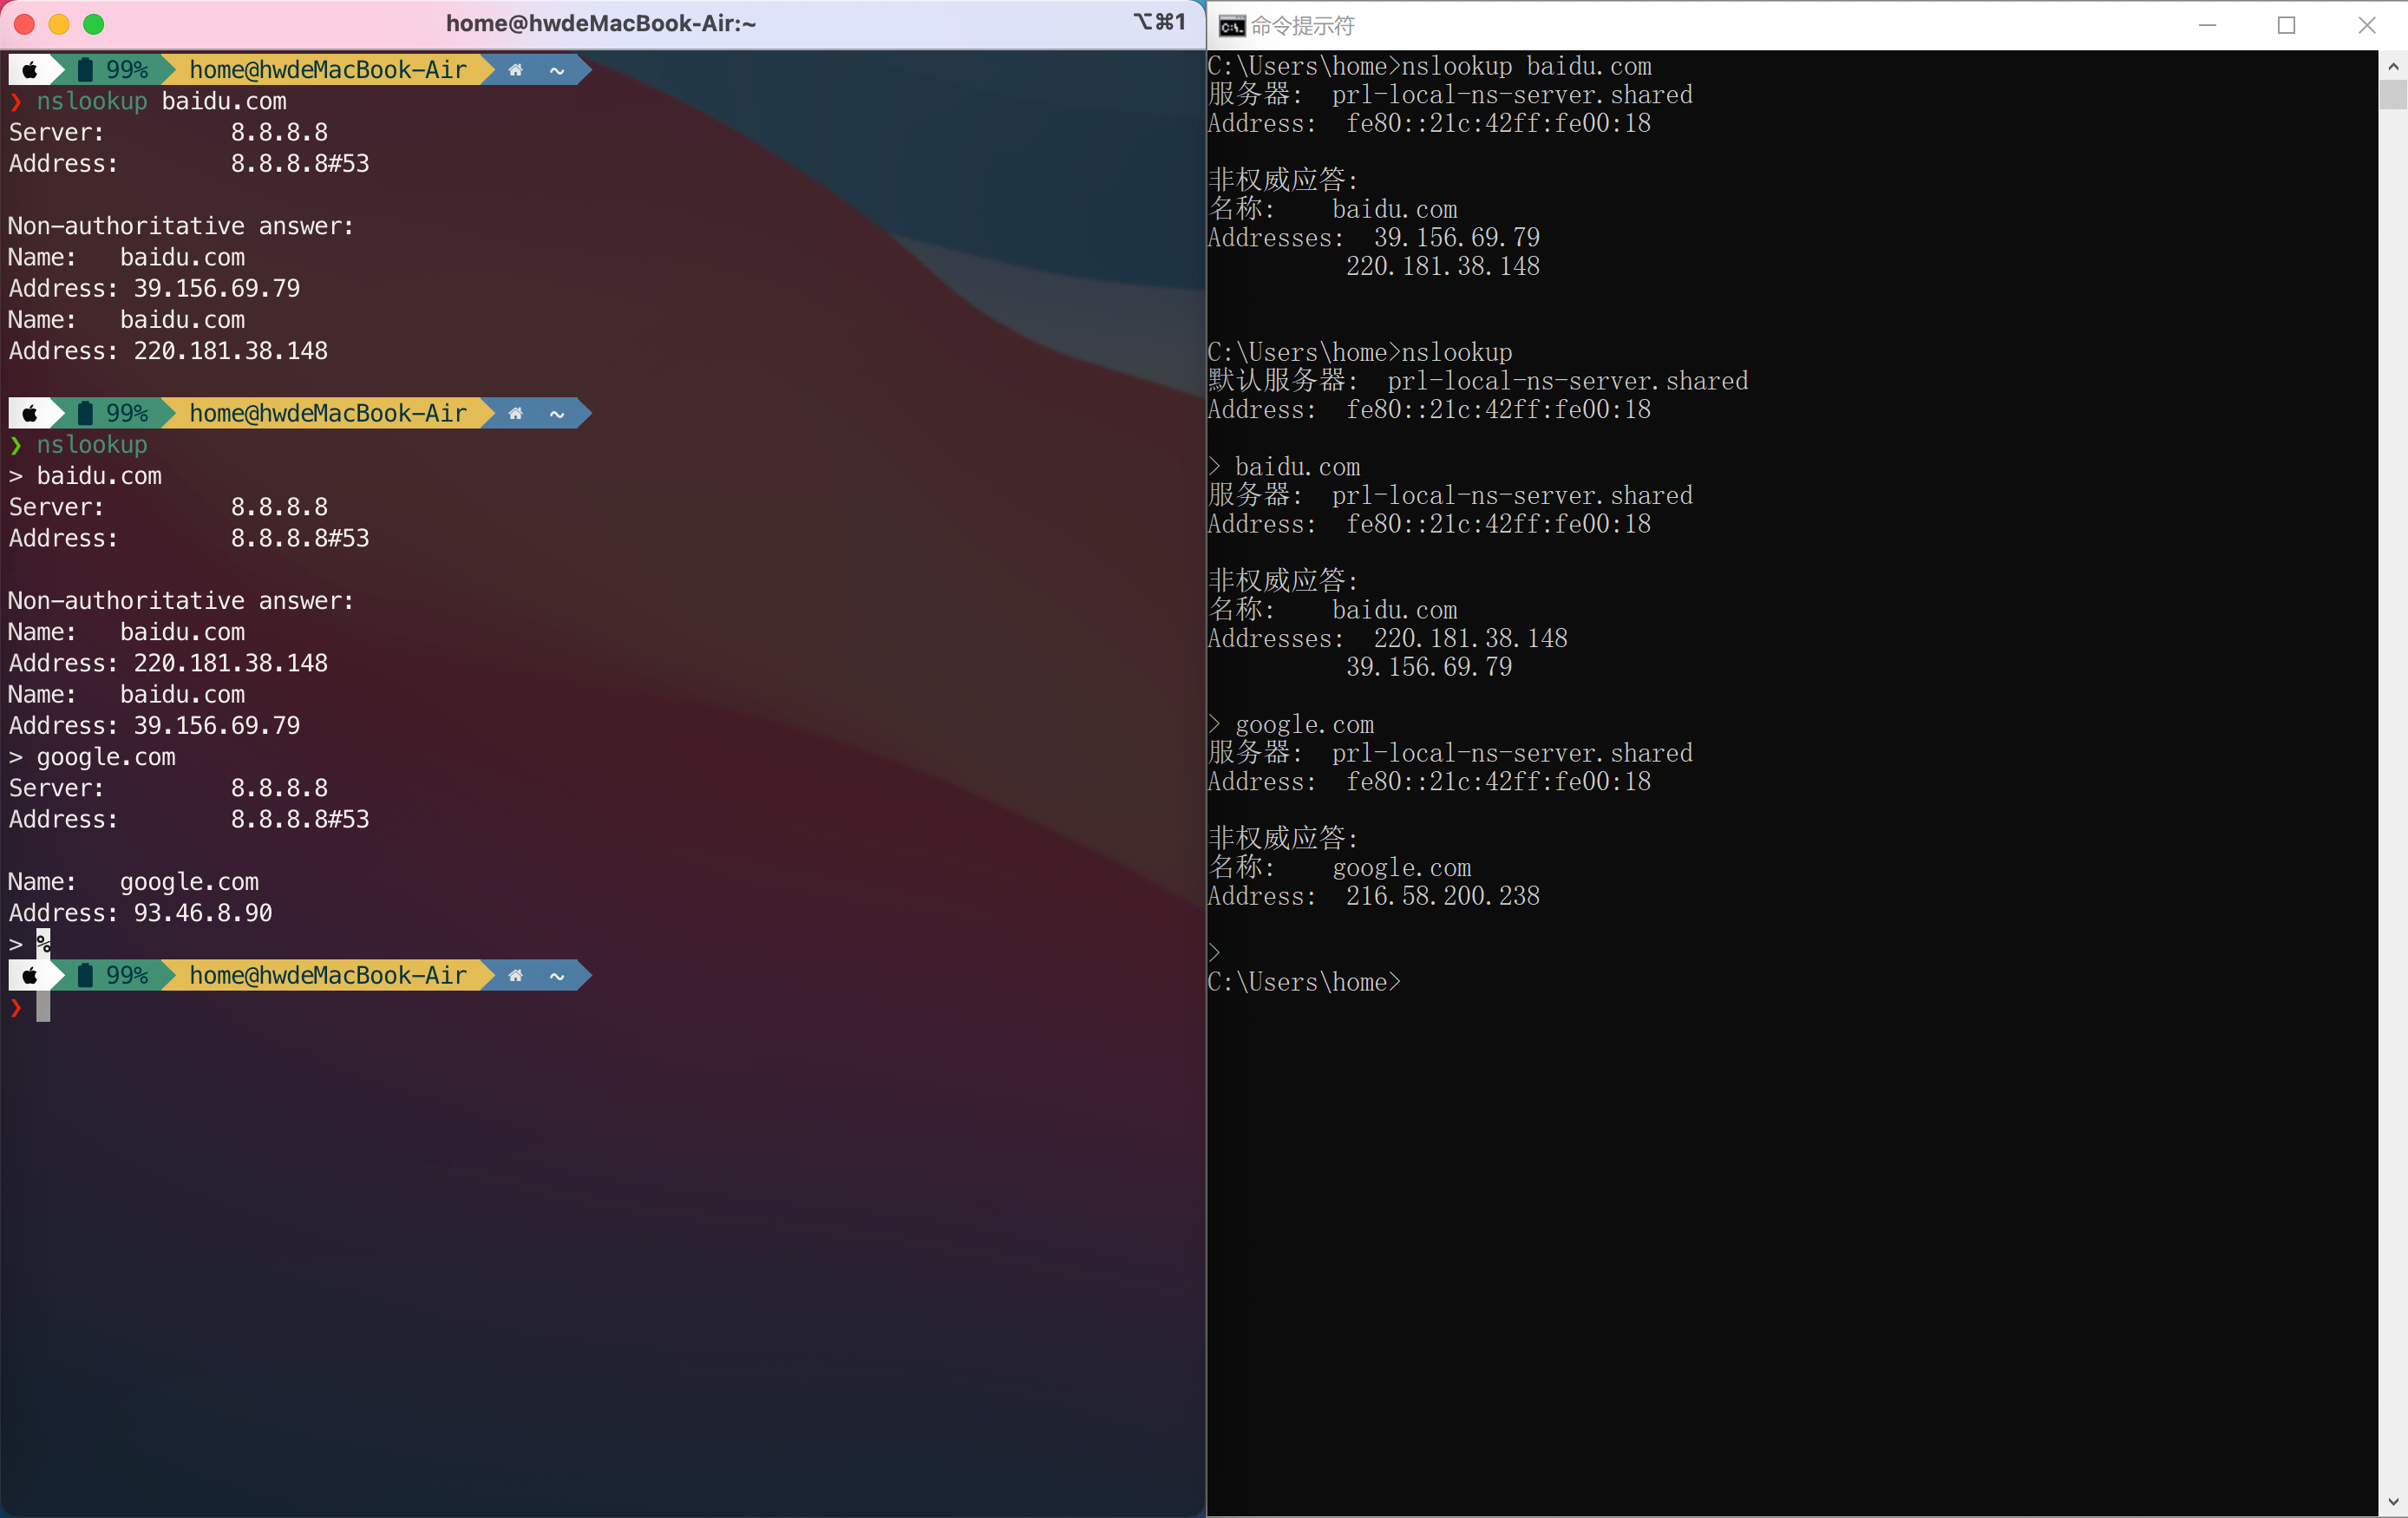
非交互模式下每次查询需要输入完整的命令和参数,以baidu.com为例

PS: nslookup 的查询在不指定参数的情况下,默认查询的类型为A。

nslookup baidu.com

下图为运行效果,左侧是 Mac 端,右侧是 Windows,Linux 呈现效果基本与 Mac 一致。结果的介绍会放在下文的交互模式部分,之后的演示大部分会在交互模式的状态下进行。

image-20210401004754713

交互模式

在命令行下输入

nslookup
baidu.com

可以看到进入交互模式后不再需要输入完整的命令便可以进行查询,并且可以连续的进行查询(友情提示Ctrl+C或者Cmd+C退出)

Mac 和 Windows 中命令的反馈结果有一点不同,不过并不影响结果

交互模式

输出部分:

  • 最上面的 Server 和 Address 是该词查询的 DNS 服务器。可以自己指定,也可以默认,之后会说到。
  • 默认情况下 DNS 服务器的端口为53
  • 非权威应答(Non-authoritative answer)意味着answer来自于其他服务器的缓存,而不是权威的Baidu DNS服务器。缓存会根据 ttl(Time to Live)的值定时的进行更新。这个链接或许对你有所帮助: What is the meaning of the non-authoritative-answer?
  • 注意到,在对google.com进行查询时,Mac 返回的结果并没有非权威服务器提示,而Windows下的命令却提示了,这是因为 8.8.8.8 这个 DNS 服务器正是谷歌的权威名字服务器,可以使用nslookup -ty=ptr 8.8.8.8验证,ptr也是一种记录类型,可以用进行反向DNS解析(Reverse DNS Lookup),拓展链接: reverse-dns-lookup

If a hostname/IP address pair is cached in a DNS server and another query arrives to the DNS server for the same hostname, the DNS server can provide the desired IP address, even if it is not authoritative for the hostname. Because hosts and mappings between hostnames and IP addresses are by no means permanent, DNS servers discard cached information after a period of time (often set to two days).

PS: 查询返回的多个结果均正确,不妨在你的浏览器用默认的80号端口试着访问一下,以第一个返回的百度网站为例,39.156.69.79:80

拓展: PTR 反向DNS解析(8.8.8.8)

nslookup -ty=ptr 8.8.8.8
image-20210331215837527

帮助界面

或许提前看看命令的帮助界面会非常的有帮助

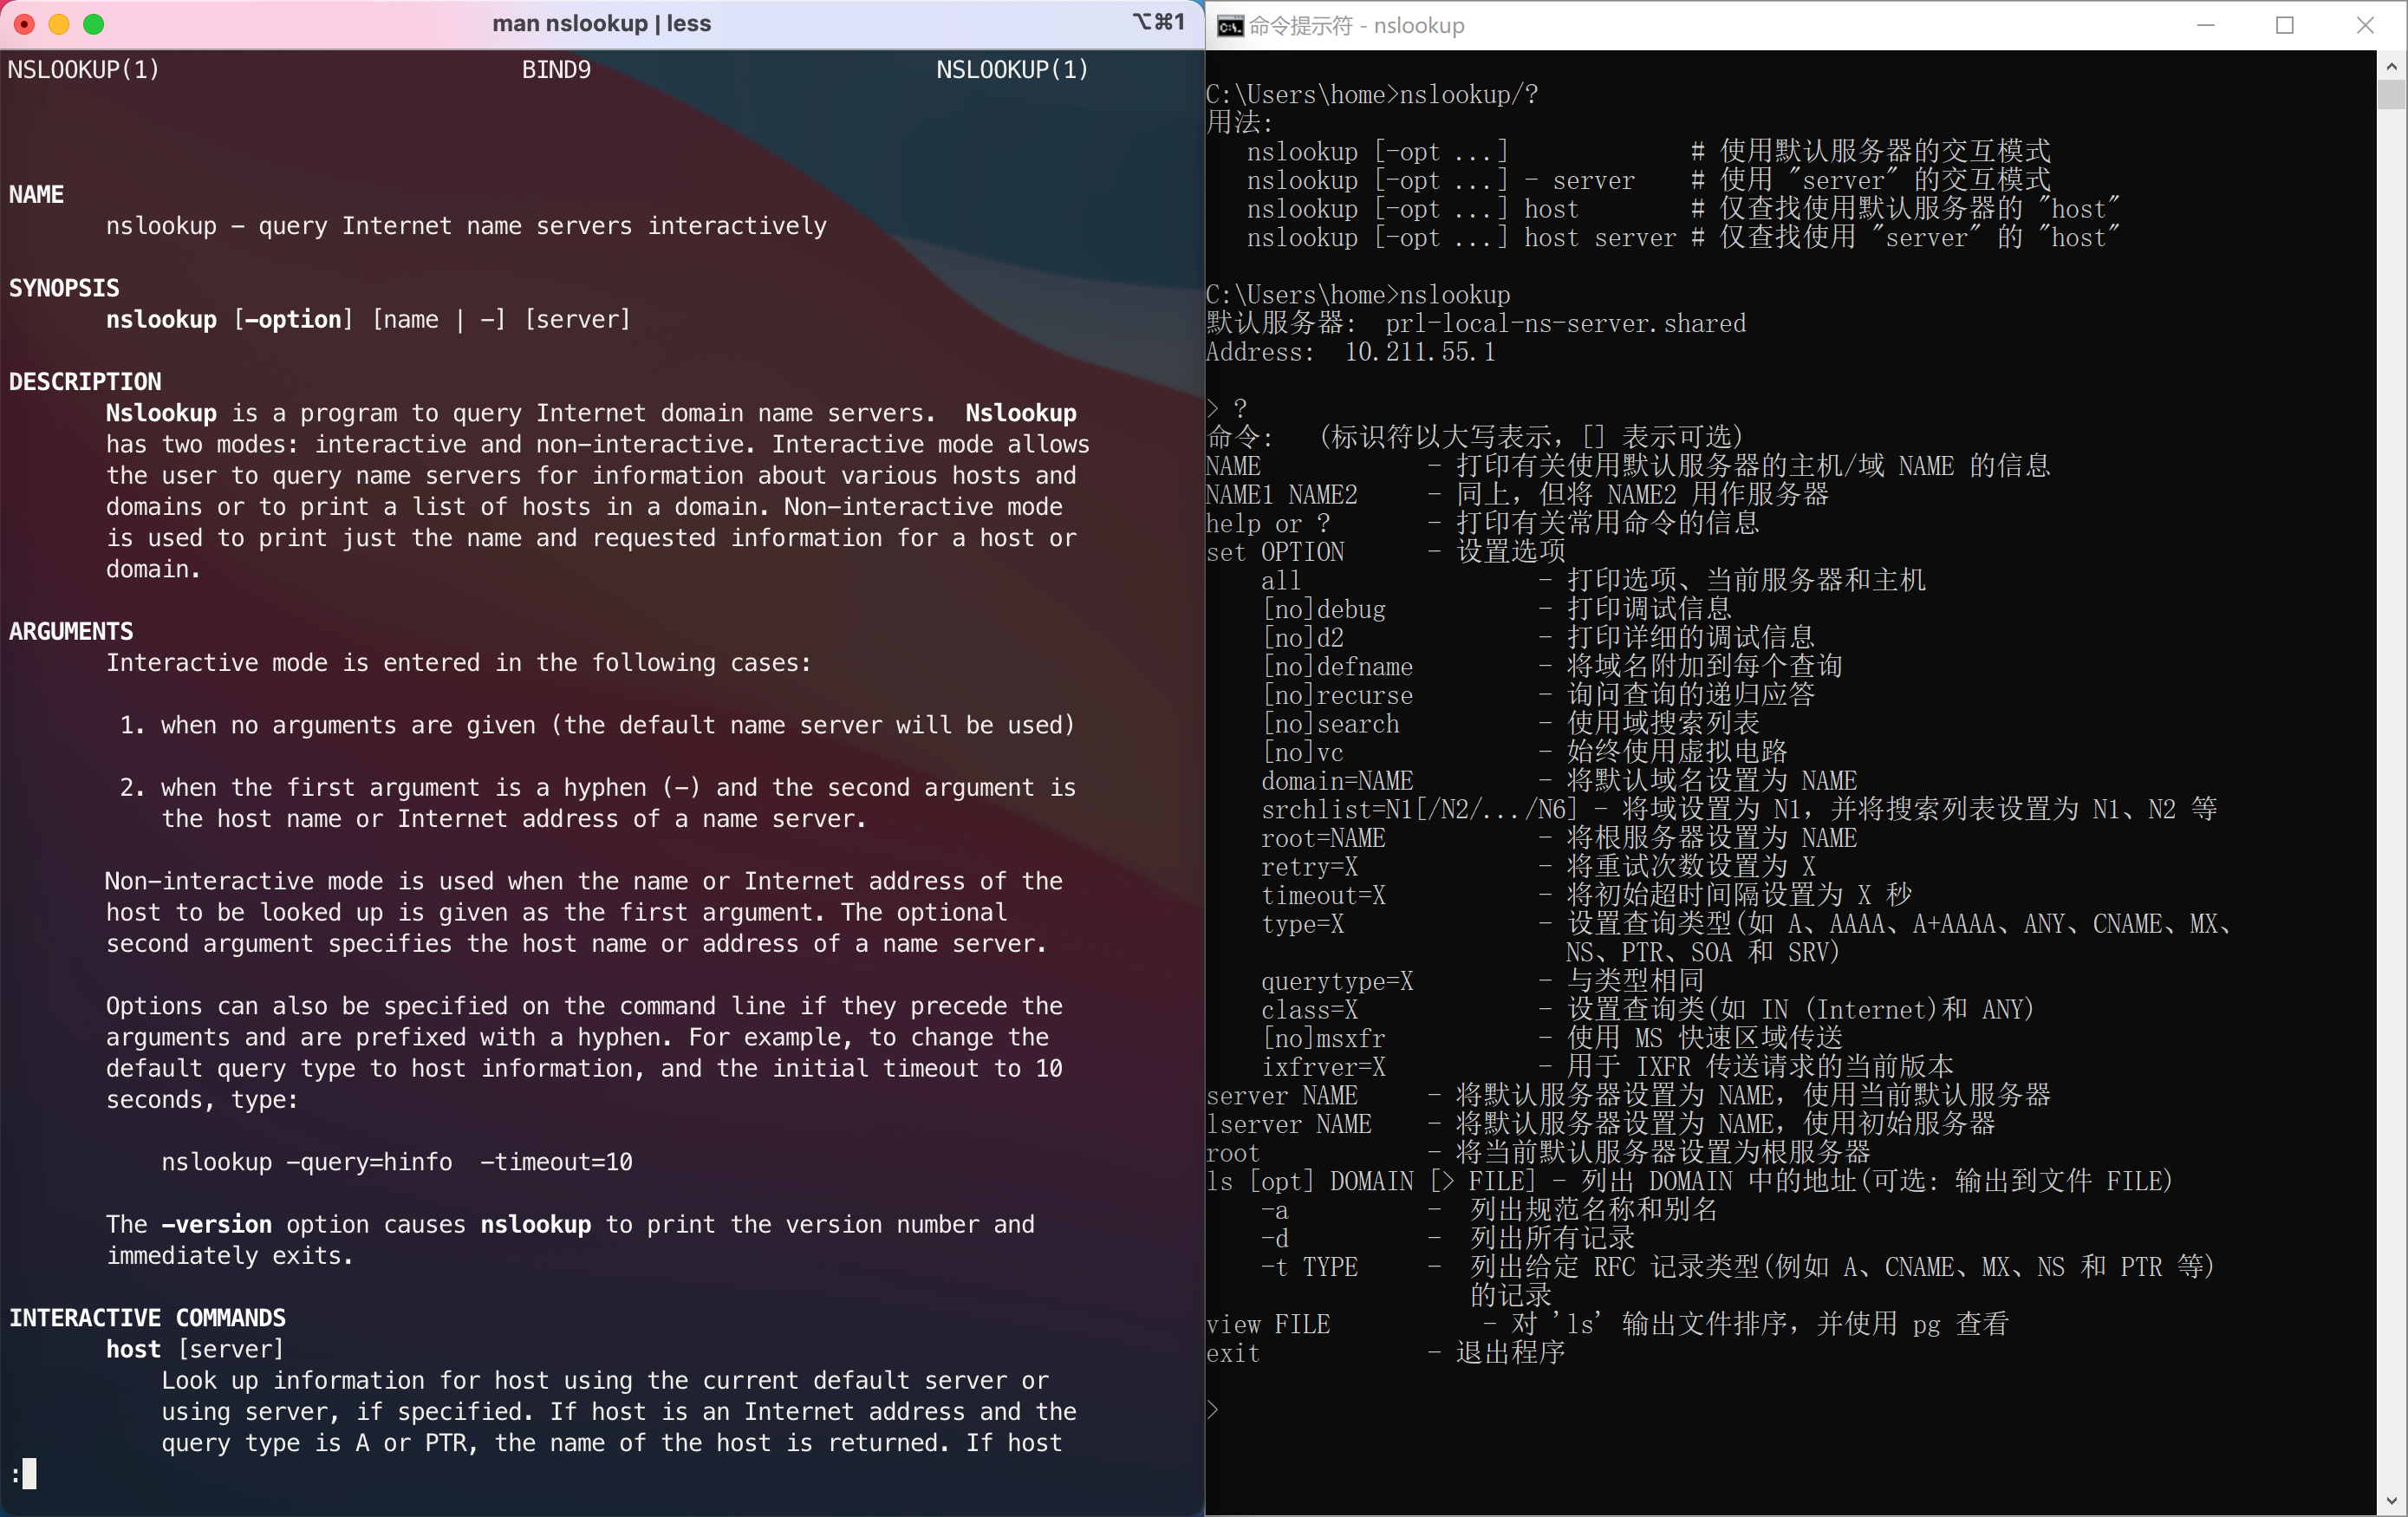
Mac 下输入man nslookup | less,使用空格往下翻页,b往上翻页,q退出

man nslookup | less

Windows下有两种,一种是直接输入nslookup/?,还有一种是在交互模式下输入help或者?

nslookup/?

Windows 给出的命令为通用命令,Mac/Linux 可用于借鉴

image-20210331223957426

关于 querytype 和 type 的小疑惑

在一开始上手nslookup时,看了一些CSDN的文章,其中有一篇混合了-querytype -type 使用 :)

当时看的我有些疑惑,直到我查看了命令的帮助手册:

image-20210331225516049

-querytype-type 的效用一致,可以简写为 -q-ty,其在不指定类型的情况下默认查询类型为 A

设置查询类型

  • 非交互模式: nslookup -ty=类型 name
  • 交互模式: set ty=类型

先来看看之前提到的 NS 类型

NS(Nameserver DNS record)

查找权威名字服务器

If Type=NS , then Name is a domain (such as foo.com ) and Value is the hostname of an authoritative DNS server that knows how to obtain the IP addresses for hosts in the domain.This record is used to route DNS queries further along in the query chain. As an example, ( foo.com , dns.foo.com , NS) is a Type NS record.

nslookup
set ty=NS

image-20210331231509656

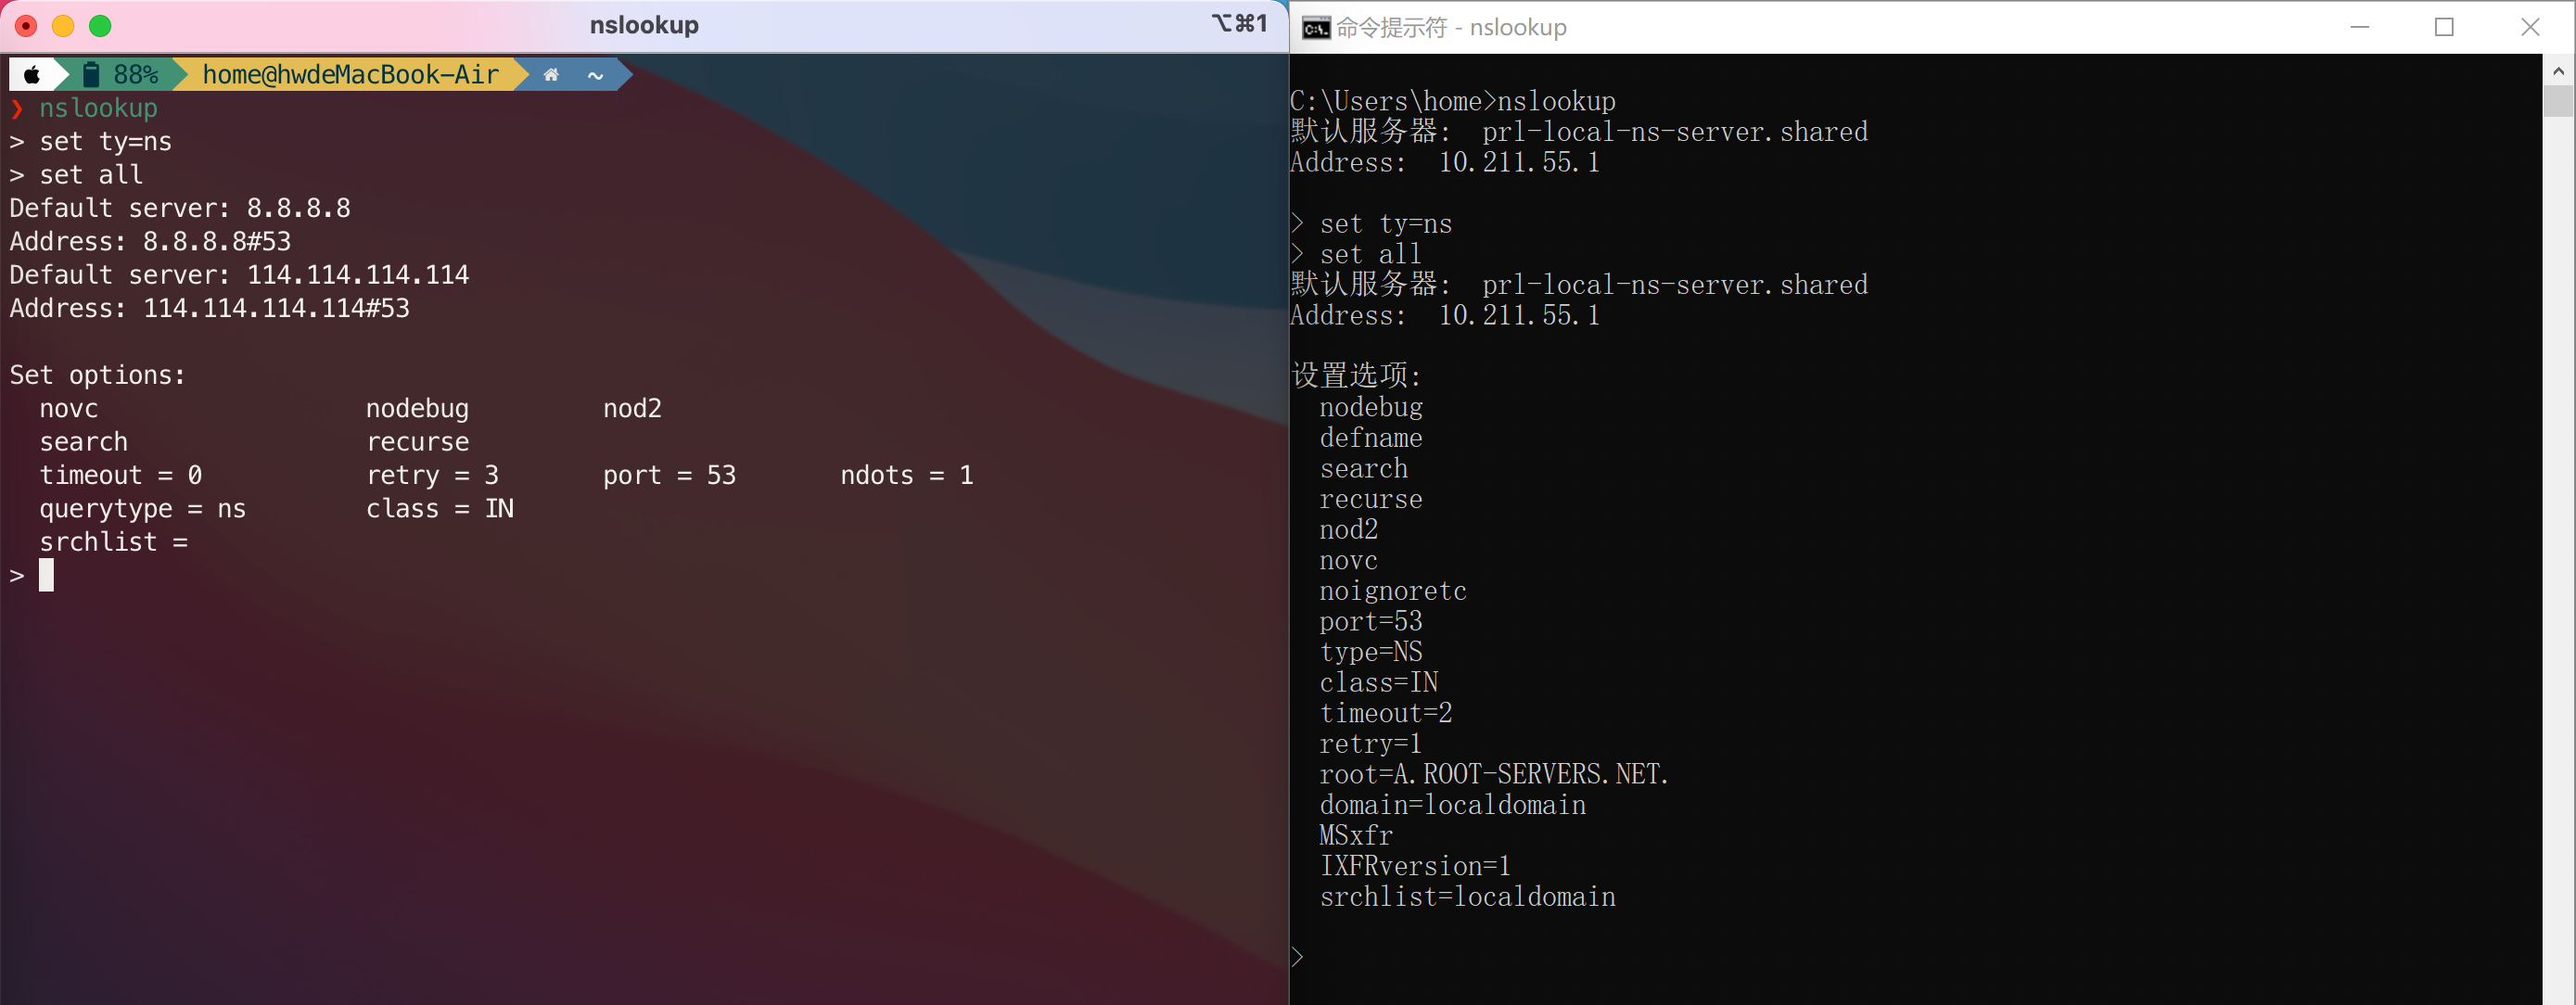
PS: 交互模式下的 set 命令可以更改影响查找的状态信息,不仅用于记录类型的变更,使用set all可以查看常用选项的当前值以及当前默认的服务器和主机信息,注意,DNS 服务器不能通过 set 指定

接下来以baidu.com为出发点,来看看对应的权威名字服务器

image-20210331234432441

Q1:哪个才是baidu.com的权威DNS服务器?请用 “name, value” 格式描述一下 NS 记录的返回内容

所有问题答案会在文章末尾给出

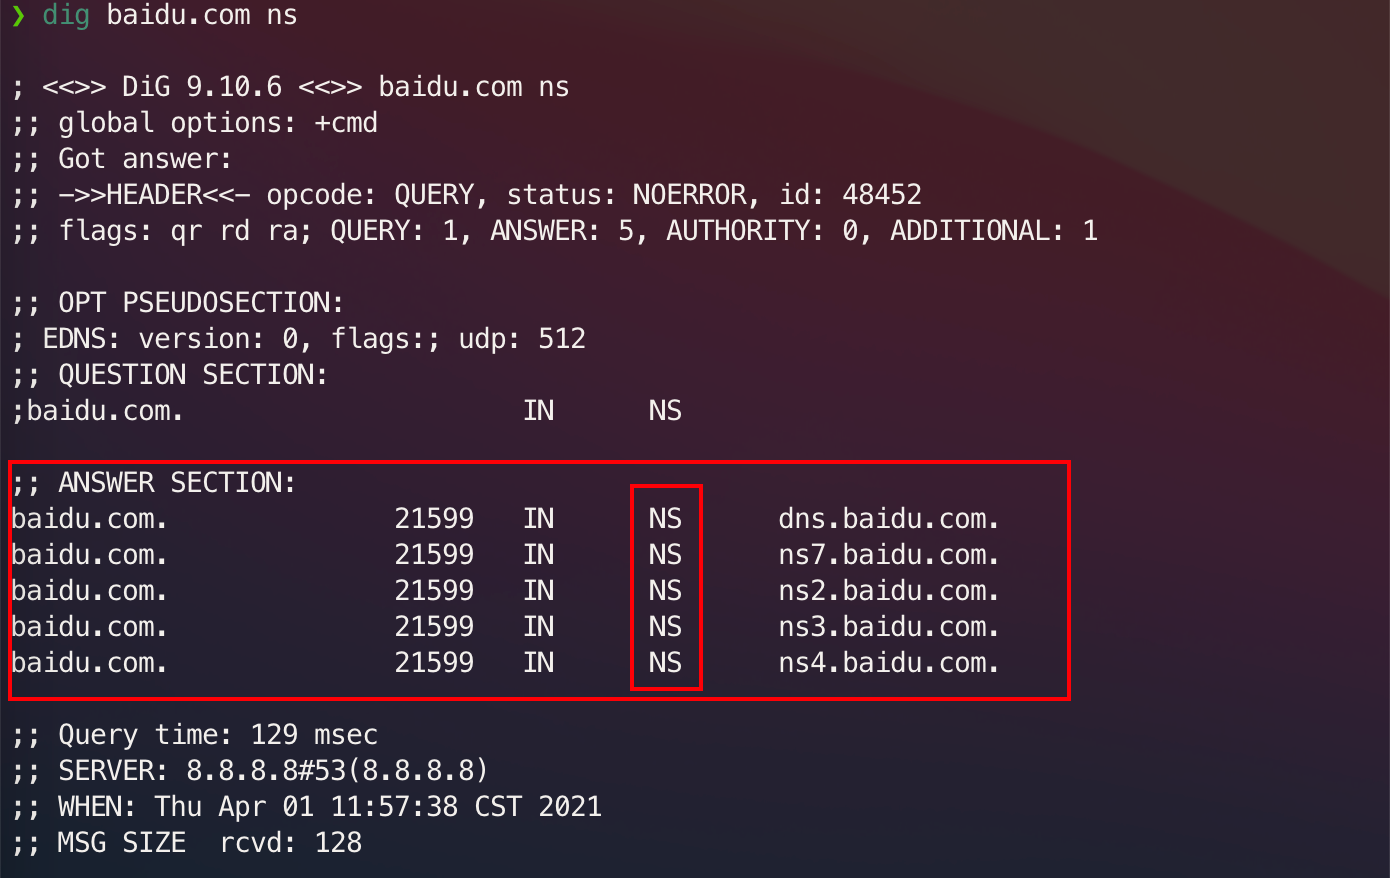
拓展: dig 命令

如果你的操作系统是 Mac/Linux,不妨尝试一下dig baidu.com ns,会对结果有个更直观的感触

image-20210401120045187

其中21599为 TTL,即 DNS 缓存刷新时间,单位为 s ,NS 就是这次查询的类型。

A(查看 IP 地址)

If Type=A , then Name is a hostname and Value is the IP address for the hostname. Thus, a Type A record provides the standard hostname-to-IP address mapping. As an example, ( relay1.bar.foo.com , 145.37.93.126, A) is a Type A record.

用以下命令(交互模式下)指定dns.baidu.combaidu.com执行 type=A 的查询来看看结果与最开始有什么不同

server dns.baidu.com
set ty=A
baidu.com

image-20210331235025484

发现了吗,此时并没有提示非权威应答(Non-authoritative answer),不妨思考一下以下两个问题

Q2:A 记录的内容是什么?用 “name, value” 格式回答其中之一

Q3:现在的这次查询和第一次有什么区别?


更新:虚拟机过期了,故只用 Mac 的终端进行展示,不过命令其实是互通的。

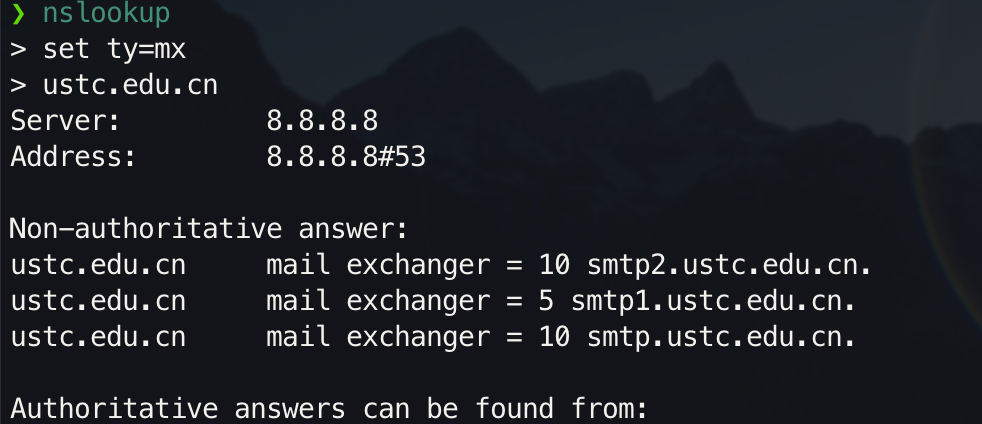
MX(Mail eXchange record)

A mail exchanger record (MX record) specifies the mail server responsible for accepting email messages on behalf of a domain name. It is a resource record in the Domain Name System (DNS). It is possible to configure several MX records, typically pointing to an array of mail servers for load balancing and redundancy.

查找host-to-find域的邮件服务器,

image-20210517154903130

熟悉的 SMTP(Simple Mail Transfer Protocol) (Ps:smtp并非一定是邮件服务器名字的组成部分)。

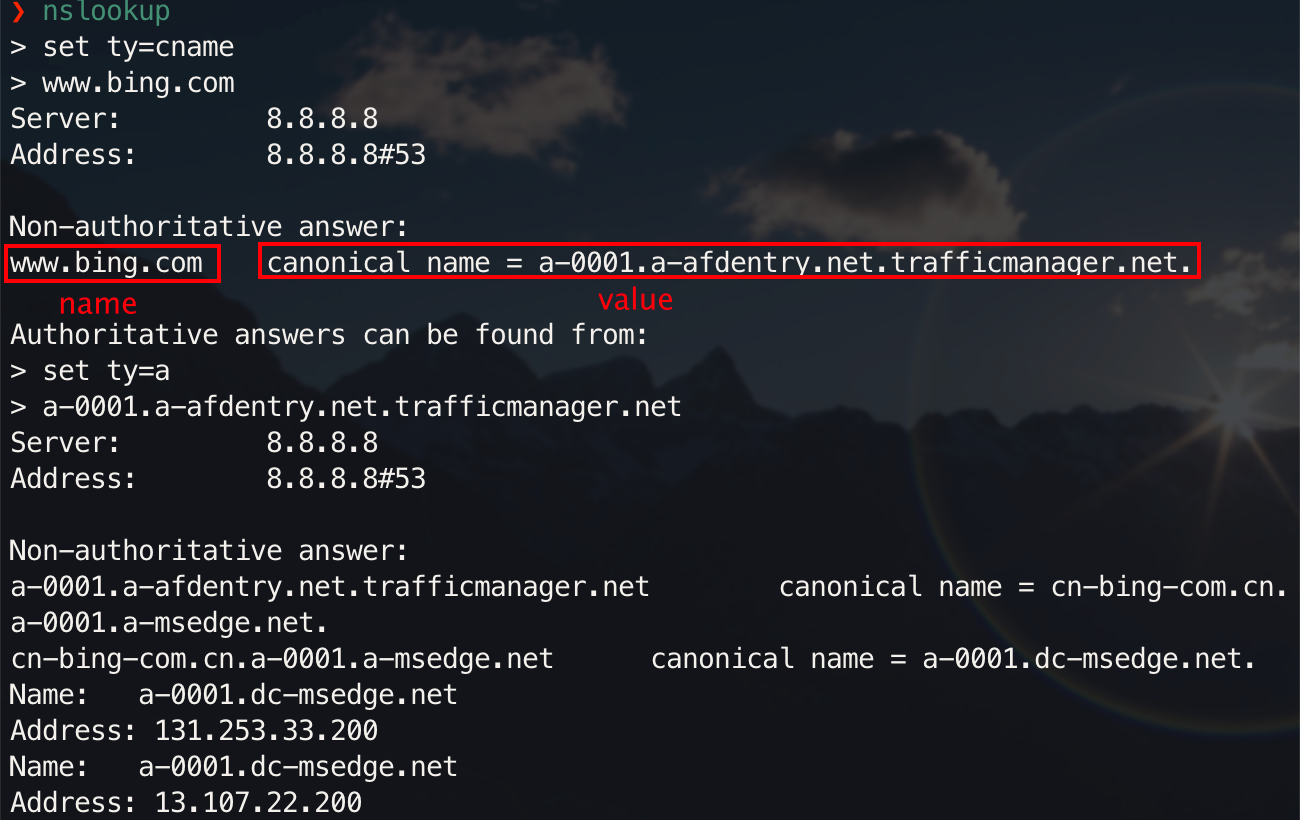
CNAME(Canonical Name record)

CNAME记录将当前 hostname 映射到另一个 hostname,相应的记录 (name, value) 中的 name 对应的是 value 的别名:

image-20210517155116154

问题答案

S1: 返回的 ns2.baidu.com ns7.baidu.com dns.baidu.com ns4.baidu.com ns3.baidu.com皆为 baidu.com 的权威 DNS 服务器。

以 dns.baidu.com 为例,NS 记录的内容: (baidu.com, dns.baidu.com)

S2: baidu.com的 ip 地址,(baidu.com, 220.181.38.148)

S3: 该次查询指定了 baidu.com 的权威DNS服务器

推荐阅读链接

nslookup 入门

十个常用命令

nslookup: Here’s how the useful DNS check works

what is meaning of non-authoritative answer

reverse-dns-lookup

dig 拓展

相关介绍有空再做

how-to-use-dig

dig 命令大全

域名系统-Wiki

详细命令空闲后补,以下多为配置文件

zsh

插件autojump的使用环境是python2

zsh 美化(Mac & Ubuntu 下通用,Windows 未尝试)

Mac 下:
Mac

Ubuntu 下:
Ubuntu

下载 Hack Nerd Font 字体,并在终端替换

安装oh-my-zsh 和 Powerlevel10k

git clone --depth=1 https://github.com/romkatv/powerlevel10k.git ${ZSH_CUSTOM:-~/.oh-my-zsh/custom}/themes/powerlevel10k

直接复制以下配置到~/.zshrc

右上角有一键复制按钮

# Enable Powerlevel10k instant prompt. Should stay close to the top of ~/.zshrc.
# Initialization code that may require console input (password prompts, [y/n]
# confirmations, etc.) must go above this block; everything else may go below.
if [[ -r "${XDG_CACHE_HOME:-$HOME/.cache}/p10k-instant-prompt-${(%):-%n}.zsh" ]]; then
source "${XDG_CACHE_HOME:-$HOME/.cache}/p10k-instant-prompt-${(%):-%n}.zsh"
fi


# Path to your oh-my-zsh installation.
export ZSH=$HOME/.oh-my-zsh

#enables colorin the terminal bash shell export
export CLICOLOR=1

#setsup thecolor scheme for list export
export LSCOLORS=gxfxcxdxbxegedabagacad

#sets up theprompt color (currently a green similar to linux terminal)
export PS1='\[\033[01;32m\]\u@\h\[\033[00m\]:\[\033[01;36m\]\w\[\033[00m\]\'
#enables colorfor iTerm
export TERM=xterm-256color

# Set name of the theme to load --- if set to "random", it will
# load a random theme each time oh-my-zsh is loaded, in which case,
# to know which specific one was loaded, run: echo $RANDOM_THEME
# See https://github.com/ohmyzsh/ohmyzsh/wiki/Themes
ZSH_THEME="powerlevel10k/powerlevel10k" #"agnoster" #"robbyrussell"

# Set list of themes to pick from when loading at random
# Setting this variable when ZSH_THEME=random will cause zsh to load
# a theme from this variable instead of looking in $ZSH/themes/
# If set to an empty array, this variable will have no effect.
# ZSH_THEME_RANDOM_CANDIDATES=( "robbyrussell" "agnoster" )

# Uncomment the following line to use case-sensitive completion.
# CASE_SENSITIVE="true"

# Uncomment the following line to use hyphen-insensitive completion.
# Case-sensitive completion must be off. _ and - will be interchangeable.
# HYPHEN_INSENSITIVE="true"

# Uncomment the following line to disable bi-weekly auto-update checks.
# DISABLE_AUTO_UPDATE="true"

# Uncomment the following line to automatically update without prompting.
# DISABLE_UPDATE_PROMPT="true"

# Uncomment the following line to change how often to auto-update (in days).
# export UPDATE_ZSH_DAYS=13

# Uncomment the following line if pasting URLs and other text is messed up.
# DISABLE_MAGIC_FUNCTIONS="true"

# Uncomment the following line to disable colors in ls.
# DISABLE_LS_COLORS="true"

# Uncomment the following line to disable auto-setting terminal title.
# DISABLE_AUTO_TITLE="true"

# Uncomment the following line to enable command auto-correction.
# ENABLE_CORRECTION="true"

# Uncomment the following line to display red dots whilst waiting for completion.
# Caution: this setting can cause issues with multiline prompts (zsh 5.7.1 and newer seem to work)
# See https://github.com/ohmyzsh/ohmyzsh/issues/5765
# COMPLETION_WAITING_DOTS="true"

# Uncomment the following line if you want to disable marking untracked files
# under VCS as dirty. This makes repository status check for large repositories
# much, much faster.
# DISABLE_UNTRACKED_FILES_DIRTY="true"

# Uncomment the following line if you want to change the command execution time
# stamp shown in the history command output.
# You can set one of the optional three formats:
# "mm/dd/yyyy"|"dd.mm.yyyy"|"yyyy-mm-dd"
# or set a custom format using the strftime function format specifications,
# see 'man strftime' for details.
# HIST_STAMPS="mm/dd/yyyy"

# Would you like to use another custom folder than $ZSH/custom?
# ZSH_CUSTOM=/path/to/new-custom-folder

# Which plugins would you like to load?
# Standard plugins can be found in $ZSH/plugins/
# Custom plugins may be added to $ZSH_CUSTOM/plugins/
# Example format: plugins=(rails git textmate ruby lighthouse)
# Add wisely, as too many plugins slow down shell startup.

source $ZSH/oh-my-zsh.sh

# To customize prompt, run `p10k configure` or edit ~/.p10k.zsh.
[[ ! -f ~/.p10k.zsh ]] || source ~/.p10k.zsh

界面美化配置

关闭再打开终端,会进入自定义的界面设置,此时设置完会生成配置文件
如果你对界面不满意或者想换成我这样的界面,那么请复制以下内容至你的~/.p10k.zsh
注: 右上角有一键复制

# Generated by Powerlevel10k configuration wizard on 2020-08-22 at 14:34 CST.
# Based on romkatv/powerlevel10k/config/p10k-rainbow.zsh, checksum 38309.
# Wizard options: nerdfont-complete + powerline, large icons, rainbow, unicode,
# 12h time, angled separators, sharp heads, flat tails, 2 lines, disconnected, no frame,
# compact, many icons, concise, instant_prompt=off.
# Type `p10k configure` to generate another config.
#
# Config for Powerlevel10k with powerline prompt style with colorful background.
# Type `p10k configure` to generate your own config based on it.
#
# Tip: Looking for a nice color? Here's a one-liner to print colormap.
#
# for i in {0..255}; do print -Pn "%K{$i} %k%F{$i}${(l:3::0:)i}%f " ${${(M)$((i%6)):#3}:+$'\n'}; done

# Temporarily change options.
'builtin' 'local' '-a' 'p10k_config_opts'
[[ ! -o 'aliases' ]] || p10k_config_opts+=('aliases')
[[ ! -o 'sh_glob' ]] || p10k_config_opts+=('sh_glob')
[[ ! -o 'no_brace_expand' ]] || p10k_config_opts+=('no_brace_expand')
'builtin' 'setopt' 'no_aliases' 'no_sh_glob' 'brace_expand'

() {
emulate -L zsh -o extended_glob

# Unset all configuration options. This allows you to apply configuration changes without
# restarting zsh. Edit ~/.p10k.zsh and type `source ~/.p10k.zsh`.
unset -m '(POWERLEVEL9K_*|DEFAULT_USER)~POWERLEVEL9K_GITSTATUS_DIR'

# Zsh >= 5.1 is required.
autoload -Uz is-at-least && is-at-least 5.1 || return

# The list of segments shown on the left. Fill it with the most important segments.
typeset -g POWERLEVEL9K_LEFT_PROMPT_ELEMENTS=(
# =========================[ Line #1 ]=========================
os_icon # os identifier
battery
context
dir # current directory
git
vcs # git status
dir_writable vi_mode
# =========================[ Line #2 ]=========================
newline # \n
prompt_char # prompt symbol
)

# The list of segments shown on the right. Fill it with less important segments.
# Right prompt on the last prompt line (where you are typing your commands) gets
# automatically hidden when the input line reaches it. Right prompt above the
# last prompt line gets hidden if it would overlap with left prompt.
typeset -g POWERLEVEL9K_RIGHT_PROMPT_ELEMENTS=(
# =========================[ Line #1 ]=========================
status background_jobs
#history
command_execution_time
wifi
ram
#load
anaconda
#ip
status # exit code of the last command
# command_execution_time # duration of the last command
background_jobs # presence of background jobs
direnv # direnv status (https://direnv.net/)
asdf # asdf version manager (https://github.com/asdf-vm/asdf)
virtualenv # python virtual environment (https://docs.python.org/3/library/venv.html)
# anaconda # conda environment (https://conda.io/)
pyenv # python environment (https://github.com/pyenv/pyenv)
goenv # go environment (https://github.com/syndbg/goenv)
nodenv # node.js version from nodenv (https://github.com/nodenv/nodenv)
nvm # node.js version from nvm (https://github.com/nvm-sh/nvm)
nodeenv # node.js environment (https://github.com/ekalinin/nodeenv)
# node_version # node.js version
# go_version # go version (https://golang.org)
# rust_version # rustc version (https://www.rust-lang.org)
# dotnet_version # .NET version (https://dotnet.microsoft.com)
# php_version # php version (https://www.php.net/)
# laravel_version # laravel php framework version (https://laravel.com/)
# java_version # java version (https://www.java.com/)
# package # name@version from package.json (https://docs.npmjs.com/files/package.json)
rbenv # ruby version from rbenv (https://github.com/rbenv/rbenv)
rvm # ruby version from rvm (https://rvm.io)
fvm # flutter version management (https://github.com/leoafarias/fvm)
luaenv # lua version from luaenv (https://github.com/cehoffman/luaenv)
jenv # java version from jenv (https://github.com/jenv/jenv)
plenv # perl version from plenv (https://github.com/tokuhirom/plenv)
phpenv # php version from phpenv (https://github.com/phpenv/phpenv)
haskell_stack # haskell version from stack (https://haskellstack.org/)
kubecontext # current kubernetes context (https://kubernetes.io/)
terraform # terraform workspace (https://www.terraform.io)
aws # aws profile (https://docs.aws.amazon.com/cli/latest/userguide/cli-configure-profiles.html)
aws_eb_env # aws elastic beanstalk environment (https://aws.amazon.com/elasticbeanstalk/)
azure # azure account name (https://docs.microsoft.com/en-us/cli/azure)
gcloud # google cloud cli account and project (https://cloud.google.com/)
google_app_cred # google application credentials (https://cloud.google.com/docs/authentication/production)
# context # user@hostname
nordvpn # nordvpn connection status, linux only (https://nordvpn.com/)
ranger # ranger shell (https://github.com/ranger/ranger)
nnn # nnn shell (https://github.com/jarun/nnn)
vim_shell # vim shell indicator (:sh)
midnight_commander # midnight commander shell (https://midnight-commander.org/)
nix_shell # nix shell (https://nixos.org/nixos/nix-pills/developing-with-nix-shell.html)
# vi_mode # vi mode (you don't need this if you've enabled prompt_char)
# vpn_ip # virtual private network indicator
# load # CPU load
# disk_usage # disk usage
# ram # free RAM
# swap # used swap
todo # todo items (https://github.com/todotxt/todo.txt-cli)
timewarrior # timewarrior tracking status (https://timewarrior.net/)
taskwarrior # taskwarrior task count (https://taskwarrior.org/)
time # current time
# =========================[ Line #2 ]=========================
newline
# ip # ip address and bandwidth usage for a specified network interface
# public_ip # public IP address
# proxy # system-wide http/https/ftp proxy
# battery # internal battery
# wifi # wifi speed
# example # example user-defined segment (see prompt_example function below)
)

# Defines character set used by powerlevel10k. It's best to let `p10k configure` set it for you.
typeset -g POWERLEVEL9K_MODE=nerdfont-complete
# When set to `moderate`, some icons will have an extra space after them. This is meant to avoid
# icon overlap when using non-monospace fonts. When set to `none`, spaces are not added.
typeset -g POWERLEVEL9K_ICON_PADDING=moderate

# When set to true, icons appear before content on both sides of the prompt. When set
# to false, icons go after content. If empty or not set, icons go before content in the left
# prompt and after content in the right prompt.
#
# You can also override it for a specific segment:
#
# POWERLEVEL9K_STATUS_ICON_BEFORE_CONTENT=false
#
# Or for a specific segment in specific state:
#
# POWERLEVEL9K_DIR_NOT_WRITABLE_ICON_BEFORE_CONTENT=false
typeset -g POWERLEVEL9K_ICON_BEFORE_CONTENT=

# Add an empty line before each prompt.
typeset -g POWERLEVEL9K_PROMPT_ADD_NEWLINE=false

# Connect left prompt lines with these symbols. You'll probably want to use the same color
# as POWERLEVEL9K_MULTILINE_FIRST_PROMPT_GAP_FOREGROUND below.
typeset -g POWERLEVEL9K_MULTILINE_FIRST_PROMPT_PREFIX=
typeset -g POWERLEVEL9K_MULTILINE_NEWLINE_PROMPT_PREFIX=
typeset -g POWERLEVEL9K_MULTILINE_LAST_PROMPT_PREFIX=
# Connect right prompt lines with these symbols.
typeset -g POWERLEVEL9K_MULTILINE_FIRST_PROMPT_SUFFIX=
typeset -g POWERLEVEL9K_MULTILINE_NEWLINE_PROMPT_SUFFIX=
typeset -g POWERLEVEL9K_MULTILINE_LAST_PROMPT_SUFFIX=

# Filler between left and right prompt on the first prompt line. You can set it to ' ', '·' or
# '─'. The last two make it easier to see the alignment between left and right prompt and to
# separate prompt from command output. You might want to set POWERLEVEL9K_PROMPT_ADD_NEWLINE=false
# for more compact prompt if using using this option.
typeset -g POWERLEVEL9K_MULTILINE_FIRST_PROMPT_GAP_CHAR=''
typeset -g POWERLEVEL9K_MULTILINE_FIRST_PROMPT_GAP_BACKGROUND=
typeset -g POWERLEVEL9K_MULTILINE_NEWLINE_PROMPT_GAP_BACKGROUND=
if [[ $POWERLEVEL9K_MULTILINE_FIRST_PROMPT_GAP_CHAR != ' ' ]]; then
# The color of the filler. You'll probably want to match the color of POWERLEVEL9K_MULTILINE
# ornaments defined above.
typeset -g POWERLEVEL9K_MULTILINE_FIRST_PROMPT_GAP_FOREGROUND=242
# Start filler from the edge of the screen if there are no left segments on the first line.
typeset -g POWERLEVEL9K_EMPTY_LINE_LEFT_PROMPT_FIRST_SEGMENT_END_SYMBOL='%{%}'
# End filler on the edge of the screen if there are no right segments on the first line.
typeset -g POWERLEVEL9K_EMPTY_LINE_RIGHT_PROMPT_FIRST_SEGMENT_START_SYMBOL='%{%}'
fi

# Separator between same-color segments on the left.
typeset -g POWERLEVEL9K_LEFT_SUBSEGMENT_SEPARATOR='\uE0B1'
# Separator between same-color segments on the right.
typeset -g POWERLEVEL9K_RIGHT_SUBSEGMENT_SEPARATOR='\uE0B3'
# Separator between different-color segments on the left.
typeset -g POWERLEVEL9K_LEFT_SEGMENT_SEPARATOR='\uE0B0'
# Separator between different-color segments on the right.
typeset -g POWERLEVEL9K_RIGHT_SEGMENT_SEPARATOR='\uE0B2'
# The right end of left prompt.
typeset -g POWERLEVEL9K_LEFT_PROMPT_LAST_SEGMENT_END_SYMBOL='\uE0B0'
# The left end of right prompt.
typeset -g POWERLEVEL9K_RIGHT_PROMPT_FIRST_SEGMENT_START_SYMBOL='\uE0B2'
# The left end of left prompt.
typeset -g POWERLEVEL9K_LEFT_PROMPT_FIRST_SEGMENT_START_SYMBOL=''
# The right end of right prompt.
typeset -g POWERLEVEL9K_RIGHT_PROMPT_LAST_SEGMENT_END_SYMBOL=''
# Left prompt terminator for lines without any segments.
typeset -g POWERLEVEL9K_EMPTY_LINE_LEFT_PROMPT_LAST_SEGMENT_END_SYMBOL=

#################################[ os_icon: os identifier ]##################################
# OS identifier color.
typeset -g POWERLEVEL9K_OS_ICON_FOREGROUND=232
typeset -g POWERLEVEL9K_OS_ICON_BACKGROUND=7
# Custom icon.
# typeset -g POWERLEVEL9K_OS_ICON_CONTENT_EXPANSION='⭐'

################################[ prompt_char: prompt symbol ]################################
# Transparent background.
typeset -g POWERLEVEL9K_PROMPT_CHAR_BACKGROUND=
# Green prompt symbol if the last command succeeded.
typeset -g POWERLEVEL9K_PROMPT_CHAR_OK_{VIINS,VICMD,VIVIS,VIOWR}_FOREGROUND=76
# Red prompt symbol if the last command failed.
typeset -g POWERLEVEL9K_PROMPT_CHAR_ERROR_{VIINS,VICMD,VIVIS,VIOWR}_FOREGROUND=196
# Default prompt symbol.
typeset -g POWERLEVEL9K_PROMPT_CHAR_{OK,ERROR}_VIINS_CONTENT_EXPANSION='❯'
# Prompt symbol in command vi mode.
typeset -g POWERLEVEL9K_PROMPT_CHAR_{OK,ERROR}_VICMD_CONTENT_EXPANSION='❮'
# Prompt symbol in visual vi mode.
typeset -g POWERLEVEL9K_PROMPT_CHAR_{OK,ERROR}_VIVIS_CONTENT_EXPANSION='V'
# Prompt symbol in overwrite vi mode.
typeset -g POWERLEVEL9K_PROMPT_CHAR_{OK,ERROR}_VIOWR_CONTENT_EXPANSION='▶'
typeset -g POWERLEVEL9K_PROMPT_CHAR_OVERWRITE_STATE=true
# No line terminator if prompt_char is the last segment.
typeset -g POWERLEVEL9K_PROMPT_CHAR_LEFT_PROMPT_LAST_SEGMENT_END_SYMBOL=
# No line introducer if prompt_char is the first segment.
typeset -g POWERLEVEL9K_PROMPT_CHAR_LEFT_PROMPT_FIRST_SEGMENT_START_SYMBOL=
# No surrounding whitespace.
typeset -g POWERLEVEL9K_PROMPT_CHAR_LEFT_{LEFT,RIGHT}_WHITESPACE=

##################################[ dir: current directory ]##################################
# Current directory background color.
typeset -g POWERLEVEL9K_DIR_BACKGROUND=4
# Default current directory foreground color.
typeset -g POWERLEVEL9K_DIR_FOREGROUND=254
# If directory is too long, shorten some of its segments to the shortest possible unique
# prefix. The shortened directory can be tab-completed to the original.
typeset -g POWERLEVEL9K_SHORTEN_STRATEGY=truncate_to_unique
# Replace removed segment suffixes with this symbol.
typeset -g POWERLEVEL9K_SHORTEN_DELIMITER=
# Color of the shortened directory segments.
typeset -g POWERLEVEL9K_DIR_SHORTENED_FOREGROUND=250
# Color of the anchor directory segments. Anchor segments are never shortened. The first
# segment is always an anchor.
typeset -g POWERLEVEL9K_DIR_ANCHOR_FOREGROUND=255
# Display anchor directory segments in bold.
typeset -g POWERLEVEL9K_DIR_ANCHOR_BOLD=true
# Don't shorten directories that contain any of these files. They are anchors.
local anchor_files=(
.bzr
.citc
.git
.hg
.node-version
.python-version
.go-version
.ruby-version
.lua-version
.java-version
.perl-version
.php-version
.tool-version
.shorten_folder_marker
.svn
.terraform
CVS
Cargo.toml
composer.json
go.mod
package.json
stack.yaml
)
typeset -g POWERLEVEL9K_SHORTEN_FOLDER_MARKER="(${(j:|:)anchor_files})"
# If set to "first" ("last"), remove everything before the first (last) subdirectory that contains
# files matching $POWERLEVEL9K_SHORTEN_FOLDER_MARKER. For example, when the current directory is
# /foo/bar/git_repo/nested_git_repo/baz, prompt will display git_repo/nested_git_repo/baz (first)
# or nested_git_repo/baz (last). This assumes that git_repo and nested_git_repo contain markers
# and other directories don't.
#
# Optionally, "first" and "last" can be followed by ":<offset>" where <offset> is an integer.
# This moves the truncation point to the right (positive offset) or to the left (negative offset)
# relative to the marker. Plain "first" and "last" are equivalent to "first:0" and "last:0"
# respectively.
typeset -g POWERLEVEL9K_DIR_TRUNCATE_BEFORE_MARKER=false
# Don't shorten this many last directory segments. They are anchors.
typeset -g POWERLEVEL9K_SHORTEN_DIR_LENGTH=1
# Shorten directory if it's longer than this even if there is space for it. The value can
# be either absolute (e.g., '80') or a percentage of terminal width (e.g, '50%'). If empty,
# directory will be shortened only when prompt doesn't fit or when other parameters demand it
# (see POWERLEVEL9K_DIR_MIN_COMMAND_COLUMNS and POWERLEVEL9K_DIR_MIN_COMMAND_COLUMNS_PCT below).
# If set to `0`, directory will always be shortened to its minimum length.
typeset -g POWERLEVEL9K_DIR_MAX_LENGTH=80
# When `dir` segment is on the last prompt line, try to shorten it enough to leave at least this
# many columns for typing commands.
typeset -g POWERLEVEL9K_DIR_MIN_COMMAND_COLUMNS=40
# When `dir` segment is on the last prompt line, try to shorten it enough to leave at least
# COLUMNS * POWERLEVEL9K_DIR_MIN_COMMAND_COLUMNS_PCT * 0.01 columns for typing commands.
typeset -g POWERLEVEL9K_DIR_MIN_COMMAND_COLUMNS_PCT=50
# If set to true, embed a hyperlink into the directory. Useful for quickly
# opening a directory in the file manager simply by clicking the link.
# Can also be handy when the directory is shortened, as it allows you to see
# the full directory that was used in previous commands.
typeset -g POWERLEVEL9K_DIR_HYPERLINK=false

# Enable special styling for non-writable directories. See POWERLEVEL9K_LOCK_ICON and
# POWERLEVEL9K_DIR_CLASSES below.
typeset -g POWERLEVEL9K_DIR_SHOW_WRITABLE=v2

# The default icon shown next to non-writable directories when POWERLEVEL9K_DIR_SHOW_WRITABLE is
# set to v2.
# typeset -g POWERLEVEL9K_LOCK_ICON='⭐'

# POWERLEVEL9K_DIR_CLASSES allows you to specify custom icons and colors for different
# directories. It must be an array with 3 * N elements. Each triplet consists of:
#
# 1. A pattern against which the current directory ($PWD) is matched. Matching is done with
# extended_glob option enabled.
# 2. Directory class for the purpose of styling.
# 3. An empty string.
#
# Triplets are tried in order. The first triplet whose pattern matches $PWD wins.
#
# If POWERLEVEL9K_DIR_SHOW_WRITABLE is set to v2 and the current directory is not writable,
# its class gets suffix _NOT_WRITABLE.
#
# For example, given these settings:
#
# typeset -g POWERLEVEL9K_DIR_CLASSES=(
# '~/work(|/*)' WORK ''
# '~(|/*)' HOME ''
# '*' DEFAULT '')
#
# Whenever the current directory is ~/work or a subdirectory of ~/work, it gets styled with class
# WORK or WORK_NOT_WRITABLE.
#
# Simply assigning classes to directories don't have any visible effects. It merely gives you an
# option to define custom colors and icons for different directory classes.
#
# # Styling for WORK.
# typeset -g POWERLEVEL9K_DIR_WORK_VISUAL_IDENTIFIER_EXPANSION='⭐'
# typeset -g POWERLEVEL9K_DIR_WORK_BACKGROUND=4
# typeset -g POWERLEVEL9K_DIR_WORK_FOREGROUND=254
# typeset -g POWERLEVEL9K_DIR_WORK_SHORTENED_FOREGROUND=250
# typeset -g POWERLEVEL9K_DIR_WORK_ANCHOR_FOREGROUND=255
#
# # Styling for WORK_NOT_WRITABLE.
# typeset -g POWERLEVEL9K_DIR_WORK_NOT_WRITABLE_VISUAL_IDENTIFIER_EXPANSION='⭐'
# typeset -g POWERLEVEL9K_DIR_WORK_NOT_WRITABLE_BACKGROUND=4
# typeset -g POWERLEVEL9K_DIR_WORK_NOT_WRITABLE_FOREGROUND=254
# typeset -g POWERLEVEL9K_DIR_WORK_NOT_WRITABLE_SHORTENED_FOREGROUND=250
# typeset -g POWERLEVEL9K_DIR_WORK_NOT_WRITABLE_ANCHOR_FOREGROUND=255
#
# If a styling parameter isn't explicitly defined for some class, it falls back to the classless
# parameter. For example, if POWERLEVEL9K_DIR_WORK_NOT_WRITABLE_FOREGROUND is not set, it falls
# back to POWERLEVEL9K_DIR_FOREGROUND.
#
# typeset -g POWERLEVEL9K_DIR_CLASSES=()

# Custom prefix.
# typeset -g POWERLEVEL9K_DIR_PREFIX='in '

#####################################[ vcs: git status ]######################################
# Version control system colors.
typeset -g POWERLEVEL9K_VCS_CLEAN_BACKGROUND=2
typeset -g POWERLEVEL9K_VCS_MODIFIED_BACKGROUND=3
typeset -g POWERLEVEL9K_VCS_UNTRACKED_BACKGROUND=2
typeset -g POWERLEVEL9K_VCS_CONFLICTED_BACKGROUND=3
typeset -g POWERLEVEL9K_VCS_LOADING_BACKGROUND=8

# Branch icon. Set this parameter to '\uF126 ' for the popular Powerline branch icon.
typeset -g POWERLEVEL9K_VCS_BRANCH_ICON='\uF126 '

# Untracked files icon. It's really a question mark, your font isn't broken.
# Change the value of this parameter to show a different icon.
typeset -g POWERLEVEL9K_VCS_UNTRACKED_ICON='?'

# Formatter for Git status.
#
# Example output: master ⇣42⇡42 *42 merge ~42 +42 !42 ?42.
#
# You can edit the function to customize how Git status looks.
#
# VCS_STATUS_* parameters are set by gitstatus plugin. See reference:
# https://github.com/romkatv/gitstatus/blob/master/gitstatus.plugin.zsh.
function my_git_formatter() {
emulate -L zsh

if [[ -n $P9K_CONTENT ]]; then
# If P9K_CONTENT is not empty, use it. It's either "loading" or from vcs_info (not from
# gitstatus plugin). VCS_STATUS_* parameters are not available in this case.
typeset -g my_git_format=$P9K_CONTENT
return
fi

# Styling for different parts of Git status.
local meta='%7F' # white foreground
local clean='%0F' # black foreground
local modified='%0F' # black foreground
local untracked='%0F' # black foreground
local conflicted='%1F' # red foreground

local res
local where # branch or tag
if [[ -n $VCS_STATUS_LOCAL_BRANCH ]]; then
res+="${clean}${(g::)POWERLEVEL9K_VCS_BRANCH_ICON}"
where=${(V)VCS_STATUS_LOCAL_BRANCH}
elif [[ -n $VCS_STATUS_TAG ]]; then
res+="${meta}#"
where=${(V)VCS_STATUS_TAG}
fi

# If local branch name or tag is at most 32 characters long, show it in full.
# Otherwise show the first 12 … the last 12.
# Tip: To always show local branch name in full without truncation, delete the next line.
(( $#where > 32 )) && where[13,-13]="…"
res+="${clean}${where//\%/%%}" # escape %

# Display the current Git commit if there is no branch or tag.
# Tip: To always display the current Git commit, remove `[[ -z $where ]] &&` from the next line.
[[ -z $where ]] && res+="${meta}@${clean}${VCS_STATUS_COMMIT[1,8]}"

# Show tracking branch name if it differs from local branch.
if [[ -n ${VCS_STATUS_REMOTE_BRANCH:#$VCS_STATUS_LOCAL_BRANCH} ]]; then
res+="${meta}:${clean}${(V)VCS_STATUS_REMOTE_BRANCH//\%/%%}" # escape %
fi

# ⇣42 if behind the remote.
(( VCS_STATUS_COMMITS_BEHIND )) && res+=" ${clean}${VCS_STATUS_COMMITS_BEHIND}"
# ⇡42 if ahead of the remote; no leading space if also behind the remote: ⇣42⇡42.
(( VCS_STATUS_COMMITS_AHEAD && !VCS_STATUS_COMMITS_BEHIND )) && res+=" "
(( VCS_STATUS_COMMITS_AHEAD )) && res+="${clean}${VCS_STATUS_COMMITS_AHEAD}"
# ⇠42 if behind the push remote.
(( VCS_STATUS_PUSH_COMMITS_BEHIND )) && res+=" ${clean}${VCS_STATUS_PUSH_COMMITS_BEHIND}"
(( VCS_STATUS_PUSH_COMMITS_AHEAD && !VCS_STATUS_PUSH_COMMITS_BEHIND )) && res+=" "
# ⇢42 if ahead of the push remote; no leading space if also behind: ⇠42⇢42.
(( VCS_STATUS_PUSH_COMMITS_AHEAD )) && res+="${clean}${VCS_STATUS_PUSH_COMMITS_AHEAD}"
# *42 if have stashes.
(( VCS_STATUS_STASHES )) && res+=" ${clean}*${VCS_STATUS_STASHES}"
# 'merge' if the repo is in an unusual state.
[[ -n $VCS_STATUS_ACTION ]] && res+=" ${conflicted}${VCS_STATUS_ACTION}"
# ~42 if have merge conflicts.
(( VCS_STATUS_NUM_CONFLICTED )) && res+=" ${conflicted}~${VCS_STATUS_NUM_CONFLICTED}"
# +42 if have staged changes.
(( VCS_STATUS_NUM_STAGED )) && res+=" ${modified}+${VCS_STATUS_NUM_STAGED}"
# !42 if have unstaged changes.
(( VCS_STATUS_NUM_UNSTAGED )) && res+=" ${modified}!${VCS_STATUS_NUM_UNSTAGED}"
# ?42 if have untracked files. It's really a question mark, your font isn't broken.
# See POWERLEVEL9K_VCS_UNTRACKED_ICON above if you want to use a different icon.
# Remove the next line if you don't want to see untracked files at all.
(( VCS_STATUS_NUM_UNTRACKED )) && res+=" ${untracked}${(g::)POWERLEVEL9K_VCS_UNTRACKED_ICON}${VCS_STATUS_NUM_UNTRACKED}"
# "─" if the number of unstaged files is unknown. This can happen due to
# POWERLEVEL9K_VCS_MAX_INDEX_SIZE_DIRTY (see below) being set to a non-negative number lower
# than the number of files in the Git index, or due to bash.showDirtyState being set to false
# in the repository config. The number of staged and untracked files may also be unknown
# in this case.
(( VCS_STATUS_HAS_UNSTAGED == -1 )) && res+=" ${modified}─"

typeset -g my_git_format=$res
}
functions -M my_git_formatter 2>/dev/null

# Don't count the number of unstaged, untracked and conflicted files in Git repositories with
# more than this many files in the index. Negative value means infinity.
#
# If you are working in Git repositories with tens of millions of files and seeing performance
# sagging, try setting POWERLEVEL9K_VCS_MAX_INDEX_SIZE_DIRTY to a number lower than the output
# of `git ls-files | wc -l`. Alternatively, add `bash.showDirtyState = false` to the repository's
# config: `git config bash.showDirtyState false`.
typeset -g POWERLEVEL9K_VCS_MAX_INDEX_SIZE_DIRTY=-1

# Don't show Git status in prompt for repositories whose workdir matches this pattern.
# For example, if set to '~', the Git repository at $HOME/.git will be ignored.
# Multiple patterns can be combined with '|': '~(|/foo)|/bar/baz/*'.
typeset -g POWERLEVEL9K_VCS_DISABLED_WORKDIR_PATTERN='~'

# Disable the default Git status formatting.
typeset -g POWERLEVEL9K_VCS_DISABLE_GITSTATUS_FORMATTING=true
# Install our own Git status formatter.
typeset -g POWERLEVEL9K_VCS_CONTENT_EXPANSION='${$((my_git_formatter()))+${my_git_format}}'
# Enable counters for staged, unstaged, etc.
typeset -g POWERLEVEL9K_VCS_{STAGED,UNSTAGED,UNTRACKED,CONFLICTED,COMMITS_AHEAD,COMMITS_BEHIND}_MAX_NUM=-1

# Custom icon.
# typeset -g POWERLEVEL9K_VCS_VISUAL_IDENTIFIER_EXPANSION='⭐'
# Custom prefix.
# typeset -g POWERLEVEL9K_VCS_PREFIX='on '

# Show status of repositories of these types. You can add svn and/or hg if you are
# using them. If you do, your prompt may become slow even when your current directory
# isn't in an svn or hg reposotiry.
typeset -g POWERLEVEL9K_VCS_BACKENDS=(git)

##########################[ status: exit code of the last command ]###########################
# Enable OK_PIPE, ERROR_PIPE and ERROR_SIGNAL status states to allow us to enable, disable and
# style them independently from the regular OK and ERROR state.
typeset -g POWERLEVEL9K_STATUS_EXTENDED_STATES=true

# Status on success. No content, just an icon. No need to show it if prompt_char is enabled as
# it will signify success by turning green.
typeset -g POWERLEVEL9K_STATUS_OK=false
typeset -g POWERLEVEL9K_STATUS_OK_VISUAL_IDENTIFIER_EXPANSION='✔'
typeset -g POWERLEVEL9K_STATUS_OK_FOREGROUND=2
typeset -g POWERLEVEL9K_STATUS_OK_BACKGROUND=0

# Status when some part of a pipe command fails but the overall exit status is zero. It may look
# like this: 1|0.
typeset -g POWERLEVEL9K_STATUS_OK_PIPE=true
typeset -g POWERLEVEL9K_STATUS_OK_PIPE_VISUAL_IDENTIFIER_EXPANSION='✔'
typeset -g POWERLEVEL9K_STATUS_OK_PIPE_FOREGROUND=2
typeset -g POWERLEVEL9K_STATUS_OK_PIPE_BACKGROUND=0

# Status when it's just an error code (e.g., '1'). No need to show it if prompt_char is enabled as
# it will signify error by turning red.
typeset -g POWERLEVEL9K_STATUS_ERROR=false
typeset -g POWERLEVEL9K_STATUS_ERROR_VISUAL_IDENTIFIER_EXPANSION='✘'
typeset -g POWERLEVEL9K_STATUS_ERROR_FOREGROUND=3
typeset -g POWERLEVEL9K_STATUS_ERROR_BACKGROUND=1

# Status when the last command was terminated by a signal.
typeset -g POWERLEVEL9K_STATUS_ERROR_SIGNAL=true
# Use terse signal names: "INT" instead of "SIGINT(2)".
typeset -g POWERLEVEL9K_STATUS_VERBOSE_SIGNAME=false
typeset -g POWERLEVEL9K_STATUS_ERROR_SIGNAL_VISUAL_IDENTIFIER_EXPANSION='✘'
typeset -g POWERLEVEL9K_STATUS_ERROR_SIGNAL_FOREGROUND=3
typeset -g POWERLEVEL9K_STATUS_ERROR_SIGNAL_BACKGROUND=1

# Status when some part of a pipe command fails and the overall exit status is also non-zero.
# It may look like this: 1|0.
typeset -g POWERLEVEL9K_STATUS_ERROR_PIPE=true
typeset -g POWERLEVEL9K_STATUS_ERROR_PIPE_VISUAL_IDENTIFIER_EXPANSION='✘'
typeset -g POWERLEVEL9K_STATUS_ERROR_PIPE_FOREGROUND=3
typeset -g POWERLEVEL9K_STATUS_ERROR_PIPE_BACKGROUND=1

###################[ command_execution_time: duration of the last command ]###################
# Execution time color.
typeset -g POWERLEVEL9K_COMMAND_EXECUTION_TIME_FOREGROUND=0
typeset -g POWERLEVEL9K_COMMAND_EXECUTION_TIME_BACKGROUND=10
# Show duration of the last command if takes at least this many seconds.
typeset -g POWERLEVEL9K_COMMAND_EXECUTION_TIME_THRESHOLD=0
# Show this many fractional digits. Zero means round to seconds.
typeset -g POWERLEVEL9K_COMMAND_EXECUTION_TIME_PRECISION=2
# Duration format: 1d 2h 3m 4s.
typeset -g POWERLEVEL9K_COMMAND_EXECUTION_TIME_FORMAT='d h m s'
# Custom icon.
# typeset -g POWERLEVEL9K_COMMAND_EXECUTION_TIME_VISUAL_IDENTIFIER_EXPANSION='⭐'
# Custom prefix.
typeset -g POWERLEVEL9K_COMMAND_EXECUTION_TIME_PREFIX='took '

#######################[ background_jobs: presence of background jobs ]#######################
# Background jobs color.
typeset -g POWERLEVEL9K_BACKGROUND_JOBS_FOREGROUND=6
typeset -g POWERLEVEL9K_BACKGROUND_JOBS_BACKGROUND=0
# Don't show the number of background jobs.
typeset -g POWERLEVEL9K_BACKGROUND_JOBS_VERBOSE=false
# Custom icon.
# typeset -g POWERLEVEL9K_BACKGROUND_JOBS_VISUAL_IDENTIFIER_EXPANSION='⭐'

#######################[ direnv: direnv status (https://direnv.net/) ]########################
# Direnv color.
# typeset -g POWERLEVEL9K_DIRENV_FOREGROUND=3
# typeset -g POWERLEVEL9K_DIRENV_BACKGROUND=0
# Custom icon.
# typeset -g POWERLEVEL9K_DIRENV_VISUAL_IDENTIFIER_EXPANSION='⭐'

###############[ asdf: asdf version manager (https://github.com/asdf-vm/asdf) ]###############
# Default asdf color. Only used to display tools for which there is no color override (see below).
# Tip: Override these parameters for ${TOOL} with POWERLEVEL9K_ASDF_${TOOL}_FOREGROUND and
# POWERLEVEL9K_ASDF_${TOOL}_BACKGROUND.
typeset -g POWERLEVEL9K_ASDF_FOREGROUND=0
typeset -g POWERLEVEL9K_ASDF_BACKGROUND=7

# There are four parameters that can be used to hide asdf tools. Each parameter describes
# conditions under which a tool gets hidden. Parameters can hide tools but not unhide them. If at
# least one parameter decides to hide a tool, that tool gets hidden. If no parameter decides to
# hide a tool, it gets shown.
#
# Special note on the difference between POWERLEVEL9K_ASDF_SOURCES and
# POWERLEVEL9K_ASDF_PROMPT_ALWAYS_SHOW. Consider the effect of the following commands:
#
# asdf local python 3.8.1
# asdf global python 3.8.1
#
# After running both commands the current python version is 3.8.1 and its source is "local" as
# it takes precedence over "global". If POWERLEVEL9K_ASDF_PROMPT_ALWAYS_SHOW is set to false,
# it'll hide python version in this case because 3.8.1 is the same as the global version.
# POWERLEVEL9K_ASDF_SOURCES will hide python version only if the value of this parameter doesn't
# contain "local".

# Hide tool versions that don't come from one of these sources.
#
# Available sources:
#
# - shell `asdf current` says "set by ASDF_${TOOL}_VERSION environment variable"
# - local `asdf current` says "set by /some/not/home/directory/file"
# - global `asdf current` says "set by /home/username/file"
#
# Note: If this parameter is set to (shell local global), it won't hide tools.
# Tip: Override this parameter for ${TOOL} with POWERLEVEL9K_ASDF_${TOOL}_SOURCES.
typeset -g POWERLEVEL9K_ASDF_SOURCES=(shell local global)

# If set to false, hide tool versions that are the same as global.
#
# Note: The name of this parameter doesn't reflect its meaning at all.
# Note: If this parameter is set to true, it won't hide tools.
# Tip: Override this parameter for ${TOOL} with POWERLEVEL9K_ASDF_${TOOL}_PROMPT_ALWAYS_SHOW.
typeset -g POWERLEVEL9K_ASDF_PROMPT_ALWAYS_SHOW=false

# If set to false, hide tool versions that are equal to "system".
#
# Note: If this parameter is set to true, it won't hide tools.
# Tip: Override this parameter for ${TOOL} with POWERLEVEL9K_ASDF_${TOOL}_SHOW_SYSTEM.
typeset -g POWERLEVEL9K_ASDF_SHOW_SYSTEM=true

# If set to non-empty value, hide tools unless there is a file matching the specified file pattern
# in the current directory, or its parent diretory, or its grandparent directory, and so on.
#
# Note: If this parameter is set to empty value, it won't hide tools.
# Note: SHOW_ON_UPGLOB isn't specific to asdf. It works with all prompt segments.
# Tip: Override this parameter for ${TOOL} with POWERLEVEL9K_ASDF_${TOOL}_SHOW_ON_UPGLOB.
#
# Example: Hide nodejs version when there is no package.json and no *.js files in the current
# directory, in `..`, in `../..` and so on.
#
# typeset -g POWERLEVEL9K_ASDF_NODEJS_SHOW_ON_UPGLOB='*.js|package.json'
typeset -g POWERLEVEL9K_ASDF_SHOW_ON_UPGLOB=

# Ruby version from asdf.
typeset -g POWERLEVEL9K_ASDF_RUBY_FOREGROUND=0
typeset -g POWERLEVEL9K_ASDF_RUBY_BACKGROUND=1
# typeset -g POWERLEVEL9K_ASDF_RUBY_VISUAL_IDENTIFIER_EXPANSION='⭐'
# typeset -g POWERLEVEL9K_ASDF_RUBY_SHOW_ON_UPGLOB='*.foo|*.bar'

# Python version from asdf.
typeset -g POWERLEVEL9K_ASDF_PYTHON_FOREGROUND=0
typeset -g POWERLEVEL9K_ASDF_PYTHON_BACKGROUND=4
# typeset -g POWERLEVEL9K_ASDF_PYTHON_VISUAL_IDENTIFIER_EXPANSION='⭐'
# typeset -g POWERLEVEL9K_ASDF_PYTHON_SHOW_ON_UPGLOB='*.foo|*.bar'

# Go version from asdf.
typeset -g POWERLEVEL9K_ASDF_GOLANG_FOREGROUND=0
typeset -g POWERLEVEL9K_ASDF_GOLANG_BACKGROUND=4
# typeset -g POWERLEVEL9K_ASDF_GOLANG_VISUAL_IDENTIFIER_EXPANSION='⭐'
# typeset -g POWERLEVEL9K_ASDF_GOLANG_SHOW_ON_UPGLOB='*.foo|*.bar'

# Node.js version from asdf.
typeset -g POWERLEVEL9K_ASDF_NODEJS_FOREGROUND=0
typeset -g POWERLEVEL9K_ASDF_NODEJS_BACKGROUND=2
# typeset -g POWERLEVEL9K_ASDF_NODEJS_VISUAL_IDENTIFIER_EXPANSION='⭐'
# typeset -g POWERLEVEL9K_ASDF_NODEJS_SHOW_ON_UPGLOB='*.foo|*.bar'

# Rust version from asdf.
typeset -g POWERLEVEL9K_ASDF_RUST_FOREGROUND=0
typeset -g POWERLEVEL9K_ASDF_RUST_BACKGROUND=208
# typeset -g POWERLEVEL9K_ASDF_RUST_VISUAL_IDENTIFIER_EXPANSION='⭐'
# typeset -g POWERLEVEL9K_ASDF_RUST_SHOW_ON_UPGLOB='*.foo|*.bar'

# .NET Core version from asdf.
typeset -g POWERLEVEL9K_ASDF_DOTNET_CORE_FOREGROUND=0
typeset -g POWERLEVEL9K_ASDF_DOTNET_CORE_BACKGROUND=5
# typeset -g POWERLEVEL9K_ASDF_DOTNET_CORE_VISUAL_IDENTIFIER_EXPANSION='⭐'
# typeset -g POWERLEVEL9K_ASDF_DOTNET_CORE_SHOW_ON_UPGLOB='*.foo|*.bar'

# Flutter version from asdf.
typeset -g POWERLEVEL9K_ASDF_FLUTTER_FOREGROUND=0
typeset -g POWERLEVEL9K_ASDF_FLUTTER_BACKGROUND=4
# typeset -g POWERLEVEL9K_ASDF_FLUTTER_VISUAL_IDENTIFIER_EXPANSION='⭐'
# typeset -g POWERLEVEL9K_ASDF_FLUTTER_SHOW_ON_UPGLOB='*.foo|*.bar'

# Lua version from asdf.
typeset -g POWERLEVEL9K_ASDF_LUA_FOREGROUND=0
typeset -g POWERLEVEL9K_ASDF_LUA_BACKGROUND=4
# typeset -g POWERLEVEL9K_ASDF_LUA_VISUAL_IDENTIFIER_EXPANSION='⭐'
# typeset -g POWERLEVEL9K_ASDF_LUA_SHOW_ON_UPGLOB='*.foo|*.bar'

# Java version from asdf.
typeset -g POWERLEVEL9K_ASDF_JAVA_FOREGROUND=1
typeset -g POWERLEVEL9K_ASDF_JAVA_BACKGROUND=7
# typeset -g POWERLEVEL9K_ASDF_JAVA_VISUAL_IDENTIFIER_EXPANSION='⭐'
# typeset -g POWERLEVEL9K_ASDF_JAVA_SHOW_ON_UPGLOB='*.foo|*.bar'

# Perl version from asdf.
typeset -g POWERLEVEL9K_ASDF_PERL_FOREGROUND=0
typeset -g POWERLEVEL9K_ASDF_PERL_BACKGROUND=4
# typeset -g POWERLEVEL9K_ASDF_PERL_VISUAL_IDENTIFIER_EXPANSION='⭐'
# typeset -g POWERLEVEL9K_ASDF_PERL_SHOW_ON_UPGLOB='*.foo|*.bar'

# Erlang version from asdf.
typeset -g POWERLEVEL9K_ASDF_ERLANG_FOREGROUND=0
typeset -g POWERLEVEL9K_ASDF_ERLANG_BACKGROUND=1
# typeset -g POWERLEVEL9K_ASDF_ERLANG_VISUAL_IDENTIFIER_EXPANSION='⭐'
# typeset -g POWERLEVEL9K_ASDF_ERLANG_SHOW_ON_UPGLOB='*.foo|*.bar'

# Elixir version from asdf.
typeset -g POWERLEVEL9K_ASDF_ELIXIR_FOREGROUND=0
typeset -g POWERLEVEL9K_ASDF_ELIXIR_BACKGROUND=5
# typeset -g POWERLEVEL9K_ASDF_ELIXIR_VISUAL_IDENTIFIER_EXPANSION='⭐'
# typeset -g POWERLEVEL9K_ASDF_ELIXIR_SHOW_ON_UPGLOB='*.foo|*.bar'

# Postgres version from asdf.
typeset -g POWERLEVEL9K_ASDF_POSTGRES_FOREGROUND=0
typeset -g POWERLEVEL9K_ASDF_POSTGRES_BACKGROUND=6
# typeset -g POWERLEVEL9K_ASDF_POSTGRES_VISUAL_IDENTIFIER_EXPANSION='⭐'
# typeset -g POWERLEVEL9K_ASDF_POSTGRES_SHOW_ON_UPGLOB='*.foo|*.bar'

# PHP version from asdf.
typeset -g POWERLEVEL9K_ASDF_PHP_FOREGROUND=0
typeset -g POWERLEVEL9K_ASDF_PHP_BACKGROUND=5
# typeset -g POWERLEVEL9K_ASDF_PHP_VISUAL_IDENTIFIER_EXPANSION='⭐'
# typeset -g POWERLEVEL9K_ASDF_PHP_SHOW_ON_UPGLOB='*.foo|*.bar'

# Haskell version from asdf.
typeset -g POWERLEVEL9K_ASDF_HASKELL_FOREGROUND=0
typeset -g POWERLEVEL9K_ASDF_HASKELL_BACKGROUND=3
# typeset -g POWERLEVEL9K_ASDF_HASKELL_VISUAL_IDENTIFIER_EXPANSION='⭐'
# typeset -g POWERLEVEL9K_ASDF_HASKELL_SHOW_ON_UPGLOB='*.foo|*.bar'

# Julia version from asdf.
typeset -g POWERLEVEL9K_ASDF_JULIA_FOREGROUND=0
typeset -g POWERLEVEL9K_ASDF_JULIA_BACKGROUND=2
# typeset -g POWERLEVEL9K_ASDF_JULIA_VISUAL_IDENTIFIER_EXPANSION='⭐'
# typeset -g POWERLEVEL9K_ASDF_JULIA_SHOW_ON_UPGLOB='*.foo|*.bar'

##########[ nordvpn: nordvpn connection status, linux only (https://nordvpn.com/) ]###########
# NordVPN connection indicator color.
# typeset -g POWERLEVEL9K_NORDVPN_FOREGROUND=7
# typeset -g POWERLEVEL9K_NORDVPN_BACKGROUND=4
# Hide NordVPN connection indicator when not connected.
typeset -g POWERLEVEL9K_NORDVPN_{DISCONNECTED,CONNECTING,DISCONNECTING}_CONTENT_EXPANSION=
typeset -g POWERLEVEL9K_NORDVPN_{DISCONNECTED,CONNECTING,DISCONNECTING}_VISUAL_IDENTIFIER_EXPANSION=
# Custom icon.
# typeset -g POWERLEVEL9K_NORDVPN_VISUAL_IDENTIFIER_EXPANSION='⭐'

#################[ ranger: ranger shell (https://github.com/ranger/ranger) ]##################
# Ranger shell color.
# typeset -g POWERLEVEL9K_RANGER_FOREGROUND=3
# typeset -g POWERLEVEL9K_RANGER_BACKGROUND=0
# Custom icon.
# typeset -g POWERLEVEL9K_RANGER_VISUAL_IDENTIFIER_EXPANSION='⭐'

######################[ nnn: nnn shell (https://github.com/jarun/nnn) ]#######################
# Nnn shell color.
# typeset -g POWERLEVEL9K_NNN_FOREGROUND=0
# typeset -g POWERLEVEL9K_NNN_BACKGROUND=6
# Custom icon.
# typeset -g POWERLEVEL9K_NNN_VISUAL_IDENTIFIER_EXPANSION='⭐'

###########################[ vim_shell: vim shell indicator (:sh) ]###########################
# Vim shell indicator color.
# typeset -g POWERLEVEL9K_VIM_SHELL_FOREGROUND=0
# typeset -g POWERLEVEL9K_VIM_SHELL_BACKGROUND=2
# Custom icon.
# typeset -g POWERLEVEL9K_VIM_SHELL_VISUAL_IDENTIFIER_EXPANSION='⭐'

######[ midnight_commander: midnight commander shell (https://midnight-commander.org/) ]######
# Midnight Commander shell color.
# typeset -g POWERLEVEL9K_MIDNIGHT_COMMANDER_FOREGROUND=3
# typeset -g POWERLEVEL9K_MIDNIGHT_COMMANDER_BACKGROUND=0
# Custom icon.
# typeset -g POWERLEVEL9K_MIDNIGHT_COMMANDER_VISUAL_IDENTIFIER_EXPANSION='⭐'

#[ nix_shell: nix shell (https://nixos.org/nixos/nix-pills/developing-with-nix-shell.html) ]##
# Nix shell color.
# typeset -g POWERLEVEL9K_NIX_SHELL_FOREGROUND=0
# typeset -g POWERLEVEL9K_NIX_SHELL_BACKGROUND=4

# Tip: If you want to see just the icon without "pure" and "impure", uncomment the next line.
# typeset -g POWERLEVEL9K_NIX_SHELL_CONTENT_EXPANSION=

# Custom icon.
# typeset -g POWERLEVEL9K_NIX_SHELL_VISUAL_IDENTIFIER_EXPANSION='⭐'

##################################[ disk_usage: disk usage ]##################################
# Colors for different levels of disk usage.
# typeset -g POWERLEVEL9K_DISK_USAGE_NORMAL_FOREGROUND=3
# typeset -g POWERLEVEL9K_DISK_USAGE_NORMAL_BACKGROUND=0
# typeset -g POWERLEVEL9K_DISK_USAGE_WARNING_FOREGROUND=0
# typeset -g POWERLEVEL9K_DISK_USAGE_WARNING_BACKGROUND=3
# typeset -g POWERLEVEL9K_DISK_USAGE_CRITICAL_FOREGROUND=7
# typeset -g POWERLEVEL9K_DISK_USAGE_CRITICAL_BACKGROUND=1
# Thresholds for different levels of disk usage (percentage points).
typeset -g POWERLEVEL9K_DISK_USAGE_WARNING_LEVEL=90
typeset -g POWERLEVEL9K_DISK_USAGE_CRITICAL_LEVEL=95
# If set to true, hide disk usage when below $POWERLEVEL9K_DISK_USAGE_WARNING_LEVEL percent.
typeset -g POWERLEVEL9K_DISK_USAGE_ONLY_WARNING=false
# Custom icon.
# typeset -g POWERLEVEL9K_DISK_USAGE_VISUAL_IDENTIFIER_EXPANSION='⭐'

###########[ vi_mode: vi mode (you don't need this if you've enabled prompt_char) ]###########
# Foreground color.
typeset -g POWERLEVEL9K_VI_MODE_FOREGROUND=0
# Text and color for normal (a.k.a. command) vi mode.
typeset -g POWERLEVEL9K_VI_COMMAND_MODE_STRING=NORMAL
typeset -g POWERLEVEL9K_VI_MODE_NORMAL_BACKGROUND=2
# Text and color for visual vi mode.
typeset -g POWERLEVEL9K_VI_VISUAL_MODE_STRING=VISUAL
typeset -g POWERLEVEL9K_VI_MODE_VISUAL_BACKGROUND=4
# Text and color for overtype (a.k.a. overwrite and replace) vi mode.
typeset -g POWERLEVEL9K_VI_OVERWRITE_MODE_STRING=OVERTYPE
typeset -g POWERLEVEL9K_VI_MODE_OVERWRITE_BACKGROUND=3
# Text and color for insert vi mode.
typeset -g POWERLEVEL9K_VI_INSERT_MODE_STRING=
typeset -g POWERLEVEL9K_VI_MODE_INSERT_FOREGROUND=8

######################################[ ram: free RAM ]#######################################
# RAM color.
typeset -g POWERLEVEL9K_RAM_FOREGROUND=0
typeset -g POWERLEVEL9K_RAM_BACKGROUND=3
# Custom icon.
# typeset -g POWERLEVEL9K_RAM_VISUAL_IDENTIFIER_EXPANSION='⭐'

#####################################[ swap: used swap ]######################################
# Swap color.
# typeset -g POWERLEVEL9K_SWAP_FOREGROUND=0
# typeset -g POWERLEVEL9K_SWAP_BACKGROUND=3
# Custom icon.
# typeset -g POWERLEVEL9K_SWAP_VISUAL_IDENTIFIER_EXPANSION='⭐'

######################################[ load: CPU load ]######################################
# Show average CPU load over this many last minutes. Valid values are 1, 5 and 15.
typeset -g POWERLEVEL9K_LOAD_WHICH=1
# Load color when load is under 50%.
typeset -g POWERLEVEL9K_LOAD_NORMAL_FOREGROUND=0
typeset -g POWERLEVEL9K_LOAD_NORMAL_BACKGROUND=2
# Load color when load is between 50% and 70%.
typeset -g POWERLEVEL9K_LOAD_WARNING_FOREGROUND=0
typeset -g POWERLEVEL9K_LOAD_WARNING_BACKGROUND=3
# Load color when load is over 70%.
typeset -g POWERLEVEL9K_LOAD_CRITICAL_FOREGROUND=0
typeset -g POWERLEVEL9K_LOAD_CRITICAL_BACKGROUND=1
# Custom icon.
# typeset -g POWERLEVEL9K_LOAD_VISUAL_IDENTIFIER_EXPANSION='⭐'

################[ todo: todo items (https://github.com/todotxt/todo.txt-cli) ]################
# Todo color.
# typeset -g POWERLEVEL9K_TODO_FOREGROUND=0
# typeset -g POWERLEVEL9K_TODO_BACKGROUND=8
# Hide todo when the total number of tasks is zero.
typeset -g POWERLEVEL9K_TODO_HIDE_ZERO_TOTAL=true
# Hide todo when the number of tasks after filtering is zero.
typeset -g POWERLEVEL9K_TODO_HIDE_ZERO_FILTERED=false

# Todo format. The following parameters are available within the expansion.
#
# - P9K_TODO_TOTAL_TASK_COUNT The total number of tasks.
# - P9K_TODO_FILTERED_TASK_COUNT The number of tasks after filtering.
#
# These variables correspond to the last line of the output of `todo.sh -p ls`:
#
# TODO: 24 of 42 tasks shown
#
# Here 24 is P9K_TODO_FILTERED_TASK_COUNT and 42 is P9K_TODO_TOTAL_TASK_COUNT.
#
# typeset -g POWERLEVEL9K_TODO_CONTENT_EXPANSION='$P9K_TODO_FILTERED_TASK_COUNT'

# Custom icon.
# typeset -g POWERLEVEL9K_TODO_VISUAL_IDENTIFIER_EXPANSION='⭐'

###########[ timewarrior: timewarrior tracking status (https://timewarrior.net/) ]############
# Timewarrior color.
# typeset -g POWERLEVEL9K_TIMEWARRIOR_FOREGROUND=255
# typeset -g POWERLEVEL9K_TIMEWARRIOR_BACKGROUND=8

# If the tracked task is longer than 24 characters, truncate and append "…".
# Tip: To always display tasks without truncation, delete the following parameter.
# Tip: To hide task names and display just the icon when time tracking is enabled, set the
# value of the following parameter to "".
typeset -g POWERLEVEL9K_TIMEWARRIOR_CONTENT_EXPANSION='${P9K_CONTENT:0:24}${${P9K_CONTENT:24}:+…}'

# Custom icon.
# typeset -g POWERLEVEL9K_TIMEWARRIOR_VISUAL_IDENTIFIER_EXPANSION='⭐'

##############[ taskwarrior: taskwarrior task count (https://taskwarrior.org/) ]##############
# Taskwarrior color.
# typeset -g POWERLEVEL9K_TASKWARRIOR_FOREGROUND=0
# typeset -g POWERLEVEL9K_TASKWARRIOR_BACKGROUND=6

# Taskwarrior segment format. The following parameters are available within the expansion.
#
# - P9K_TASKWARRIOR_PENDING_COUNT The number of pending tasks: `task +PENDING count`.
# - P9K_TASKWARRIOR_OVERDUE_COUNT The number of overdue tasks: `task +OVERDUE count`.
#
# Zero values are represented as empty parameters.
#
# The default format:
#
# '${P9K_TASKWARRIOR_OVERDUE_COUNT:+"!$P9K_TASKWARRIOR_OVERDUE_COUNT/"}$P9K_TASKWARRIOR_PENDING_COUNT'
#
# typeset -g POWERLEVEL9K_TASKWARRIOR_CONTENT_EXPANSION='$P9K_TASKWARRIOR_PENDING_COUNT'

# Custom icon.
# typeset -g POWERLEVEL9K_TASKWARRIOR_VISUAL_IDENTIFIER_EXPANSION='⭐'

##################################[ context: user@hostname ]##################################
# Context color when running with privileges.
typeset -g POWERLEVEL9K_CONTEXT_ROOT_FOREGROUND=1
typeset -g POWERLEVEL9K_CONTEXT_ROOT_BACKGROUND=3
# Context color in SSH without privileges.
typeset -g POWERLEVEL9K_CONTEXT_{REMOTE,REMOTE_SUDO}_FOREGROUND=0
typeset -g POWERLEVEL9K_CONTEXT_{REMOTE,REMOTE_SUDO}_BACKGROUND=3
# Default context color (no privileges, no SSH).
typeset -g POWERLEVEL9K_CONTEXT_FOREGROUND=0
typeset -g POWERLEVEL9K_CONTEXT_BACKGROUND=3

# Context format when running with privileges: user@hostname.
typeset -g POWERLEVEL9K_CONTEXT_ROOT_TEMPLATE='%n@%m'
# Context format when in SSH without privileges: user@hostname.
typeset -g POWERLEVEL9K_CONTEXT_{REMOTE,REMOTE_SUDO}_TEMPLATE='%n@%m'
# Default context format (no privileges, no SSH): user@hostname.
typeset -g POWERLEVEL9K_CONTEXT_TEMPLATE='%n@%m'

# Don't show context unless running with privileges or in SSH.
# Tip: Remove the next line to always show context.
# typeset -g POWERLEVEL9K_CONTEXT_{DEFAULT,SUDO}_{CONTENT,VISUAL_IDENTIFIER}_EXPANSION=

# Custom icon.
# typeset -g POWERLEVEL9K_CONTEXT_VISUAL_IDENTIFIER_EXPANSION='⭐'
# Custom prefix.
# typeset -g POWERLEVEL9K_CONTEXT_PREFIX='with '

###[ virtualenv: python virtual environment (https://docs.python.org/3/library/venv.html) ]###
# Python virtual environment color.
# typeset -g POWERLEVEL9K_VIRTUALENV_FOREGROUND=0
# typeset -g POWERLEVEL9K_VIRTUALENV_BACKGROUND=4
# Don't show Python version next to the virtual environment name.
typeset -g POWERLEVEL9K_VIRTUALENV_SHOW_PYTHON_VERSION=false
# Don't show virtualenv if pyenv is already shown.
typeset -g POWERLEVEL9K_VIRTUALENV_SHOW_WITH_PYENV=false
# Separate environment name from Python version only with a space.
typeset -g POWERLEVEL9K_VIRTUALENV_{LEFT,RIGHT}_DELIMITER=
# Custom icon.
# typeset -g POWERLEVEL9K_VIRTUALENV_VISUAL_IDENTIFIER_EXPANSION='⭐'

#####################[ anaconda: conda environment (https://conda.io/) ]######################
# Anaconda environment color.
typeset -g POWERLEVEL9K_ANACONDA_FOREGROUND=0
typeset -g POWERLEVEL9K_ANACONDA_BACKGROUND=4

# Anaconda segment format. The following parameters are available within the expansion.
#
# - CONDA_PREFIX Absolute path to the active Anaconda/Miniconda environment.
# - CONDA_DEFAULT_ENV Name of the active Anaconda/Miniconda environment.
# - CONDA_PROMPT_MODIFIER Configurable prompt modifier (see below).
# - P9K_ANACONDA_PYTHON_VERSION Current python version (python --version).
#
# CONDA_PROMPT_MODIFIER can be configured with the following command:
#
# conda config --set env_prompt '({default_env}) '
#
# The last argument is a Python format string that can use the following variables:
#
# - prefix The same as CONDA_PREFIX.
# - default_env The same as CONDA_DEFAULT_ENV.
# - name The last segment of CONDA_PREFIX.
# - stacked_env Comma-separated list of names in the environment stack. The first element is
# always the same as default_env.
#
# Note: '({default_env}) ' is the default value of env_prompt.
#
# The default value of POWERLEVEL9K_ANACONDA_CONTENT_EXPANSION expands to $CONDA_PROMPT_MODIFIER
# without the surrounding parentheses, or to the last path component of CONDA_PREFIX if the former
# is empty.
# typeset -g POWERLEVEL9K_ANACONDA_CONTENT_EXPANSION='${${${${CONDA_PROMPT_MODIFIER#\(}% }%\)}:-${CONDA_PREFIX:t}}'

# Custom icon.
# typeset -g POWERLEVEL9K_ANACONDA_VISUAL_IDENTIFIER_EXPANSION='⭐'

################[ pyenv: python environment (https://github.com/pyenv/pyenv) ]################
# Pyenv color.
# typeset -g POWERLEVEL9K_PYENV_FOREGROUND=0
# typeset -g POWERLEVEL9K_PYENV_BACKGROUND=4
# Hide python version if it doesn't come from one of these sources.
typeset -g POWERLEVEL9K_PYENV_SOURCES=(shell local global)
# If set to false, hide python version if it's the same as global:
# $(pyenv version-name) == $(pyenv global).
typeset -g POWERLEVEL9K_PYENV_PROMPT_ALWAYS_SHOW=false
# If set to false, hide python version if it's equal to "system".
typeset -g POWERLEVEL9K_PYENV_SHOW_SYSTEM=true

# Pyenv segment format. The following parameters are available within the expansion.
#
# - P9K_CONTENT Current pyenv environment (pyenv version-name).
# - P9K_PYENV_PYTHON_VERSION Current python version (python --version).
#
# The default format has the following logic:
#
# 1. Display "$P9K_CONTENT $P9K_PYENV_PYTHON_VERSION" if $P9K_PYENV_PYTHON_VERSION is not
# empty and unequal to $P9K_CONTENT.
# 2. Otherwise display just "$P9K_CONTENT".
typeset -g POWERLEVEL9K_PYENV_CONTENT_EXPANSION='${P9K_CONTENT}${${P9K_PYENV_PYTHON_VERSION:#$P9K_CONTENT}:+ $P9K_PYENV_PYTHON_VERSION}'

# Custom icon.
# typeset -g POWERLEVEL9K_PYENV_VISUAL_IDENTIFIER_EXPANSION='⭐'

################[ goenv: go environment (https://github.com/syndbg/goenv) ]################
# Goenv color.
# typeset -g POWERLEVEL9K_GOENV_FOREGROUND=0
# typeset -g POWERLEVEL9K_GOENV_BACKGROUND=4
# Hide go version if it doesn't come from one of these sources.
typeset -g POWERLEVEL9K_GOENV_SOURCES=(shell local global)
# If set to false, hide go version if it's the same as global:
# $(goenv version-name) == $(goenv global).
typeset -g POWERLEVEL9K_GOENV_PROMPT_ALWAYS_SHOW=false
# If set to false, hide go version if it's equal to "system".
typeset -g POWERLEVEL9K_GOENV_SHOW_SYSTEM=true
# Custom icon.
# typeset -g POWERLEVEL9K_GOENV_VISUAL_IDENTIFIER_EXPANSION='⭐'

##########[ nodenv: node.js version from nodenv (https://github.com/nodenv/nodenv) ]##########
# Nodenv color.
# typeset -g POWERLEVEL9K_NODENV_FOREGROUND=2
# typeset -g POWERLEVEL9K_NODENV_BACKGROUND=0
# Hide node version if it doesn't come from one of these sources.
typeset -g POWERLEVEL9K_NODENV_SOURCES=(shell local global)
# If set to false, hide node version if it's the same as global:
# $(nodenv version-name) == $(nodenv global).
typeset -g POWERLEVEL9K_NODENV_PROMPT_ALWAYS_SHOW=false
# If set to false, hide node version if it's equal to "system".
typeset -g POWERLEVEL9K_NODENV_SHOW_SYSTEM=true
# Custom icon.
# typeset -g POWERLEVEL9K_NODENV_VISUAL_IDENTIFIER_EXPANSION='⭐'

##############[ nvm: node.js version from nvm (https://github.com/nvm-sh/nvm) ]###############
# Nvm color.
# typeset -g POWERLEVEL9K_NVM_FOREGROUND=0
# typeset -g POWERLEVEL9K_NVM_BACKGROUND=5
# Custom icon.
# typeset -g POWERLEVEL9K_NVM_VISUAL_IDENTIFIER_EXPANSION='⭐'

############[ nodeenv: node.js environment (https://github.com/ekalinin/nodeenv) ]############
# Nodeenv color.
# typeset -g POWERLEVEL9K_NODEENV_FOREGROUND=2
# typeset -g POWERLEVEL9K_NODEENV_BACKGROUND=0
# Don't show Node version next to the environment name.
typeset -g POWERLEVEL9K_NODEENV_SHOW_NODE_VERSION=false
# Separate environment name from Node version only with a space.
typeset -g POWERLEVEL9K_NODEENV_{LEFT,RIGHT}_DELIMITER=
# Custom icon.
# typeset -g POWERLEVEL9K_NODEENV_VISUAL_IDENTIFIER_EXPANSION='⭐'

##############################[ node_version: node.js version ]###############################
# Node version color.
# typeset -g POWERLEVEL9K_NODE_VERSION_FOREGROUND=7
# typeset -g POWERLEVEL9K_NODE_VERSION_BACKGROUND=2
# Show node version only when in a directory tree containing package.json.
typeset -g POWERLEVEL9K_NODE_VERSION_PROJECT_ONLY=true
# Custom icon.
# typeset -g POWERLEVEL9K_NODE_VERSION_VISUAL_IDENTIFIER_EXPANSION='⭐'

#######################[ go_version: go version (https://golang.org) ]########################
# Go version color.
# typeset -g POWERLEVEL9K_GO_VERSION_FOREGROUND=255
# typeset -g POWERLEVEL9K_GO_VERSION_BACKGROUND=2
# Show go version only when in a go project subdirectory.
typeset -g POWERLEVEL9K_GO_VERSION_PROJECT_ONLY=true
# Custom icon.
# typeset -g POWERLEVEL9K_GO_VERSION_VISUAL_IDENTIFIER_EXPANSION='⭐'

#################[ rust_version: rustc version (https://www.rust-lang.org) ]##################
# Rust version color.
# typeset -g POWERLEVEL9K_RUST_VERSION_FOREGROUND=0
# typeset -g POWERLEVEL9K_RUST_VERSION_BACKGROUND=208
# Show rust version only when in a rust project subdirectory.
typeset -g POWERLEVEL9K_RUST_VERSION_PROJECT_ONLY=true
# Custom icon.
# typeset -g POWERLEVEL9K_RUST_VERSION_VISUAL_IDENTIFIER_EXPANSION='⭐'

###############[ dotnet_version: .NET version (https://dotnet.microsoft.com) ]################
# .NET version color.
# typeset -g POWERLEVEL9K_DOTNET_VERSION_FOREGROUND=7
# typeset -g POWERLEVEL9K_DOTNET_VERSION_BACKGROUND=5
# Show .NET version only when in a .NET project subdirectory.
typeset -g POWERLEVEL9K_DOTNET_VERSION_PROJECT_ONLY=true
# Custom icon.
# typeset -g POWERLEVEL9K_DOTNET_VERSION_VISUAL_IDENTIFIER_EXPANSION='⭐'

#####################[ php_version: php version (https://www.php.net/) ]######################
# PHP version color.
typeset -g POWERLEVEL9K_PHP_VERSION_FOREGROUND=0
typeset -g POWERLEVEL9K_PHP_VERSION_BACKGROUND=5
# Show PHP version only when in a PHP project subdirectory.
typeset -g POWERLEVEL9K_PHP_VERSION_PROJECT_ONLY=true
# Custom icon.
# typeset -g POWERLEVEL9K_PHP_VERSION_VISUAL_IDENTIFIER_EXPANSION='⭐'

##########[ laravel_version: laravel php framework version (https://laravel.com/) ]###########
# Laravel version color.
typeset -g POWERLEVEL9K_LARAVEL_VERSION_FOREGROUND=1
typeset -g POWERLEVEL9K_LARAVEL_VERSION_BACKGROUND=7
# Custom icon.
# typeset -g POWERLEVEL9K_LARAVEL_VERSION_VISUAL_IDENTIFIER_EXPANSION='⭐'

#############[ rbenv: ruby version from rbenv (https://github.com/rbenv/rbenv) ]##############
# Rbenv color.
# typeset -g POWERLEVEL9K_RBENV_FOREGROUND=0
# typeset -g POWERLEVEL9K_RBENV_BACKGROUND=1
# Hide ruby version if it doesn't come from one of these sources.
typeset -g POWERLEVEL9K_RBENV_SOURCES=(shell local global)
# If set to false, hide ruby version if it's the same as global:
# $(rbenv version-name) == $(rbenv global).
typeset -g POWERLEVEL9K_RBENV_PROMPT_ALWAYS_SHOW=false
# If set to false, hide ruby version if it's equal to "system".
typeset -g POWERLEVEL9K_RBENV_SHOW_SYSTEM=true
# Custom icon.
# typeset -g POWERLEVEL9K_RBENV_VISUAL_IDENTIFIER_EXPANSION='⭐'

####################[ java_version: java version (https://www.java.com/) ]####################
# Java version color.
typeset -g POWERLEVEL9K_JAVA_VERSION_FOREGROUND=1
typeset -g POWERLEVEL9K_JAVA_VERSION_BACKGROUND=7
# Show java version only when in a java project subdirectory.
typeset -g POWERLEVEL9K_JAVA_VERSION_PROJECT_ONLY=true
# Show brief version.
typeset -g POWERLEVEL9K_JAVA_VERSION_FULL=false
# Custom icon.
# typeset -g POWERLEVEL9K_JAVA_VERSION_VISUAL_IDENTIFIER_EXPANSION='⭐'

###[ package: name@version from package.json (https://docs.npmjs.com/files/package.json) ]####
# Package color.
# typeset -g POWERLEVEL9K_PACKAGE_FOREGROUND=0
# typeset -g POWERLEVEL9K_PACKAGE_BACKGROUND=6

# Package format. The following parameters are available within the expansion.
#
# - P9K_PACKAGE_NAME The value of `name` field in package.json.
# - P9K_PACKAGE_VERSION The value of `version` field in package.json.
#
# typeset -g POWERLEVEL9K_PACKAGE_CONTENT_EXPANSION='${P9K_PACKAGE_NAME//\%/%%}@${P9K_PACKAGE_VERSION//\%/%%}'

# Custom icon.
# typeset -g POWERLEVEL9K_PACKAGE_VISUAL_IDENTIFIER_EXPANSION='⭐'

#######################[ rvm: ruby version from rvm (https://rvm.io) ]########################
# Rvm color.
# typeset -g POWERLEVEL9K_RVM_FOREGROUND=0
# typeset -g POWERLEVEL9K_RVM_BACKGROUND=240
# Don't show @gemset at the end.
typeset -g POWERLEVEL9K_RVM_SHOW_GEMSET=false
# Don't show ruby- at the front.
typeset -g POWERLEVEL9K_RVM_SHOW_PREFIX=false
# Custom icon.
# typeset -g POWERLEVEL9K_RVM_VISUAL_IDENTIFIER_EXPANSION='⭐'

###########[ fvm: flutter version management (https://github.com/leoafarias/fvm) ]############
# Fvm color.
# typeset -g POWERLEVEL9K_FVM_FOREGROUND=0
# typeset -g POWERLEVEL9K_FVM_BACKGROUND=4
# Custom icon.
# typeset -g POWERLEVEL9K_FVM_VISUAL_IDENTIFIER_EXPANSION='⭐'

##########[ luaenv: lua version from luaenv (https://github.com/cehoffman/luaenv) ]###########
# Lua color.
# typeset -g POWERLEVEL9K_LUAENV_FOREGROUND=0
# typeset -g POWERLEVEL9K_LUAENV_BACKGROUND=4
# Hide lua version if it doesn't come from one of these sources.
typeset -g POWERLEVEL9K_LUAENV_SOURCES=(shell local global)
# If set to false, hide lua version if it's the same as global:
# $(luaenv version-name) == $(luaenv global).
typeset -g POWERLEVEL9K_LUAENV_PROMPT_ALWAYS_SHOW=false
# If set to false, hide lua version if it's equal to "system".
typeset -g POWERLEVEL9K_LUAENV_SHOW_SYSTEM=true
# Custom icon.
# typeset -g POWERLEVEL9K_LUAENV_VISUAL_IDENTIFIER_EXPANSION='⭐'

###############[ jenv: java version from jenv (https://github.com/jenv/jenv) ]################
# Java color.
# typeset -g POWERLEVEL9K_JENV_FOREGROUND=1
# typeset -g POWERLEVEL9K_JENV_BACKGROUND=7
# Hide java version if it doesn't come from one of these sources.
typeset -g POWERLEVEL9K_JENV_SOURCES=(shell local global)
# If set to false, hide java version if it's the same as global:
# $(jenv version-name) == $(jenv global).
typeset -g POWERLEVEL9K_JENV_PROMPT_ALWAYS_SHOW=false
# If set to false, hide java version if it's equal to "system".
typeset -g POWERLEVEL9K_JENV_SHOW_SYSTEM=true
# Custom icon.
# typeset -g POWERLEVEL9K_JENV_VISUAL_IDENTIFIER_EXPANSION='⭐'

###########[ plenv: perl version from plenv (https://github.com/tokuhirom/plenv) ]############
# Perl color.
# typeset -g POWERLEVEL9K_PLENV_FOREGROUND=0
# typeset -g POWERLEVEL9K_PLENV_BACKGROUND=4
# Hide perl version if it doesn't come from one of these sources.
typeset -g POWERLEVEL9K_PLENV_SOURCES=(shell local global)
# If set to false, hide perl version if it's the same as global:
# $(plenv version-name) == $(plenv global).
typeset -g POWERLEVEL9K_PLENV_PROMPT_ALWAYS_SHOW=false
# If set to false, hide perl version if it's equal to "system".
typeset -g POWERLEVEL9K_PLENV_SHOW_SYSTEM=true
# Custom icon.
# typeset -g POWERLEVEL9K_PLENV_VISUAL_IDENTIFIER_EXPANSION='⭐'

############[ phpenv: php version from phpenv (https://github.com/phpenv/phpenv) ]############
# PHP color.
# typeset -g POWERLEVEL9K_PHPENV_FOREGROUND=0
# typeset -g POWERLEVEL9K_PHPENV_BACKGROUND=5
# Hide php version if it doesn't come from one of these sources.
typeset -g POWERLEVEL9K_PHPENV_SOURCES=(shell local global)
# If set to false, hide php version if it's the same as global:
# $(phpenv version-name) == $(phpenv global).
typeset -g POWERLEVEL9K_PHPENV_PROMPT_ALWAYS_SHOW=false
# If set to false, hide PHP version if it's equal to "system".
typeset -g POWERLEVEL9K_PHPENV_SHOW_SYSTEM=true
# Custom icon.
# typeset -g POWERLEVEL9K_PHPENV_VISUAL_IDENTIFIER_EXPANSION='⭐'

##########[ haskell_stack: haskell version from stack (https://haskellstack.org/) ]###########
# Haskell color.
# typeset -g POWERLEVEL9K_HASKELL_STACK_FOREGROUND=0
# typeset -g POWERLEVEL9K_HASKELL_STACK_BACKGROUND=3

# Hide haskell version if it doesn't come from one of these sources.
#
# shell: version is set by STACK_YAML
# local: version is set by stack.yaml up the directory tree
# global: version is set by the implicit global project (~/.stack/global-project/stack.yaml)
typeset -g POWERLEVEL9K_HASKELL_STACK_SOURCES=(shell local)
# If set to false, hide haskell version if it's the same as in the implicit global project.
typeset -g POWERLEVEL9K_HASKELL_STACK_ALWAYS_SHOW=true
# Custom icon.
# typeset -g POWERLEVEL9K_HASKELL_STACK_VISUAL_IDENTIFIER_EXPANSION='⭐'

################[ terraform: terraform workspace (https://www.terraform.io) ]#################
# Don't show terraform workspace if it's literally "default".
typeset -g POWERLEVEL9K_TERRAFORM_SHOW_DEFAULT=false
# POWERLEVEL9K_TERRAFORM_CLASSES is an array with even number of elements. The first element
# in each pair defines a pattern against which the current terraform workspace gets matched.
# More specifically, it's P9K_CONTENT prior to the application of context expansion (see below)
# that gets matched. If you unset all POWERLEVEL9K_TERRAFORM_*CONTENT_EXPANSION parameters,
# you'll see this value in your prompt. The second element of each pair in
# POWERLEVEL9K_TERRAFORM_CLASSES defines the workspace class. Patterns are tried in order. The
# first match wins.
#
# For example, given these settings:
#
# typeset -g POWERLEVEL9K_TERRAFORM_CLASSES=(
# '*prod*' PROD
# '*test*' TEST
# '*' OTHER)
#
# If your current terraform workspace is "project_test", its class is TEST because "project_test"
# doesn't match the pattern '*prod*' but does match '*test*'.
#
# You can define different colors, icons and content expansions for different classes:
#
# typeset -g POWERLEVEL9K_TERRAFORM_TEST_FOREGROUND=2
# typeset -g POWERLEVEL9K_TERRAFORM_TEST_BACKGROUND=0
# typeset -g POWERLEVEL9K_TERRAFORM_TEST_VISUAL_IDENTIFIER_EXPANSION='⭐'
# typeset -g POWERLEVEL9K_TERRAFORM_TEST_CONTENT_EXPANSION='> ${P9K_CONTENT} <'
typeset -g POWERLEVEL9K_TERRAFORM_CLASSES=(
# '*prod*' PROD # These values are examples that are unlikely
# '*test*' TEST # to match your needs. Customize them as needed.
'*' OTHER)
typeset -g POWERLEVEL9K_TERRAFORM_OTHER_FOREGROUND=4
typeset -g POWERLEVEL9K_TERRAFORM_OTHER_BACKGROUND=0
# typeset -g POWERLEVEL9K_TERRAFORM_OTHER_VISUAL_IDENTIFIER_EXPANSION='⭐'

#############[ kubecontext: current kubernetes context (https://kubernetes.io/) ]#############
# Show kubecontext only when the the command you are typing invokes one of these tools.
# Tip: Remove the next line to always show kubecontext.
typeset -g POWERLEVEL9K_KUBECONTEXT_SHOW_ON_COMMAND='kubectl|helm|kubens|kubectx|oc|istioctl|kogito'

# Kubernetes context classes for the purpose of using different colors, icons and expansions with
# different contexts.
#
# POWERLEVEL9K_KUBECONTEXT_CLASSES is an array with even number of elements. The first element
# in each pair defines a pattern against which the current kubernetes context gets matched.
# More specifically, it's P9K_CONTENT prior to the application of context expansion (see below)
# that gets matched. If you unset all POWERLEVEL9K_KUBECONTEXT_*CONTENT_EXPANSION parameters,
# you'll see this value in your prompt. The second element of each pair in
# POWERLEVEL9K_KUBECONTEXT_CLASSES defines the context class. Patterns are tried in order. The
# first match wins.
#
# For example, given these settings:
#
# typeset -g POWERLEVEL9K_KUBECONTEXT_CLASSES=(
# '*prod*' PROD
# '*test*' TEST
# '*' DEFAULT)
#
# If your current kubernetes context is "deathray-testing/default", its class is TEST
# because "deathray-testing/default" doesn't match the pattern '*prod*' but does match '*test*'.
#
# You can define different colors, icons and content expansions for different classes:
#
# typeset -g POWERLEVEL9K_KUBECONTEXT_TEST_FOREGROUND=0
# typeset -g POWERLEVEL9K_KUBECONTEXT_TEST_BACKGROUND=2
# typeset -g POWERLEVEL9K_KUBECONTEXT_TEST_VISUAL_IDENTIFIER_EXPANSION='⭐'
# typeset -g POWERLEVEL9K_KUBECONTEXT_TEST_CONTENT_EXPANSION='> ${P9K_CONTENT} <'
typeset -g POWERLEVEL9K_KUBECONTEXT_CLASSES=(
# '*prod*' PROD # These values are examples that are unlikely
# '*test*' TEST # to match your needs. Customize them as needed.
'*' DEFAULT)
typeset -g POWERLEVEL9K_KUBECONTEXT_DEFAULT_FOREGROUND=7
typeset -g POWERLEVEL9K_KUBECONTEXT_DEFAULT_BACKGROUND=5
# typeset -g POWERLEVEL9K_KUBECONTEXT_DEFAULT_VISUAL_IDENTIFIER_EXPANSION='⭐'

# Use POWERLEVEL9K_KUBECONTEXT_CONTENT_EXPANSION to specify the content displayed by kubecontext
# segment. Parameter expansions are very flexible and fast, too. See reference:
# http://zsh.sourceforge.net/Doc/Release/Expansion.html#Parameter-Expansion.
#
# Within the expansion the following parameters are always available:
#
# - P9K_CONTENT The content that would've been displayed if there was no content
# expansion defined.
# - P9K_KUBECONTEXT_NAME The current context's name. Corresponds to column NAME in the
# output of `kubectl config get-contexts`.
# - P9K_KUBECONTEXT_CLUSTER The current context's cluster. Corresponds to column CLUSTER in the
# output of `kubectl config get-contexts`.
# - P9K_KUBECONTEXT_NAMESPACE The current context's namespace. Corresponds to column NAMESPACE
# in the output of `kubectl config get-contexts`. If there is no
# namespace, the parameter is set to "default".
# - P9K_KUBECONTEXT_USER The current context's user. Corresponds to column AUTHINFO in the
# output of `kubectl config get-contexts`.
#
# If the context points to Google Kubernetes Engine (GKE) or Elastic Kubernetes Service (EKS),
# the following extra parameters are available:
#
# - P9K_KUBECONTEXT_CLOUD_NAME Either "gke" or "eks".
# - P9K_KUBECONTEXT_CLOUD_ACCOUNT Account/project ID.
# - P9K_KUBECONTEXT_CLOUD_ZONE Availability zone.
# - P9K_KUBECONTEXT_CLOUD_CLUSTER Cluster.
#
# P9K_KUBECONTEXT_CLOUD_* parameters are derived from P9K_KUBECONTEXT_CLUSTER. For example,
# if P9K_KUBECONTEXT_CLUSTER is "gke_my-account_us-east1-a_my-cluster-01":
#
# - P9K_KUBECONTEXT_CLOUD_NAME=gke
# - P9K_KUBECONTEXT_CLOUD_ACCOUNT=my-account
# - P9K_KUBECONTEXT_CLOUD_ZONE=us-east1-a
# - P9K_KUBECONTEXT_CLOUD_CLUSTER=my-cluster-01
#
# If P9K_KUBECONTEXT_CLUSTER is "arn:aws:eks:us-east-1:123456789012:cluster/my-cluster-01":
#
# - P9K_KUBECONTEXT_CLOUD_NAME=eks
# - P9K_KUBECONTEXT_CLOUD_ACCOUNT=123456789012
# - P9K_KUBECONTEXT_CLOUD_ZONE=us-east-1
# - P9K_KUBECONTEXT_CLOUD_CLUSTER=my-cluster-01
typeset -g POWERLEVEL9K_KUBECONTEXT_DEFAULT_CONTENT_EXPANSION=
# Show P9K_KUBECONTEXT_CLOUD_CLUSTER if it's not empty and fall back to P9K_KUBECONTEXT_NAME.
POWERLEVEL9K_KUBECONTEXT_DEFAULT_CONTENT_EXPANSION+='${P9K_KUBECONTEXT_CLOUD_CLUSTER:-${P9K_KUBECONTEXT_NAME}}'
# Append the current context's namespace if it's not "default".
POWERLEVEL9K_KUBECONTEXT_DEFAULT_CONTENT_EXPANSION+='${${:-/$P9K_KUBECONTEXT_NAMESPACE}:#/default}'

# Custom prefix.
# typeset -g POWERLEVEL9K_KUBECONTEXT_PREFIX='at '

#[ aws: aws profile (https://docs.aws.amazon.com/cli/latest/userguide/cli-configure-profiles.html) ]#
# Show aws only when the the command you are typing invokes one of these tools.
# Tip: Remove the next line to always show aws.
typeset -g POWERLEVEL9K_AWS_SHOW_ON_COMMAND='aws|awless|terraform|pulumi'

# POWERLEVEL9K_AWS_CLASSES is an array with even number of elements. The first element
# in each pair defines a pattern against which the current AWS profile gets matched.
# More specifically, it's P9K_CONTENT prior to the application of context expansion (see below)
# that gets matched. If you unset all POWERLEVEL9K_AWS_*CONTENT_EXPANSION parameters,
# you'll see this value in your prompt. The second element of each pair in
# POWERLEVEL9K_AWS_CLASSES defines the profile class. Patterns are tried in order. The
# first match wins.
#
# For example, given these settings:
#
# typeset -g POWERLEVEL9K_AWS_CLASSES=(
# '*prod*' PROD
# '*test*' TEST
# '*' DEFAULT)
#
# If your current AWS profile is "company_test", its class is TEST
# because "company_test" doesn't match the pattern '*prod*' but does match '*test*'.
#
# You can define different colors, icons and content expansions for different classes:
#
# typeset -g POWERLEVEL9K_AWS_TEST_FOREGROUND=28
# typeset -g POWERLEVEL9K_AWS_TEST_VISUAL_IDENTIFIER_EXPANSION='⭐'
# typeset -g POWERLEVEL9K_AWS_TEST_CONTENT_EXPANSION='> ${P9K_CONTENT} <'
typeset -g POWERLEVEL9K_AWS_CLASSES=(
# '*prod*' PROD # These values are examples that are unlikely
# '*test*' TEST # to match your needs. Customize them as needed.
'*' DEFAULT)
# typeset -g POWERLEVEL9K_AWS_DEFAULT_FOREGROUND=7
# typeset -g POWERLEVEL9K_AWS_DEFAULT_BACKGROUND=1
# typeset -g POWERLEVEL9K_AWS_DEFAULT_VISUAL_IDENTIFIER_EXPANSION='⭐'

#[ aws_eb_env: aws elastic beanstalk environment (https://aws.amazon.com/elasticbeanstalk/) ]#
# AWS Elastic Beanstalk environment color.
# typeset -g POWERLEVEL9K_AWS_EB_ENV_FOREGROUND=2
# typeset -g POWERLEVEL9K_AWS_EB_ENV_BACKGROUND=0
# Custom icon.
# typeset -g POWERLEVEL9K_AWS_EB_ENV_VISUAL_IDENTIFIER_EXPANSION='⭐'

##########[ azure: azure account name (https://docs.microsoft.com/en-us/cli/azure) ]##########
# Show azure only when the the command you are typing invokes one of these tools.
# Tip: Remove the next line to always show azure.
typeset -g POWERLEVEL9K_AZURE_SHOW_ON_COMMAND='az|terraform|pulumi'
# Azure account name color.
# typeset -g POWERLEVEL9K_AZURE_FOREGROUND=7
# typeset -g POWERLEVEL9K_AZURE_BACKGROUND=4
# Custom icon.
# typeset -g POWERLEVEL9K_AZURE_VISUAL_IDENTIFIER_EXPANSION='⭐'

##########[ gcloud: google cloud account and project (https://cloud.google.com/) ]###########
# Show gcloud only when the the command you are typing invokes one of these tools.
# Tip: Remove the next line to always show gcloud.
typeset -g POWERLEVEL9K_GCLOUD_SHOW_ON_COMMAND='gcloud|gcs'
# Google cloud color.
# typeset -g POWERLEVEL9K_GCLOUD_FOREGROUND=7
# typeset -g POWERLEVEL9K_GCLOUD_BACKGROUND=4

# Google cloud format. Change the value of POWERLEVEL9K_GCLOUD_PARTIAL_CONTENT_EXPANSION and/or
# POWERLEVEL9K_GCLOUD_COMPLETE_CONTENT_EXPANSION if the default is too verbose or not informative
# enough. You can use the following parameters in the expansions. Each of them corresponds to the
# output of `gcloud` tool.
#
# Parameter | Source
# -------------------------|--------------------------------------------------------------------
# P9K_GCLOUD_CONFIGURATION | gcloud config configurations list --format='value(name)'
# P9K_GCLOUD_ACCOUNT | gcloud config get-value account
# P9K_GCLOUD_PROJECT_ID | gcloud config get-value project
# P9K_GCLOUD_PROJECT_NAME | gcloud projects describe $P9K_GCLOUD_PROJECT_ID --format='value(name)'
#
# Note: ${VARIABLE//\%/%%} expands to ${VARIABLE} with all occurences of '%' replaced with '%%'.
#
# Obtaining project name requires sending a request to Google servers. This can take a long time
# and even fail. When project name is unknown, P9K_[<64;37;10MGCLOUD_PROJECT_NAME is not set and gcloud
# prompt segment is in state PARTIAL. When project name gets known, P9K_GCLOUD_PROJECT_NAME gets
# set and gcloud prompt segment transitions to state COMPLETE.
#
# You can customize the format, icon and colors of gcloud segment separately for states PARTIAL
# and COMPLETE. You can also hide gcloud in state PARTIAL by setting
# POWERLEVEL9K_GCLOUD_PARTIAL_VISUAL_IDENTIFIER_EXPANSION and
# POWERLEVEL9K_GCLOUD_PARTIAL_CONTENT_EXPANSION to empty.
typeset -g POWERLEVEL9K_GCLOUD_PARTIAL_CONTENT_EXPANSION='${P9K_GCLOUD_PROJECT_ID//\%/%%}'
typeset -g POWERLEVEL9K_GCLOUD_COMPLETE_CONTENT_EXPANSION='${P9K_GCLOUD_PROJECT_NAME//\%/%%}'

# Send a request to Google (by means of `gcloud projects describe ...`) t[<64;37;10M[<64;37;10Mo obtain project name
# this often. Negative value disables periodic polling. In this mode project name is retrieved
# only when the current configuration, account or project id changes.
typeset -g POWERLEVEL9K_GCLOUD_REFRESH_PROJECT_NAME_SECONDS=60

# Custom icon.
# typeset -g POWERLEVEL9K_GCLOUD_VISUAL_IDENTIFIER_EXPANSION='⭐'

#[ google_app_cred: google application credentials (https://cloud.google.com/docs/authentication/production) ]#
# Show google_app_cred only when the the command you are typing invokes one of these tools.
# Tip: Remove the next line to always show google_app_cred.
typeset -g POWERLEVEL9K_GOOGLE_APP_CRED_SHOW_ON_COMMAND='terraform|pulumi'

# Google application credentials classes for the purpose of using different [<64;37;10M[<64;37;10M[<64;37;10M[<64;37;10Mcolors, icons and
# expansions with different credentials.
#
# POWERLEVEL9K_GOOGLE_APP_CRED_CLASSES is an array with even number of elements. The first
# element in each pair defines a pattern against which the current kubernetes context gets
# matched. More specifically, it's P9K_CONTENT prior to the application of context expansion
# (see below) that gets matched. If you unset all POWERLEVEL9K_GOOGLE_APP_CRED_*CONTENT_EXPANSION
# parameters, you'll see this value in your prompt. The second element of each pair in
# POWERLEVEL9K_GOOGLE_APP_CRED_CLASSES defines the context class. Patterns are tried in order.
# The first match wins.
#
# For example, given these settings:
#
# typeset -g POWERLEVEL9K_GOOGLE_APP_CRED_CLASSES=(
# [<64;37;10M[<64;37;10M '*:*prod*:*' PROD
# '*:*test*:*' TEST
# '*' DEFAULT)
#
# If your current Google application credentials is "service_account deathray-testing x@y.com",
# its class is TEST because it doesn't match the pattern '* *prod* *' but does match '* *test* *'.
#
# You can define different colors, icons and content expansions for different classes:
#
# typeset -g POWERLEVEL9K_GOOGLE_APP_CRED_TEST_FOREGROUND=28
# typeset -g POWERLEVEL9K_GOOGLE_APP_CRED_TEST_VISUAL_IDENTIFIER_EXPANSION='⭐'
# typeset -g POWERLEVEL9K_GOOGLE_APP_CRED_TEST_CONTENT_EXPANSION='$P9K_GOOGLE_APP_CRED_PROJECT_ID'
typeset -g POWERLEVEL9K_GOOGLE_APP_CRED_CLASSES=(
# '*:*prod*:*' PROD # These values are examples that are unlikely
# '*:[<64;37;10M[<64;37;10M[<64;37;10M[<64;37;10M*test*:*' TEST # to match your needs. Customize them as needed.
'*' DEFAULT)
# typeset -g POWERLEVEL9K_GOOGLE_APP_CRED_DEFAULT_FOREGROUND=7
# typeset -g POWERLEVEL9K_GOOGLE_APP_CRED_DEFAULT_BACKGROUND=4
# typeset -g POWERLEVEL9K_GOOGLE_APP_CRED_DEFAULT_VISUAL_IDENTIFIER_EXPANSION='⭐'

# Use POWERLEVEL9K_GOOGLE_APP_CRED_CONTENT_EXPANSION to specify the content displayed by
# google_app_cred segment. Parameter expansions are very flexible and fast, too. See reference:
# http://zsh.sourceforge.net/Doc/Release/Expansion.html#Parameter-Expansion.
#
# You can use the following parameters in the expansion. Each of them corresponds to one of the
# fields in the JSON file pointed to by GOOGLE_APPLICATION_CREDENTIALS.
#
# [<64;37;10M[<64;37;10M[<64;37;10M[<64;37;10MParameter | JSON key file field
# ---------------------------------+---------------
# P9K_GOOGLE_APP_CRED_TYPE | type
# P9K_GOOGLE_APP_CRED_PROJECT_ID | project_id
# P9K_GOOGLE_APP_CRED_CLIENT_EMAIL | client_email
#
# Note: ${VARIABLE//\%/%%} expands to ${VARIABLE} with all occurences of '%' replaced by '%%'.
typeset -g POWERLEVEL9K_GOOGLE_APP_CRED_DEFAULT_CONTENT_EXPANSION='${P9K_GOOGLE_APP_CRED_PROJECT_ID//\%/%%}'

###############################[ public_ip: public IP address ]###############################
# Public IP color.
# typeset -g POWERLEVEL9K_PUBLIC_IP_FOREGROUND=7
# typeset -g POWERLEVEL9K_PUBLIC_IP_BACKGROUND=0
# Custom icon.
# typeset -g POWERLEVEL9K_PUBLIC_IP_VISUAL_IDENTIFIER[<64;37;10M_EXPANSION='⭐'

########################[ vpn_ip: virtual private network indicator ]#########################
# VPN IP color.
# typeset -g POWERLEVEL9K_VPN_IP_FOREGROUND=0
# typeset -g POWERLEVEL9K_VPN_IP_BACKGROUND=6
# When on VPN, show just an icon without the IP address.
# Tip: To display the private IP address when on VPN, remove the next line.
typeset -g POWERLEVEL9K_VPN_IP_CONTENT_EXPANSION=
# Regular expression for the VPN network interface. Run `ifconfig` or `ip -4 a show` while on VPN
# to see the name of the interface.
typeset -g POWERLEVEL9K_VPN_IP_INTERFACE='(wg|(.*tun))[0-9]*'
# If set to true, show one segment per matching network interface. If set to false, show only
# one segment corresponding to the first matching ne[<64;37;10M[<64;37;10Mtwork interface.
# Tip: If you set it to true, you'll probably want to unset POWERLEVEL9K_VPN_IP_CONTENT_EXPANSION.
typeset -g POWERLEVEL9K_VPN_IP_SHOW_ALL=false
# Custom icon.
# typeset -g POWERLEVEL9K_VPN_IP_VISUAL_IDENTIFIER_EXPANSION='⭐'

###########[ ip: ip address and bandwidth usage for a specified network interface ]###########
# IP color.
typeset -g POWERLEVEL9K_IP_BACKGROUND=5
typeset -g POWERLEVEL9K_IP_FOREGROUND=0
# The following parameters are accessible within the expansion:
#
# Parameter | Meaning
# ----------------------+---------------
# P9K_IP_IP | IP address
# P9K_IP_INTERFACE | network interface
# P9K_IP_RX_BYTES | total number of bytes received
# P9K_IP_TX_BYTES | total number of bytes sent
# P9K_IP_RX_RATE | receive rate (since last prompt)
# P9K_IP_TX_RATE | send rate (since last prompt)
# typeset -g POWERLEVEL9K_IP_CONTENT_EXPANSION='${P9K_IP_RX_RATE:+⇣$P9K_IP_RX_RATE }${P9K_IP_TX_RATE:+⇡$P9K_IP_TX_RATE }$P9K_IP_IP'
typeset -g POWERLEVEL9K_IP_CONTENT_EXPANSION='$P9K_IP_IP'

# Show information for the first network interface whose name matches this regular expression.
# Run `ifconfig` or `ip -4 a show` to see the names of all network interfaces.
typeset -g POWERLEVEL9K_IP_INTERFACE='e.*'
# Custom icon.
# typeset -g POWERLEVEL9K_IP_VISUAL_IDENTIFIER_EXPANSION='⭐'[<64;37;10M[<64;37;10M[<64;37;10M[<64;37;10M[<64;37;10M

#########################[ proxy: system-wide http/https/ftp proxy ]##########################
# Proxy color.
# typeset -g POWERLEVEL9K_PROXY_FOREGROUND=4
# typeset -g POWERLEVEL9K_PROXY_BACKGROUND=0
# Custom icon.
# typeset -g POWERLEVEL9K_PROXY_VISUAL_IDENTIFIER_EXPANSION='⭐'

################################[ battery: internal battery ]#################################
# Show battery in red when it's below this level and not connected to power supply.
typeset -g POWERLEVEL9K_BATTERY_LOW_THRESHOLD=20
typeset -g POWERLEVEL9K_BATTERY_LOW_FOREGROUND=1
# Show battery in green when it's charging or fully charged.
typeset -g POWERLEVEL9K_BATTERY_{CHARGING,CHARGED}_FOREGROUND=2
# Show battery in yellow when it's discharging.
typeset -g POWERLEVEL9K_BATTERY_DISCONNECTED_FOREGROUND=0
# Battery pictograms going from low to high level of charge.
typeset -g POWERLEVEL9K_BATTERY_STAGES='\uf58d\uf579\uf57a\uf57b\uf57c\uf57d\uf57e\uf57f\uf580\uf581\uf578'
# Don't show the remaining time to charge/discharge.
typeset -g POWERLEVEL9K_BATTERY_VERBOSE=false
typeset -g POWERLEVEL9K_BATTERY_BACKGROUND=2

#####################################[ wifi: wifi speed ]#####################################
# WiFi color.
typeset -g POWERLEVEL9K_WIFI_FOREGROUND=0
typeset -g POWERLEVEL9K_WIFI_BACKGROUND=9
# Custom icon.
# typeset -g POWERLEVEL9K_WIFI_VISUAL_IDENTIFIER_EXPANSION='⭐'

# Use different colors and icons depending on signal strength ($P9K_WIFI_BARS).
#
# # Wifi colors and [<64;37;10M[<64;37;10M[<64;37;10M[<64;37;10M[<64;37;10M[<64;37;10M[<64;37;10M[<64;37;10M[<64;37;10M[<64;37;10M[<64;37;10M[<64;37;10M[<64;37;10M[<64;37;10M[<64;37;10Micons for different signal strength levels (low to high).
# typeset -g my_wifi_fg=(0 0 0 0 0) # <-- change these values
# typeset -g my_wifi_icon=('WiFi' 'WiFi' 'WiFi' 'WiFi' 'WiFi') # <-- change these values
#
# typeset -g POWERLEVEL9K_WIFI_CONTENT_EXPANSION='%F{${my_wifi_fg[P9K_WIFI_BARS+1]}}$P9K_WIFI_LAST_TX_RATE Mbps'
# typeset -g POWERLEVEL9K_WIFI_VISUAL_IDENTIFIER_EXPANSION='%F{${my_wifi_fg[P9K_WIFI_BARS+1]}}${my_wifi_icon[P9K_WIFI_BARS+1]}'
#
# The following parameters are accessible within the expansions:
#
# Parameter | Meaning
# ----------------------+---------------
# P9K_WIFI_SSID | service set identifier, a.k.a. network name
# P9K_WIFI_LINK_AUTH | a[<64;37;10M[<64;37;10M[<64;37;10M[<64;37;10M[<64;37;10M[<64;37;10M[<64;37;10M[<64;37;10M[<64;37;10M[<64;37;10M[<64;37;10M[<64;37;10M[<64;37;10M[<64;37;10M[<64;37;10Muthentication protocol such as "wpa2-psk" or "none"
# P9K_WIFI_LAST_TX_RATE | wireless transmit rate in megabits per second
# P9K_WIFI_RSSI | signal strength in dBm, from -120 to 0
# P9K_WIFI_NOISE | noise in dBm, from -120 to 0
# P9K_WIFI_BARS | signal strength in bars, from 0 to 4 (derived from P9K_WIFI_RSSI and P9K_WIFI_NOISE)
#
# All parameters except P9K_WIFI_BARS are extracted from the output of the following command:
#
# /System/Library/PrivateFrameworks/Apple80211.framework/Versions/Current/Resources/airport -I

####################################[ time: current time ]####################################
# Current time color.
typeset -g POWERLEVEL9K_TIME_FOREGROUND=0
typeset -g POWERLEVEL9K_TIME_BACKGROUND=7
# Format for the current time: 09:51:02. See `man 3 strftime`.
typeset -g POWERLEVEL9K_TIME_FORMAT='%D{%I:%M:%S %p}'
# typeset -g POWERLEVEL9K_TIME_FORMAT='%D{%I:%M:%S %p}'
# typeset -g POWERLEVEL9K_TIME_FORMAT='%D{%Y.%-b.%-d %I:%M:%S %p}'

# If set to true, time will update when you hit enter. This way prompts for the past
# commands will contain the start times of their commands as opposed to the default
# behavior where they contain the end times of their preceding commands.
typeset -g POWERLEVEL9K_TIME_UPDATE_ON_COMMAND=false
# Custom icon.
# typeset -g POWERLEVEL9K_TIME_VISUAL_IDENTIFIER_EXPANSION='⭐'
# Custom prefix.
# typeset -g POWERLEVEL9K_TIME_PREFIX='at '

# Example of a user-defined prompt segment. Functi[<64;37;10M[<64;37;10M[<64;37;10M[<64;37;10M[<64;37;10M[<64;37;10M[<64;37;10M[<64;37;10M[<64;37;10M[<64;37;10M[<64;37;10M[<64;37;10M[<64;37;10M[<64;37;10Mon prompt_example will be called on every
# prompt if `example` prompt segment is added to POWERLEVEL9K_LEFT_PROMPT_ELEMENTS or
# POWERLEVEL9K_RIGHT_PROMPT_ELEMENTS. It displays an icon and yellow text on red background
# greeting the user.
#
# Type `p10k help segment` for documentation and a more sophisticated example.
function prompt_example() {
p10k segment -b 1 -f 3 -i '⭐' -t 'hello, %n'
}

# User-defined prompt segments may optionally provide an instant_prompt_* function. Its job
# is to generate the prompt segment for display in instant prompt. See
# https://github.com/romkatv/powerlevel10k/blob/master/README.md#instant-prompt.
#
# Powerlevel10k will call instant_prompt_* at the same time as the regular prompt_* function
#[<64;37;10M[<64;37;10M[<64;37;10M[<64;37;10M[<64;37;10M[<64;37;10M[<64;37;10M[<64;37;10M[<64;37;10M[<64;37;10M[<64;37;10M[<64;37;10M[<64;37;10M[<64;37;10M and will record all `p10k segment` calls it makes. When displaying instant prompt, Powerlevel10k
# will replay these calls without actually calling instant_prompt_*. It is imperative that
# instant_prompt_* always makes the same `p10k segment` calls regardless of environment. If this
# rule is not observed, the content of instant prompt will be incorrect.
#
# Usually, you should either not define instant_prompt_* or simply call prompt_* from it. If
# instant_prompt_* is not defined for a segment, the segment won't be shown in instant prompt.
function instant_prompt_example() {
# Since prompt_example always makes the same `p10k segment` calls, we can call it from
# instant_prompt_example. This will give us the same `example` prompt segment in the instant
# and regular prompts.
prompt_example
}

# User-defined prompt segments can be customized the same way as built-in segments.
# typeset -g POWERLEVEL9K_EXAMPLE_FOREGROUND=3
# typeset -g POWERLEVEL9K_EXAMPLE_VISUAL_IDENTIFIER_EXPANSION='⭐'

# Transient prompt works similarly to the builtin transient_rprompt option. It trims down prompt
# when accepting a command line. Supported values:
#
# - off: Don't change prompt when accepting a command line.
# - always: Trim down prompt when accepting a command line.
# - same-dir: Trim down prompt when accepting a command line unless this is the first command
# typed after changing current working directory.
typeset -g POWERLEVEL9K_TRANSIENT_PRO[<64;37;10M[<64;37;10M[<64;37;10M[<64;37;10M[<64;37;10M[<64;37;10M[<64;37;10M[<64;37;10M[<64;37;10M[<64;37;10M[<64;37;10M[<64;37;10M[<64;37;10M[<64;37;10MMPT=off

# Instant prompt mode.
#
# - off: Disable instant prompt. Choose this if you've tried instant prompt and found
# it incompatible with your zsh configuration files.
# - quiet: Enable instant prompt and don't print warnings when detecting console output
# during zsh initialization. Choose this if you've read and understood
# https://github.com/romkatv/powerlevel10k/blob/master/README.md#instant-prompt.
# - verbose: Enable instant prompt and print a warning when detecting console output during
# zsh initialization. Choose this if you've never tried instant prompt, haven't
# seen the warning, or if you are unsure what this all means.
typeset -g POWERLEVEL9K_INSTANT_PROMPT=off

# Hot reload allows you to change POWERLEVEL9K options after Powerlevel10k has been initialized.
# For example, you can type POWERLEVEL9K_BACKGROUND=red and see your prompt turn red. Hot reload
# can slow down prompt by 1-2 milliseconds, so it's better to keep it turned off unless you
# really need it.
typeset -g POWERLEVEL9K_DISABLE_HOT_RELOAD=true

# If p10k is already loaded, reload configuration.
# This works even with POWERLEVEL9K_DISABLE_HOT_RELOAD=true.
(( ! $+functions[p10k] )) || p10k reload
}

# Tell `p10k configure` which file it should overwrite.
typeset -g POWERLEVEL9K_CONFIG_FILE=${${(%):-%x}:a}

(( ${#p10k_config_opts} )) && setopt ${p10k_config_opts[@]}
'builtin' 'unset' 'p10k_config_opts'


这个.p10k.zsh的配置方案并非本人原创,为之前配置时Google搜索所寻得,因时间较久寻不到当时的链接,故在此说明一下。

工具: homebrew(x86)
环境: conda虚拟环境 python=3.7
tips: M1 芯片利用 homebrew 安装 miniconda 搭建 python3.7 的虚拟环境
如果还装了 miniforge,注意在安装完后根据提示 init 一下你的 shell
OCRmyPDF 似乎还未对3.8及以上的版本作适配
官方文档: https://ocrmypdf.readthedocs.io/en/latest/installation.html

搭建虚拟环境 & 安装 OCRmyPDF

brew install miniconda
conda install python=3.7
conda create -n py37 python=3.7
conda activate py37
conda info | grep env # 看下目前环境
pip install ocrmypdf
# 嫌麻烦的话直接brew install ocrmypdf
ocrmypdf --version
# conda deactivate # 关闭

pip安装需要配置依赖的包

官方提示:
As of ocrmypdf 7.2.1, the following versions are recommended:
Python 3.7 or 3.8
Ghostscript 9.23 or newer
qpdf 8.2.1
Tesseract 4.0.0 or newer
以下三个为可选项:
jbig2enc 0.29 or newer
pngquant 2.5 or newer
unpaper 6.1

利用下面这个命令根据提示进行配置,

ocrmypdf -l eng --clean-final input.pdf ocr.pdf

出现该指令代表以已经配置成功: InputFileError: File not found - input.pdf

  1. 安装 tesseract-lang
    brew install tesseract-lang
  1. 安装 unpaper

    报错信息 The program ‘unpaper’ could not be executed or was not found on your system PATH. This program is required when you use the [‘–clean, –clean-final’] arguments. You could try omitting these arguments, or installthe package.

    brew install unpaper
  2. 安装 Ghostscript

    报错信息 Could not find program ‘gs’ on the PATH

    brew install Ghostscript

此时再次运行测试的命令就不会报依赖包缺失的错误了,若有其他的需求,根据官方文档给出的提示用 brew install 安装即可

桌面配置

程序坞延迟关闭
defaults write com.apple.Dock autohide-delay -float 0 && killall Dock

恢复
defaults delete com.apple.Dock autohide-delay && killall Dock

将finder文件名中文改回英文

重命名 or 删除 文件夹下的 .localized 即可

Homebrew相关操作

配置安装arm架构&x86架构的homebrew

安装图形化界面的app不需要安装cask,直接brew进行安装,卡了我两小时 :(

替换源

清华开源软件镜像站

为Mac终端设置代理

更改Mac自带vim为brew安装的

以下两种方法皆可

path=(‘/opt/homebrew/bin’ $path)
export path
alias vim=‘/opt/homebrew/bin/vim’

代理

## 设置代理
# 网站在http.和proxy之间即设置对该网站代理

# http/https代理(全局)
git config --global http.proxy http://127.0.0.1:1080
git config --global https.proxy https://127.0.0.1:1080


# socks5代理
git config --global http.https://github.com.proxy socks5://127.0.0.1:1186
git config --global https.https://github.com.proxy socks5://127.0.0.1:1186

## 取消代理
git config --global --unset http.proxy
git config --global --unset https.proxy
git config --global --unset https.https://github.com.proxy
git config --global --unset http.https://github.com.proxy

文章借鉴

(没挂代理)github本身速度太慢

在.com后面加上后缀,例:https://github.com.cnpmjs.org

安装python3.7以使用旧版本的包

软件:
Homebrew
Pycharm

使用Python的时候发现之前用的包有两个没有适配M1和最新版本的Python,于是想着退回到之前使用Python3.7,再利用Pycharm重新开虚拟环境在里面进行包的安装。

brew install python@3.7

等它安装完之后 Copy 下安装的位置,打开Pycharm,点击新建项目
新建项目
找到python3.7的位置,点击右下角创建项目
创建环境
进入pycharm后点击下方的终端,输入python3,此时可以发现版本已经是3.7了,exit()退出,然后就可以快乐的pip下载包了:)
终端

在Pycharm配置Qt Designer和PyUIC5

Qt Designer

brew install qt

等待安装,copy安装路径

brew list qt | grep Designer.app

我的路径是/opt/homebrew/Cellar/qt/5.15.2/libexec/Designer.app,根据命令行显示的结果往上滑把你自己的Designer.app文件夹 copy 下来,进入Pycharm, cmd+, 进入setting,工具->外部工具->点击+号
步骤

如图填空
步骤二

最后点击确定,在左上角的工具中打开Qt designer
步骤三
配置成功
结果

PyUIC5

现在我们去找到PyUIC5并配置它

which pyuic5
# 我的路径
/opt/homebrew/bin/pyuic5

copy它,重复之前的步骤添加外部工具,我的参数配置:

# -x 生成可执行的.py文件,当然你也可以去掉这个,-o 指定生成的文件名
-x $FileName$ -o $FileNameWithoutExtension$.py

配置
现在就大功告成了,使用方法见下图
在这里插入图片描述

sublime配置

以下配置皆需要先cmd+shift+p搜索并安装package control,等一段时间在新的输入框输入install,回车跳转,然后等待新的输入框出现再进行下一步操作
图片

虚拟环境

搜索并下载 virtualenv,等待左下角安装完成后
切换
输入 cmd+shift+p ,键入并选择Virtualenv:Avtivate,在之后给出的选项中选择已有的环境

汉化

搜索chinese,安装 Chinese Localization,不出意外的话应该是第一个,安装完成后会弹出类似readme的界面,可以通过该点判断是否安装。

接着点击上方菜单栏中的Help,切换至中文即可
图片

设置Python快捷键

搜索sublimeREPL并安装,从菜单栏找到它的配置,具体见下图
图片
自下至上为其路径,根据你打开的文件夹寻找即可
图片

进入Python文件夹后,打开Main.sublime-menu,将文件所有cmd后的Python改为你自己的Python路径,因为我的电脑是M1,然后有些包不适配,就再安装了Python3.7,以下是我修改的路径是/Users/home/PycharmProjects/pythonProject1/venv/bin/python,仅供参考,一般只需要把它改成Python3即可,这里想法的由来源自知乎,他的文章很有帮助,下面的代码块将以该作者的进行展示

"cmd": ["python3", "-i", "-u"],
"cmd": ["python3", "-i", "-u", "-m", "pdb", "$file_basename"],
"cmd": ["python3", "-u", "$file_basename"],
"cmd": {
"osx": ["python3", "-u", "${packages}/SublimeREPL/config/Python/ipy_repl.py"],
"linux": ["python3", "-u", "${packages}/SublimeREPL/config/Python/ipy_repl.py"],
"windows": ["python3", "-u", "${packages}/SublimeREPL/config/Python/ipy_repl.py"]
},

接下来需要配置快捷键,知乎的这篇文章)配置的快捷键是无法运行的,或许是我版本的原因,这里给出可以运行的示例

[
{
"keys": [
"command+1"
],
"command": "repl_open",
"caption": "Python - RUN current file",
"id": "repl_python_run",
"mnemonic": "R",
"args": {
"type": "subprocess",
"encoding": "utf8",
"cmd": ["python3", "-u", "$file_basename"],
"cwd": "$file_path",
"syntax": "Packages/Python/Python.tmLanguage",
"external_id": "python",
"extend_env": {"PYTHONIOENCODING": "utf-8"}
}
},
{
"keys": [
"command+2"
],
"command": "repl_open",
"caption": "Python - IPython",
"id": "repl_python_ipython",
"mnemonic": "I",
"args": {
"type": "subprocess",
"encoding": "utf8",
"autocomplete_server": true,
"cmd": {
"osx": ["python3", "-u", "${packages}/SublimeREPL/config/Python/ipy_repl.py"],
"linux": ["python3", "-u", "${packages}/SublimeREPL/config/Python/ipy_repl.py"],
"windows": ["python3", "-u", "${packages}/SublimeREPL/config/Python/ipy_repl.py"]
},
"cwd": "$file_path",
"syntax": "Packages/Python/Python.tmLanguage",
"external_id": "python",
"extend_env": {
"PYTHONIOENCODING": "utf-8",
"SUBLIMEREPL_EDITOR": "$editor"
}
}
},
]

如果not found报错,把python3路径改一下就可以

注意,此时快捷键command不能缩写为cmd,否则无法工作

现在使用快捷键运行后,会跳转到新界面,不太习惯这种操作,但是找了很久的配置发现无法修改,网上关于该点配置已经过时,不过可以通过分栏来提高浏览的舒适度Mac快捷键是command+option+2,此时呈现的效果还是很不错的
图片

如果想把command+b(windows下是ctrl+b)改为同样的运行格式,你只需要在工具下新建编译系统即可,自定义名字
图片

替换成下述代码,然后在工具下将编译系统切换成你刚定义的名字,使用快捷键command+b,此时运行效果同sublimeREPL,修改思路来自于stackoverflow

{
"target": "run_existing_window_command",
"id": "repl_python_run",
"file": "config/Python/Main.sublime-menu"

}

速览:

  • 命令行即shell

  • 终端: 让用户访问shell

  • 终端下鼠标选中/单击/双击可快速copy

  • rm 用通配符删除文件之前最好使用 ls 命令查看对应文件

  • 双引号"“和单引号'‘在shell中的意义不完全相同

$

$在不加括号时为参数扩展,比如我的电脑中$USER代表的就是home,所有的可用参数可以由一行命令看到:

printenv | less

命令过多此处不进行展示。

$(命令) 得到的是命令的输出结果,此时可以将其用作其他命令的参数

echo $(ls) # 结果和 ls 一致
ls -l $(which ls)

引用类型: 双引号"" & 单引号'' & 反斜线\

参数之间的分割是通过空格进行的,下面以 cal 命令为例看一下结果

echo $(cal)
三月 2021 日 一 二 三 四 五 六 1 2 3 4 5 6 7 8 9 10 11 12 13 14 15 16 17 18 19 20 21 22 23 24 25 26 27 28 29 30 31

这里的结果是因为没有经过引用(或者转义)的空格会被当成分割符而不是参数的组成部分,不建议使用 touch 代替这里的 echo,当然,你也可以建个文件夹试试看 : )

利用单/双引号引用的参数会传递一个字符串,此时其中的空格是参数的组成部分,以hello world为例

mkdir testfile
cd testfile
touch hello world
ll
total 0
-rw-r--r-- 1 home staff 0B 5 17 11:52 hello
-rw-r--r-- 1 home staff 0B 5 17 11:52 world

该命令会创建两个文件:helloworld(Ps: 前两行仅为了 ll 命令的简洁,llls -lh 的别名),现在 引用 & 转义 空格让其包含在文件名中:

touch "hello world1"
touch 'hello world2'
touch hello\ world3
ll
+ -rw-r--r--  1 home  staff     0B  5 17 11:56 hello world1
+ -rw-r--r-- 1 home staff 0B 5 17 11:56 hello world2
+ -rw-r--r-- 1 home staff 0B 5 17 11:56 hello world3

以上三种方式都可以达到参数中包含空格的效果。

关于引用下的禁止拓展

'" 在shell中有时并不相同:

echo "$(cal)"
      三月 2021
日 一 二 三 四 五 六
    1  2  3  4  5  6
 7  8  9 10 11 12 13
14 15 16 17 18 19 20
21 22 23 24 25 26 27
28 29 30 31
echo '$(cal)'
$(cal)

某种意义上来说,单引号禁止的扩展类型比双引号多,另一个例子是 \ 在单引号中将不具备特殊含义:

echo "\$"
echo '\$'
$
\$

更多的内容请参考Bash quoting 手册

history

假设现有历史命令总数为 totalNumber
history [number] 可以查看序号从 numbertotal_number 的历史记录
history [-number] 可以查看最后 number 个记录

history 10

umask

umask [掩码] 和在使用 chmod [增加权限] 的实现原理完全一样,只是反了过来,二者在终端中都是8进制的表现方式,比如掩码 002,展开为2进制就是000 000 010,这代表掩盖其他用户组的写入权限。

文件似乎在创建时默认是没有可执行权限的,目录才有,所以掩码不需要任何值来去除文件的执行权限。

环境 & 教程:
macOS Big Sur 11.2.1(m1)
Git 使用简易指南(含安装)
在线网站实操(强烈推荐)
Pro Git 官方中文教程(推荐)


直观的动画演示

  • 关于在线网站实操的快捷操作:
    • 点击右边动画可以查看对应的简单命令
    • levels 可以查看并选择关卡
      • level intro1 快速跳转到第一关
      • show goal 查看当前目标
      • hide goal 或点击画面隐藏目标
      • objective 查看当前关卡提示
      • undo 撤销 reset重做

Git

  • 分布式版本控制: 每个人的电脑都是一个完整的版本库,可离线本地提交,联网时再push,不因服务器损坏或网络问题造成工作停止
  • 若对某个命令感兴趣,如git checkout,在命令行下输入man git-checkout,你会发现一切变得简单起来

文件状态

  • 未追踪(untracked)
  • 已追踪(tracked)
    • 已修改(modified)
      • 表示修改了文件,但还没保存到数据库
    • 已暂存(staged)
      • 表示对一个文件的当前版本做了标记,使其包含在下次提交的快照中
    • 已提交(commited)
      • 表示数据已经保存在本地数据库中

已追踪下的三个状态对应了Git项目中的三个阶段: 工作区、暂存区以及 Git 目录。
工作区、暂存区以及 Git 目录

尚处于未跟踪(untracked)状态的某种意义来讲不属于上图叙述的工作区。可以把暂存区中的文件理解为下次将提交至仓库的文件,单纯的语言有些枯燥,不妨往下面看看,命令的反馈或许给你带来一些感触。
图片

查看配置 & 配置基础信息

git config -l # 查看所有配置
git config --system -l # 系统配置
git config --global -l # 全局配置
git config --user.name "yourname" # 配置你的用户名和邮件地址,这很重要
git config --user.email "youremail"

我个人的配置文件在~/.gitconfig,其内容与--global查看到的内容一致

基础命令

命令会基于创建在家目录下的~/notes进行阐述假设你创建了,当然,你也可以在你的桌面上新建一个文件夹,叫什么都行。

创建仓库

在需要版本控制的目录下初始化本地仓库

现在你想对的notes进行版本控制,只需切换到对应文件夹,初始化仓库

cd ~/notes
git init # 文件路径可选,默认在当前文件夹下,此时会创建.git文件夹

查看状态

现在来看看你的笔记里面有啥能放进仓库的

git status
On branch master

No commits yet

nothing to commit (create/copy files and use "git add" to track)

好的,什么都没有。来添加点东西,相信下面的命令你们都懂的,不懂百度~

touch English
echo "English is very easy!" >> English

再输入git status看看有什么变化:

On branch master
Your branch is up to date with 'origin/master'.

Untracked files:
(use "git add <file>..." to include in what will be committed)
English

nothing added to commit but untracked files present (use "git add" to track)

提示有一个未跟踪的文件English,使用git add进行跟踪

或许你会觉得命令的输出有些长,可以使用git status -s or git status --short缩短命令输出

git status -s

你会得到一段非常简短的反馈

?? English

??表示该文件为新添加的未跟踪文件

将文件增加到下次提交序列

git add指令实际上是一个多功能指令,但先不展开介绍,先处理English

git add English

似乎没有任何反馈,不用担心,用git status看看就好了

On branch master
Your branch is up to date with 'origin/master'.

Changes to be committed:
(use "git restore --staged <file>..." to unstage)
new file: English

可以看到English文件已经处于暂存区了,此时使用git restore --staged <file>可以移出暂存区,变为不跟踪的状态当然不移了
来给英语笔记添加点内容,然后看看变化

echo "My English is very poor" >> English
git status
On branch master
Your branch is up to date with 'origin/master'.

Changes to be committed:
(use "git restore --staged <file>..." to unstage)
new file: English

Changes not staged for commit:
(use "git add <file>..." to update what will be committed)
(use "git restore <file>..." to discard changes in working directory)
modified: English

提示English发生了改变,但是不在暂存区,用git add把它加到暂存区(下一次提交的队列),或者git restore 丢弃此次更改。

此时你可能有点好奇简短的输出是什么样子的,让我们输入git status -s看看

AM English

引入-+来方便讲解,此时??->AM,我们将-s输出的类型分为两栏,左边的是暂存区的状态,右边是工作区的状态。看一下上面未缩减的输出可以发现,此时存在两个English笔记,对应于缩减的输出可以理解为AM的A表示有同名的文件暂存了,M表示后来修改过的文件没有暂存,有没有觉得-s的输出短小精悍

-?? English
+AM English

git diff查看修改

假设此时你不太记得更改了什么

git diff

温馨提示,按q退出

diff --git a/English b/English
index e69de29..82b9f44 100644
--- a/English
+++ b/English
@@ -0,0 +1 @@
+My English is very poor
(END)

高亮的那一行就是你添加的内容你英语不好

分支操作

创建和切换

git branch # 查看本地分支
git branch -r # 查看远程(remote)分支
git branch [branch_name] # 建立分支
git branch -d [branch_name] # 删除分支
git checkout [branch_name] # 切换分支
git checkout -b [branch_name] # 创建分支并切换过去

合并

若你现在建立了两个分支,一个main,一个是bugFix,两个分支都各自对文件进行了部分修改,此时你想合并修改看是否符合预期。
合并前

使用git status可以查看当前分支,假设main为当前所在分支。

merge

把修改拉过来

git merge bugFix则可将bugFix修改的记录合并至main,此时main包含了所有的修改,但注意,bugFix没有,应使用git checkout bugFix; git merge main切换至bugFix分支并再次合并。
若你对此缺少主观的印象,建议点击该网站,输入level intro3
merge

rebase

让修改看起来是顺序开发的
命令: git rebase bugFix

rebase

忽略文件

将不需要提交的文件加入.gitignore文件中
忽略文件的规则:

  • # 注释
  • 可采用通配符
  • ! 取反
  • /home 表示只忽略当前文件夹下 home 文件,不包括其他目录下的home
  • dir_name/ 忽略任何目录下名为dir_name的文件夹

克隆远程(remote)仓库

git clone url [file_name] # 文件路径可选,默认到当前文件夹下

若出现403错误,检查钥匙串是否有两个账号,更改/删除另一个账号

扩展

码云公钥生成

cd ~/.ssh
ssh-keygen
pbcopy < ~/.ssh/id_rsa.pub # 已拷贝至剪切板,直接黏贴即可

copyhttps://gitee.com/profile/sshkeys下即可

参考链接

详解Github的.gitignore忽略文件+.gitignore不生效解决方案+生产配置大奉送

MAC 生成SSH公钥